2015 Top 10 Blog Hop

Hello and welcome to the 2015 Top 10 Blog Hop! 2015 has been seriously been an amazing year. A year full of dreams come true. I began 2015 with a new job - a dream job really - as a Graphic Designer for Jillibean Soup. It's been almost a year now, that I've been working my dream job and it still feels surreal to me!

I was also blessed to design for some amazing manufacturers and businesses including SRM Stickers, Scrapbook Generation's Create Magazine and Therm O Web. Another great opportunity I had, was to teach my very first online class at Big Picture Classes called Stretch Your Cuts.

Just so you know, there is an amazing giveaway at the end of this post!

This is one of the layouts I created for my Stretch Your Cuts Class at Big Picture Classes. This class includes four free digital cut files and four lessons that teach you all about getting the most out of your electronic die cut machine. In each lesson, I teach you a variety of techniques for transforming cut files and how to use different tools to add unique elements to your scrapbook layouts.
PS...I will have a new class coming out in February 2016, so stay tuned for more details as the date approaches!

Youer Than You Scrapbook Page by Juliana Michaels

This layout was created when I guest designed for Spiegelmom Scraps Etsy Shop. Wink, wink...there is a digital cut file for this layout called Hello Summer. 

Hello Summer Scrapbook Page by Juliana Michaels

I created this layout when I guest designed for Ruby Rocket. The Rose Cluster is a digital cut file I created and it's available for you to download.

Love First Communion Scrapbook Page by Juliana Michaels

This is a layout I created for Jillibean Soup using their Yellow Saffron Soup collection. This isn't one of the collections I designed for them, but I loved creating with it.

You Are My Sunshine Scrapbook Page by Juliana Michaels

This layout also included by very first process video and another digital cut file. As you can see, I created a shared quite a few free digital cut files this past year!

Always Believe Scrapbook Page by Juliana Micheals

I created another process video for this layout and shared with you how to created watercolored die cuts.


This one includes another digital cut file for you!

So Happy Puppy Scrapbook Page by Juliana Michaels

But First Coffee Altered Wood Plank Home DecorI also created quite a few coffee themed projects this year as part of the Coffee Lovers Blog Hop. One of them was this altered wood plank and of course it included a coffee themed digital cut file!

For more coffee themed projects and cut files, check out all of my Coffee Lovers Blog Hop projects:

But First Coffee Altered Wood Plank Home Decor by Juliana Michaels

This is a trio of cards I created for Therm O Web showcasing one of my favorite products to play with - Deco Foil! There is a process video available that takes you step by step through how I created these elegant cards.


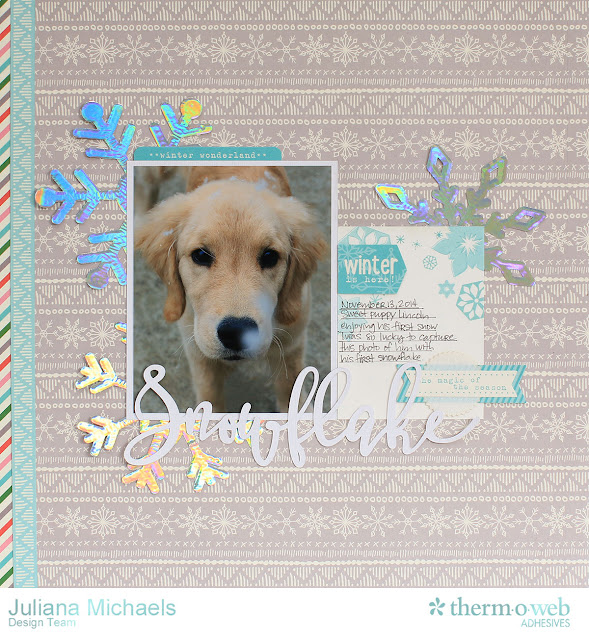
Snowflakes and Puppies
Last but not least, this is a layout I created for Therm O Web and recently shared here on my blog along with a digital cut file entitled Snow Adorable.  That sweet face gets me every time!


Now, that you've made it to the end, it's time for the giveaway! 

Leave a comment below for your chance to win 
the Top 10 Blog Hop Grand Prize... 

an $80 Gift Certificate to the online store of your choosing!

To be entered to win, all you have to do is leave a comment below by 11:59 pm CST on January 3. There are 23 blogs on this hop, so make sure you leave a comment on each blog to increase your chance of winning this amazing Grand Prize! You have until January 4th to leave your comment and a random winner will be selected and announced on January 5th.

Top 10 Blog Hop List:
Juliana Michaels <<< you are here!

Snowflakes and Puppies | Digital Cut File Included

Hello all! I don't know about the weather where you live, but this year sure hasn't been like last winter. A little snow goes a long way in my book and last year we had enough here to last me for quite some time. I'm really quite happy that we haven't had any yet! During the first snow fall we got last year, I was able to get a picture of Lincoln enjoying his first snowflake and I couldn't help resist creating a scrapbook page featuring this precious moment.

I used Therm O Web's awesome Deco Foil and Hot Melt Adhesive Sheets to create the shimmery snowflakes on my layout. I applied the Deco Foil using one of my favorite techniques – Deco Foiled Die Cuts.

Snowflake Puppy First Snow Scrapbook Page by Juliana Michaels featuring Therm O Web Deco Foil and Adhesives

The snowflakes are part of a set of snowflakes and words I designed and put together into a digital file that you can download and use for all kinds of winter themed crafting called Snow Adorable. The file includes SVG, Studio, PNG and DXF formats. They can be used with a variety of electronic cutting machines, however, if you don't have one you can also print them using the PNG file and hand cut them to use on your projects.


Snow Adorable Free Digital Cut File by Juliana Michaels 17turtles.com

Snowflake Puppy First Snow Scrapbook Page by Juliana Michaels featuring Therm O Web Deco Foil and Adhesives

The new Iridescent Deco Foil is so much fun! By definition, iridescent means showing luminous colors that seem to change when seen from different angles. This foil does just that and is so perfect for adding shimmer and shine to just about any winter themed project you can imagine and create. I hope you enjoy using the Snow Adorable Digital Cut File!

Snowflake Puppy First Snow Scrapbook Page by Juliana Michaels featuring Therm O Web Deco Foil and Adhesives

Supplies:
Patterned Paper, Die Cuts: Elle's Studio
Cardstock: American Crafts
Therm O Web Memory Tape Runner XL
Therm O Web Sticky Dots Adhesive
Therm O Web iCraft® DecoFoil™ – Iridescent
Therm O Web iCraft® DecoFoil™ Hot Melt Adhesive
12″ Royal Sovereign Foil Laminator

And the winner is...

I can't believe how fast the time is flying by this holiday season. We have been traveling to visit family the past few days, so the time really got away from to post the winner from the Holiday Coffee Lovers Blog Hop. I sure hope you all enjoyed the hop! I know I did was inspired by all of the yummy creations I saw along the way.  Now, without further ado....the winner of the $10 Starbucks Gift Card is Gail!
Congratulations Gail! 
I've sent you an email as well to make sure I have your correct contact information. 


Holiday Coffee Lovers Blog Hop + Downloadable Cut File

Welcome and thanks for stopping by today. I'm so happy to be playing along with the Holiday Coffee Lovers Blog Hop! I hope you're enjoying something warm and yummy as you hop along.
Holiday Coffee Lovers Blog Hop

The Holiday Coffee Lovers Blog Hop started today Friday, December 11th and will run through Friday, December 18th. The theme for this hop is winter/holiday and this inspired me to create a cup of cheer as the main element on a Christmas card. For more details about the hop and a chance to win a special little gift from me, check out the bottom of this post.

Ho Ho Ho Happy Holidays Coffee Mug Christmas Card by Juliana Michaels

Ho Ho Ho Happy Holidays Coffee Mug Christmas Card by Juliana Michaels

To make this Ho! Ho! Ho! Happy Holidays card, I created a digital cut file that you can download below to use and create your own cup of cheer holiday card!

FREE DIGITAL CUT FILE | COFFEE CUP LOVE

Coffee Cup Love Free Digital Cut File by Juliana Michaels 17turtles.com

This set contains three different cups that you can use to cut a cup for coffee, tea or cocoa! Did you know that December 13th is National Cocoa Day or that December 15th is International Tea Day? This set would be perfect to help you celebrate either or both of these yummy days!

Here are the details for the Holiday Coffee Lovers Blog Hop:
If you want to play along all you have to do is create a new winter/holiday coffee, tea and/or cocoa themed project and then head over over to the Coffee Loving Cardmakers Blog to link it up and to check out all of the details. Anyone is welcome to link up any time between Friday, December 11th at 6 am pacific and Friday, December 18th @ 11:59 pm pacific. There are no limits to the number of entries. The more the merrier! By linking up your project, you become eligible to win a prize from one the amazing Super Sponsors! I hope you'll play along and thanks so much for stopping by today!

During this hop, we're also celebrating our Cocoa and Tea loving friends. As I mentioned above, December 13th is National Cocoa Day and December 15th is International Tea Day. There will be Flash prizes awarded on December 13th and 15th! To be eligible all you have to do is link up winter/holiday themed tea and/or cocoa projects before 7 pm pacific on each of those days to be eligible. Winners will be posted in the Coffee Lovers Facebook Page by 8:00 pm pacific.
As a special Merry Christmas gift to you, I'm giving away a $10 Starbuck's Gift Card to one lucky person who leaves a comment below. Make sure to leave a way for me to contact you if you're the winner. Commenting will be open until December 18th at 11:59 EST. Merry Christmas and Happy Holidays!

Scrapbook Generation Create Magazine | November 2015

I have some great news to share with you today! The Scrapbook Generation Create Magazine November 2015 issue is now live. As I've shared before, this magazine is great source for scrapbooking and card making inspiration. It is available to download and enjoy right now, so don't wait any longer to check it out!

Scrapbook Generation Create Magazine November 2015

As one of their Design Team Members I have three projects in this month's issue and today I'm sharing a sneak peek to entice you to check out this awesome digital scrapbooking and paper crafting magazine.

For all three of my projects, I stuck with a Christmas theme and used the Santa Dear collection from Photo Play.  I created a layout based on the color challenge and then a card and tag using the card and tag sketches in this month's issue. Here is a peek at the card I made...

Sneak Peek by Juliana Michaels for Scrapbook Generation Create Magazine November 2015

So what are you waiting for? Head on over and check out the Scrapbook Generation Create Magazine November 2015 issue. I hope you'll check out the magazine to see my full creations, along with the rest of the amazing projects created by the very talented Scrapbook Generation Design Team. You are sure to be inspired!

Merry Christmas | Christmas Titles, Fonts and Digital Cut File

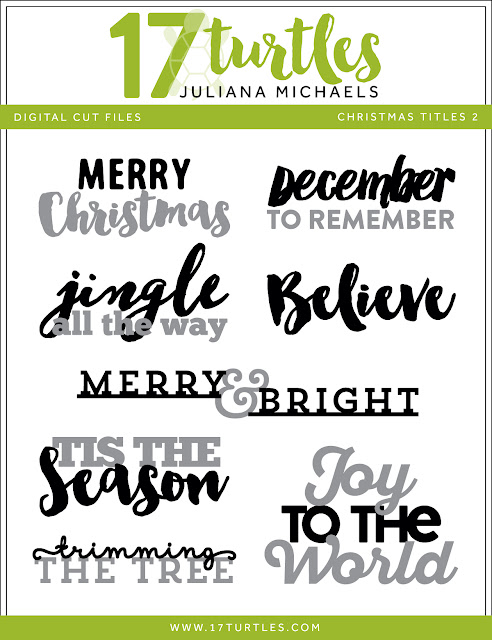
Over a year ago, I created and shared a set of Christmas Titles and Fonts along with a set of digital cut files. After spending a lot of time recently designing Christmas themed products and projects I was inspired to put together another set of some of my favorite fonts along with a set of digital cut files and share them with you as a bit of an early Christmas present.

Just like the original Christmas Titles and Fonts you will find the link to the fonts I used below. Some of them are free and some of them are not free. For those of you who don't want to buy the fonts, I have you covered with a digital cut file I created that you can download and use with your electronic cutting machine.

Christmas Titles and Fonts 2  by Juliana Michaels 17turtles.com

Free Fonts

Not Free

FREE DIGITAL CUT FILE | CHRISTMAS TITLES 2

Christmas Titles 2 Free Digital Cut File by Juliana Michaels 17turtles.com

This free cut file can be used with a variety of electronic digital cutting machines to create a full range of projects, including cards, gift wrap, tags, home decor, scrapbook pages and more. The only limit to what you can create using this cut file is your own imagination. This digital file is available in SVG, PNG, DXF and Studio formats and you may download this digital cut file for your own personal use. Please refer to my terms of use for more information if you wish to use these for more than your own personal projects. If you have questions, concerns or comments about my digital cut files, please feel free to leave me a message in the comment section.

I hope you enjoy this Christmas titles and font share, as well as the digital download. Merry Christmas!

Handmade Holidays Blog Hop 2015

Handmade Holidays Blog Hop 2015

Hello everyone and welcome to the 5th Annual Handmade Holidays Blog Hop! This is my first time to participate with this hop and I'm very excited to share my handmade project with you. This hop is all about sharing ideas with you for handmade gifts that you can create this holiday season. You will find over 80 ideas, along with tutorials for each project, to inspire you from a variety of bloggers and manufacturers. To make this hop even more fun, they have all gotten together to provide a huge crafter's prize package worth over $600! Make sure to check out all the details below on how to enter the giveaway and how to continue to your next destination on the blog hop.

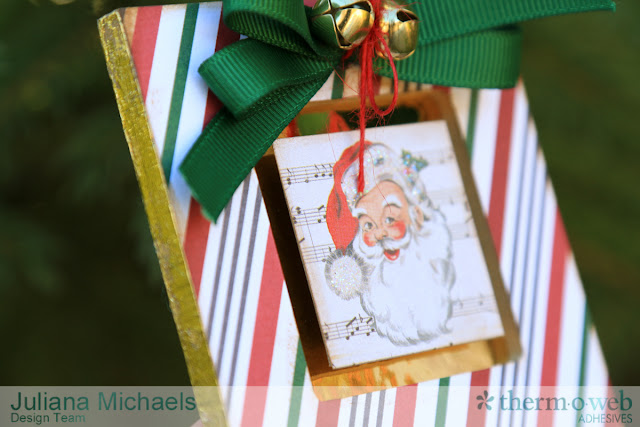
Altered Wooden Christmas Ornament Frames by Juliana Michaels featuring Therm O Web Deco Foil and Adhesives

In my family, handmade Christmas ornaments are something we have created, gifted and treasured since I was a little girl. Some of the ornaments made and given to me by my Grandma and Mom are some of my most treasured! Because of this tradition, I wanted to share with you a set of Christmas ornaments that I created along with a tutorial on how to add a gorgeous gold foil touch to them using Therm O Web's iCraft DecoFoil. After the tutorial, you can see the other three ornaments that I created.
  
Altered Wooden Christmas Ornament Frames by Juliana Michaels featuring Therm O Web Deco Foil and Adhesives

Altered Wooden Christmas Ornaments Tutorial

Supplies:
Wooden Frame Ornaments - Hobby Lobby
Patterned Paper, Stickers - Photo Play | Dear Santa
Other: Ribbon, Jute, Jingle Bells

Altered Wood Frame Christmas Ornaments Tutorial featuring Therm O Web Deco Foil and Photo Play Dear Santa by Juliana Michaels

1.  Remove the ribbon and take out the inside parts of the frame. Set these pieces to the side.

2. Apply iCraft DecoFoil Liquid Transfer Adhesive along the outside edge of the frame. Apply a nice coating of the adhesive. but wipe away an excess that gets on the front or back side of the frame. Allow the glue to dry until it becomes clear and tacky. Drying time will vary depending upon how thick you apply the glue.

Altered Wood Frame Christmas Ornaments Tutorial featuring Therm O Web Deco Foil and Photo Play Dear Santa by Juliana Michaels

3.  After the glue is dry, lay a piece of Deco Foil on the edge and rub over it to help it stick to the glue. 

Altered Wood Frame Christmas Ornaments Tutorial featuring Therm O Web Deco Foil and Photo Play Dear Santa by Juliana Michaels

4.  Peel off the foil and repeat this process along all four sides of the frame until each side is covered with gold foil.

Altered Wood Frame Christmas Ornaments Tutorial featuring Therm O Web Deco Foil and Photo Play Dear Santa by Juliana Michaels

5.  To foil the inside of the frame, apply foil to a piece of cardstock using iCraft Hot Melt Adhesive and a laminator.

For full details on this process please check out my Deco Foil Die Cuts Tutorial

6.  Once you have the foil adhered to the cardstock, take the inside piece from the frame, lay it onto the foiled cardstock and trace around it with a pencil.

Altered Wood Frame Christmas Ornaments Tutorial featuring Therm O Web Deco Foil and Photo Play Dear Santa by Juliana Michaels

7.  Cut along the traced line to cut out the shape. You are now ready to place this inside the frame.

Altered Wood Frame Christmas Ornaments Tutorial featuring Therm O Web Deco Foil and Photo Play Dear Santa by Juliana Michaels

8.  To cover the frame, cut a piece of patterned paper to the size of the frame. Ink the edges of the paper if desired and then adhere it to the frame using Therm O Web XL Tape Runner.

Altered Wood Frame Christmas Ornaments Tutorial featuring Therm O Web Deco Foil and Photo Play Dear Santa by Juliana Michaels

9. To embellish the frame, adhere stickers with 3D Foam Squares to pop them up and to add extra depth and dimension.

10. Top off each ornament with a ribbon bow and use a piece of jute to tie on a pair of jingle bells.

There you have it, your very own handmade Christmas Ornament!

Here are the other three ornaments I created using the wood frames.

Altered Wooden Christmas Ornament Frames by Juliana Michaels featuring Therm O Web Deco Foil and Adhesives

Altered Wooden Christmas Ornament Frames by Juliana Michaels featuring Therm O Web Deco Foil and Adhesives

Each ornament is slightly different and I can't wait to give them to my family as Christmas presents this year.

Altered Wooden Christmas Ornament Frames by Juliana Michaels featuring Therm O Web Deco Foil and Adhesives

Altered Wooden Christmas Ornament Frames by Juliana Michaels featuring Therm O Web Deco Foil and Adhesives

Altered Wooden Christmas Ornament Frames by Juliana Michaels featuring Therm O Web Deco Foil and Adhesives

Altered Wooden Christmas Ornament Frames by Juliana Michaels featuring Therm O Web Deco Foil and Adhesives

I hope you enjoyed this tutorial on creating your own handmade Christmas ornaments using simple wood frame ornaments and Therm O Web Deco Foil.

Now, here is the awesome prize package I mentioned worth over $600! There are some amazing products in this package that will certainly help you make this holiday handmade! 

To enter, use the Rafflecopter widget below...

Handmade Holidays Blog Hop 2015 Prize Package

These are the amazing sponsors who helped make this amazing prize package possible.
Handmade Holidays Blog Hop Sponsors 2015

SPONSORS LIST:
Clearsnap
Tombow
Graphic45
Walnut Hollow
rukristin Papercrafts
The Twinery
ICE Resin
Thermoweb
Buttons Galore
Stencil1
DecoArt
Spellbinders

Enter the giveaway here:

a Rafflecopter giveaway

Now, it's time for you to continue the hop and check out more amazing projects and inspiration. I invite you to visit all the links in the hop and give the gift of handmade this holiday season!


Linked and Shared:
Tip Junkie
The Pink Junkie
Snap Creativity

My Creative Scrapbook | November Main Kit Scrapbook Page Ideas Part 1

So did you and your family get to an apple orchard this fall? We found an awesome orchard that is about 30 minutes from where we live called Quarry Hill Orchard and it was the perfect apple orchard for us. I've been to many of them over the years and I really prefer the ones that keep the focus on the apples with apple picking and apple cider!

This particular orchard was even dog friendly and allowed us to bring Lincoln. He experienced his first apple and even had a little taste of apple cider. He loved them both!

To help me capture the memories of this special day, I used the My Creative Scrapbook November Main Kit.

Apples Fall Scrapbook Page by Juliana Michaels featuring My Creative Scrapbook November Main Kit

I die cut several of the patterned papers from the kit using MFT Stamps Cross-Stitch Circle Stax. I love how these dies continued the cross stitch theme that is already on the background paper I used. 

Apples Fall Scrapbook Page by Juliana Michaels featuring My Creative Scrapbook November Main Kit

To further continue the stitching theme, I also used my sewing machine to add a little stitching. If you don't have a sewing machine you could also do some hand stitching or even draw them using a marker.

Apples Fall Scrapbook Page by Juliana Michaels featuring My Creative Scrapbook November Main Kit

Here is a peek at the My Creative Scrapbook November Main Kit that I used to create the layout I shared with you all today. It is full of awesome products from Photo Play, Carta Bella, Heidi Swapp, Echo Park, and Simple Stories.

Make sure to visit the My Creative Scrapbook Design Team Gallery for even more inspiration from the rest of the MCS Design Team.

My Creative Scrapbook November Main Kit

My Creative Scrapbook offers several monthly kits and subscription options. No matter what your style is, you are sure to find a kit that is perfect for you! My Creative Scrapbook is now accepting new members. Visit My Creative Scrapbook to learn more.

My Creative Scrapbook | Guest Designer and Sneak Peeks

Happy November friends! Today, I have some fun news to share with you. I am guest designing for My Creative Scrapbook this month! I was asked to create and share some projects with you using their fabulous November Main Kit.

Here are a some sneak peeks of the four projects I made using the November Main Kit. I invite you to visit the My Creative Scrapbook to check out the full reveal on November 5. 

My Creative Scrapbook November Main Kit Sneak Peek by Juliana Michaels

This kit contains some awesome papers from Photo Play and Carta Bella along with some cool embellishments from Heidi Swapp, Echo Park and Simple Stories. Everything in the November Main Kit is coordinated perfectly to use with all your fall and Thanksgiving themed photos!

My Creative Scrapbook November Main Kit Sneak Peek by Juliana Michaels

My Creative Scrapbook November Main Kit Sneak Peek by Juliana Michaels

My Creative Scrapbook November Main Kit Sneak Peek by Juliana Michaels

I can't wait to share the full reveal with you starting on November 5! Until then, here are some more sneak peeks of projects from some of the other design team members. To see more sneak peeks from their Creative Kit and Limited Edition Kit, visit the My Creative Scrapbook blog.

My Creative Scrapbook November Main Kit Sneak Peeks

Happy Halloween Shaker Box Card

Happy Halloween my crafty friends! Today I'm sharing a Halloween shaker box card that I created using a combination of super fun products from SRM Press, MFT Stamps, Pretty Pink Posh and Jillibean Soup.

Happy Halloween Shaker Box Card by Juliana Michaels featuring SRM Stickers Jane's Doodles Stamps, Pretty Pink Posh Sequins, MFT Stamps Dies and Jillibean Soup Paper

I started off by stamping several of the images from the SRM Stickers / Jane's Doodles Get Candy stamp set with Ranger Archival Ink in black. I colored in each of the images using colored pencils and blended the colors using gamsol and blending stumps.  Finally, I fussy cut each of the images.

Happy Halloween Shaker Box Card by Juliana Michaels featuring SRM Stickers Jane's Doodles Stamps, Pretty Pink Posh Sequins, MFT Stamps Dies and Jillibean Soup Paper

To create the shaker box, I used the MFT Stamps Die-namics Stitched Circle Frames. Those awesome sequins are from Pretty Pink Posh and I added my own touch with the tiny silver stars. 

Happy Halloween Shaker Box Card by Juliana Michaels featuring SRM Stickers Jane's Doodles Stamps, Pretty Pink Posh Sequins, MFT Stamps Dies and Jillibean Soup Paper

I then layered the shaker box onto a piece of paper from the Jillibean Soup Owloween Stew 6x6 Paper Pad and American Crafts cardstock.

Happy Halloween Shaker Box Card by Juliana Michaels featuring SRM Stickers Jane's Doodles Stamps, Pretty Pink Posh Sequins, MFT Stamps Dies and Jillibean Soup Paper

If you are looking for more Halloween card inspiration using the adorable Get Candy Stamp Set by Jane's Doodles you can check out another Happy Halloween card I created and that is on the SRM Stickers blog.

Happy Halloween Shaker Box Card by Juliana Michaels featuring SRM Stickers, Jane's Doodles Stamps and Echo Park Paper

Thanks so much for stopping by today and I hope you enjoyed the Halloween card ideas I shared with you today!

Supplies | Happy Halloween Shaker Box Card
Pretty Pink Posh Sequins
Subscribe