Happy Halloween

Happy Halloween everyone!!! We will be handing out candy and enjoy seeing all the little trick or treaters who stop by this evening! This is along photo heavy post, but I wanted to share some of the photos from the Halloween party we had this past weekend. It was such a blast and we have already decided that we will be hosting another one next year!
All of these photos were taken by our dear friend and professional photographer - Tom McInerney - owner of Poses A Studio. He is amazing and so very talented! I can not thank him enough for taking all of these amazing photos and allowing me to share them with you!!!

Michael Halloween Party 2013 Poses A Studio

This is the front door with my Dollar Tree Halloween Door Garland. At the last minute I added the sign "The Witches Inn" that I found at JoAnn's on sale and added one of my extra Dollar Tree skulls to the top of it. The witch is courtesy of Tom! Isn't she amazing?!

Michael Halloween Party 2013 Poses A Studio

Michael Halloween Party 2013 Poses A Studio

Michael Halloween Party 2013 Poses A Studio

Now for some of the indoor decorations...

This scary looking butler is another "Thanks to Tom!" item. He looks so cool in my foyer!!!

Michael Halloween Party 2013 Poses A Studio


Here is the Halloween Witch I transformed with a new skirt!


Michael Halloween Party 2013 Poses A Studio

The table all set with my American Crafts Halloween Treat ConesAmerican Crafts Halloween Label Jars and Halloween Altered Frames!

Michael Halloween Party 2013 Poses A Studio

Do you see the ghost in the background?

Michael Halloween Party 2013 Poses A Studio

Michael Halloween Party 2013 Poses A Studio

This is an oldie but a goodie...my Happy Halloween frame!

Michael Halloween Party 2013 Poses A Studio


Michael Halloween Party 2013 Poses A Studio

A few more photos of me and Danny in our costumes! I called myself a Corpse Bride and Danny was the Dead Bagpiper. We each did our own makeup and the costumes are real. Mine was an old formal and I made the headpiece myself. Danny used to play the pipes so this was the kilt he used to wear!

Michael Halloween Party 2013 Poses A Studio

Michael Halloween Party 2013 Poses A Studio

Michael Halloween Party 2013 Poses A Studio

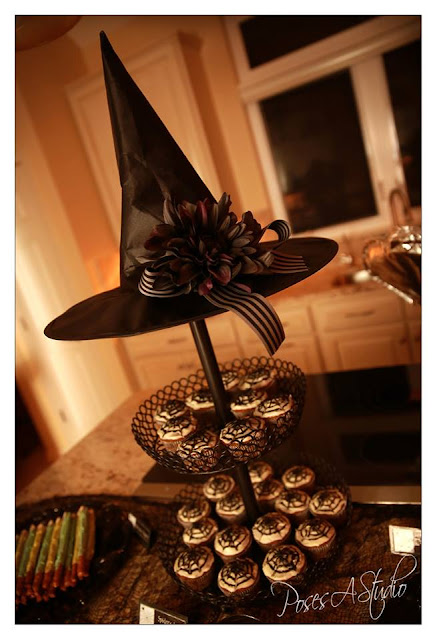
Next, up we have some photos of the yummies we served at the party! These are pumpkin cupcakes with cream cheese frosting. I added the spider web and spider to give them a Halloween feel!

Michael Halloween Party 2013 Poses A Studio

Michael Halloween Party 2013 Poses A Studio

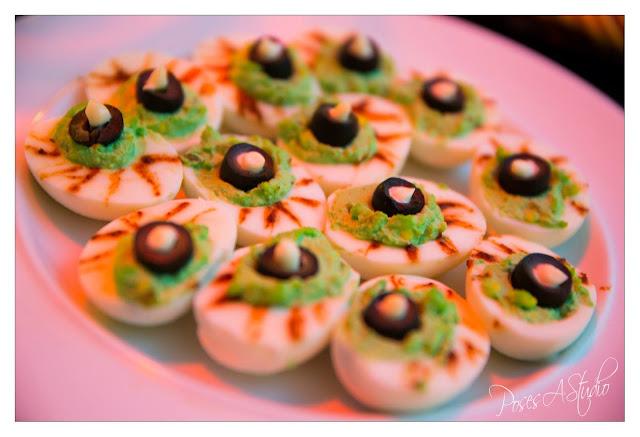
Deviled eggs...that look like eyeballs!

Michael Halloween Party 2013 Poses A Studio

Candy coated pretzels that we called Witches Fingers!

Michael Halloween Party 2013 Poses A Studio

And finally, some of the costumes that our guests wore. It was such a blast to see how creative and clever some of them were with their costumes!!

Michael Halloween Party 2013 Poses A Studio

Michael Halloween Party 2013 Poses A Studio

Michael Halloween Party 2013 Poses A Studio

Michael Halloween Party 2013 Poses A Studio

This is our photographer friend Tom! Any guesses on what he was???

Michael Halloween Party 2013 Poses A Studio

Michael Halloween Party 2013 Poses A Studio

Michael Halloween Party 2013 Poses A Studio

Michael Halloween Party 2013 Poses A Studio

There you have it! The First Annual Michaels Halloween Party!!! Thanks for stopping by!!!

Witches Fingers Pretzel Sticks | Halloween Treats

Our Halloween Party the other night was a success! While I am waiting to get copies of the photos that were taken by our best friend Tom who owns Poses A Studio, I thought I would share one of the treats I made for the party. They were simple to make and I will share a few tips with you on how to make them yourself.

Witches Fingers Pretzel Sticks by Juliana Michaels

INGREDIENTS |

Pretzel Rods or Sticks - 2 pkgs 
Wilton Candy Melts in Vibrant Green - 2 pkgs 
Sliced Almonds  - 2 oz pkg

TIPS | Making Witches Fingers Pretzel Sticks

1.  Melt the Candy Melts per instructions on bag. I did mine in the microwave in a glass bowl. Make sure you take it slow with melting them so that you don't burn them.

Witches Fingers Pretzel Sticks Candy Melts Green by Juliana Michaels

2.  If you don't have colored Candy Melts, you can also use Wilton Cake Icing Color in Leaf Green and add a couple drops to White Candy Melts. I thought it worked great! The color it produced was more green, which you can see in very first photo above. The ones made with the Vibrant Green Candy Melts have a more yellow tone to them. I liked the mix of them together! But the mix came from necessity when I ran out of the Vibrant Green Melts and I didn't have time to run to the store for more! Also, to save money, use a coupon from Michaels, JoAnn's or Hobby Lobby!

Witches Fingers Pretzel Sticks Candy Melts White by Juliana Michaels

3.  Create stations for each ingredient.  For example, put the pretzels in one place and the almonds in another. Separate the whole pretzel sticks and set the broken ones to the side. Do this same thing with the almond slices beforehand and separate out the whole slices. (They are on the plate to the right in the photo.)

Witches Fingers Pretzel Sticks The Process by Juliana Michaels

4. Cover a cookie sheet with a piece of parchment paper. Once you have coated the pretzel with candy, place it on the parchment paper to dry. 

5. Before the candy has time to dry, use a toothpick to create the creases in the fingers. Wipe away the excess candy from the toothpick on a paper towel each time you draw a crease. Finish it by adding an almond to the top to create the fingernail.

6. These can be made days ahead of time and can even be put in the freezer if needed.

Witches Fingers Pretzel Sticks Finished Juliana Michaels

7.  One last tip. Don't throw away the broken pretzels!!! After you do all of the whole sticks, use the remaining Candy Melts and make some smaller treats for snacks. My husband loved that I did this, because I wouldn't let him touch the ones for the party!

These were really easy to make and I am pretty sure after the reaction I had to them at the party, that they will be making a repeat appearance next year!


LINKED HERE |

2 Blackbirds Autumn Wreath | Tutorial

A couple weeks ago, I decided I wanted to make an Autumn wreath for my MIL's front door. She was so excited about my plan to make her one that I knew I couldn't buy a pre-made anything for her...and I didn't want too! What fun would that be?! So I took a trip to JoAnn's and found some fun fall items to work with and put together a wreath that she fell in love with at first sight!

2 Blackbirds Autumn Wreath by Juliana Michaels

My favorite part about the wreath are these 2 adorable blackbirds. They add a touch of whimsy and fun to the wreath!!!

2 Blackbirds Autumn Wreath by Juliana Michaels detail

2 Blackbirds Autumn Wreath by Juliana Michaels detail

SUPPLIES | JoAnn's

24" Birch Stick Wreath
Fall Leaves Bush
Fall Flowers Bush
Hot Glue Gun
Wire Cutter
2 Blackbirds or Crows


TUTORIAL | 2 Blackbirds Autumn Wreath

It all really began with these 2 adorable little blackbirds that I found at JoAnn's! They spoke to me and said "Put us on a wreath. We'll be adorable!" And of course they were!!!

2 Blackbirds Autumn Wreath Tutorial by Juliana Michaels

Begin with 24" Birch Stick wreath.

2 Blackbirds Autumn Wreath Tutorial by Juliana Michaels

Take each of the flower and leaf bushes and cut them apart using the wire cutters.

2 Blackbirds Autumn Wreath Tutorial by Juliana Michaels

2 Blackbirds Autumn Wreath Tutorial by Juliana Michaels

Start placing the stems on the wreath and play around with their placement. Do NOT hot glue anything just yet. You want to make sure you like it there before you commit with the glue!

2 Blackbirds Autumn Wreath Tutorial by Juliana Michaels

Once you are pleased and happy with where everything is going to go, hot glue them in place.

2 Blackbirds Autumn Wreath Tutorial by Juliana Michaels
There you have it! I simple, DIY, Autumn Wreath...perfect for your the indoors or outdoors!!!

LINKED

The Pin Junkie Friday Link Party #41
Tatertots & Jello Link Party Palooza

Tags As A Border and a Horse Layout

Sometimes I find it so enjoyable to just play along with a challenge I find posted online. Do you like to do this? Where are your favorite challenge places? Lately I have been inspired to play along with some of the challenges I have seen on the Elle's Studio blog. Most recently their challenge was to create a layout using Tags As A Border. I have some Elle's tags and other bits and pieces from them in my stash, so it was quite fun to put them together to create a border for my layout entitle Beautiful Day. The photo I used on my scrapbook page is of Danny and Woody right before Danny left to move to Ohio last year. We really weren't sure at the time if Woody would be able to go with us when we moved, so this was kind of a bittersweet moment. Looking back on it though, it was just a brief parting and we are both so happy that we were able to bring him with us and that he is here with us today.


To select the Elle's Studio pieces to use, I went through my stash and started selecting ones that coordinated. This is not that difficult though, since most of their products do coordinate and this is one of the things I love about them. They are really so easy to work with!  I then started laying them down on the background paper to help determine their placement. Once I did this, I adhered the tags and bits to each other and then moved them to the side so that I could add the ink splatters.

TIP | Spray Ink Splatters

I used Heidi Swapp Color Shine in Mustard and flicked the ink onto the paper. To achieve this look, begin by gently shaking the bottle re-mix the liquid and paint as they tend to separate. Next unscrew the applicator and then flick the ink onto the paper from the bottom tip of the spray applicator. Dip the tip back into the bottle to get more ink onto it and flick it again. Repeat this process as necessary to achieve the desired amount of splatters or look you are going for. I usually allow mine to air dry because it doesn't take very long for them to dry, but you can speed the drying with a heat gun if you are getting impatient.

Beautiful Day Layout by Juliana Michaels - Elle's Studio Tags As A Border Challenge detail

Beautiful Day Layout by Juliana Michaels - Elle's Studio Tags As A Border Challenge detail

SUPPLIES | 

Patterned Paper: Pebbles, Inc / Front Porch Collection and From Me to You Collection
Die Cuts: Elle's Studio
Spray Ink: Heidi Swap Color Shine in Mustard
Thread: Craft Thread by Hobby Lobby
Adhesive: Scotch Double Sided Foam Mounting Tape, Scotch Quick Dry Liquid Adhesive, EK Success Herm Vario
Wood Embellishment: Freckled Fawn

Dollar Tree Halloween Door Decor | Part 2

Yesterday I shared with you how I created a Halloween Door Garland using black trash bags from Dollar Tree. Today, I am going to share with you how I decorated the garland using more fun finds from Dollar Tree, including some skeletons and skulls!!!

Dollar Tree Halloween Door Decor Skeleton by Juliana Michaels

Dollar Tree Halloween Door Decor Skull by Juliana Michaels

SUPPLIES |

3 plastic skulls
6 plastic skeletons
Silver Tinsel
Krylon Silver Spray Paint


TUTORIAL | Decorating the Dollar Tree Halloween Door Garland


  • Pull half of the garland hanging in front of the door over to the right side and wrap a length of wire around it to hold it in place. Pretend you are tying back a curtain.
  • Take the silver tinsel, cut it in half and wrap half of it around the tied back garland.
  • Repeat this process on the other side.
  • Spray paint the skulls and the skeletons with silver spray paint until they are fully covered.
  • Let dry.
  • Attach to garland using 20 gauge wire. 
  • I had to do a little finagling with the wire to attach the skulls, and quite honestly it was a bit of a pain to get them attached. If I had it to do again, I would use a strong adhesive, such as E6000, to attach a length of ribbon to the back side of them and use that to tie them to the garland. I would recommend that you use this method if you want to attempt this yourself.
You have now decorated your garland and you are ready for Halloween!!!

Overall this project was a bit time consuming, but the joy I had in making it and the money I saved by doing something like this made it all worthwhile to me.  Cutting the trash bags is what took the longest amount of time and I did that over several evenings while watching TV. If you break it up into pieces, it is really quite manageable.  I am also hoping that I will be able to salvage it and re-use it next year, but maybe freshen it up with some other decorations! I guess we'll just have to wait and see!

Dollar Tree Halloween Door Decor Garland

What happens when you take 50 black trash bags, 3 plastic skulls, 6 plastic skeletons, and some silver tinsel from the Dollar Tree store and mix in some silver spray paint and wire??? You get a fabulous Halloween Door Garland for less than $20!!! I have been wanting to decorate the outside of my house for our Halloween Party, but I really needed to limit how much money I spent. After talking to a friend of mine who wanted to use big black trash bags as a backdrop for a photo shoot, I came up with this crazy idea. And believe it or not, this is the first time I have ever created something to decorate the front porch for Halloween. I usually keep all of my decorating indoors, but this year I wanted to extend the festivities to the outdoors by creating a garland for the front door.  Today I am going to share with you how I created the actual garland using black trash bags.


Of course, Milo had to be a part of the photo shoot and he did such a great job posing for me!!!

SUPPLIES |

50 - 30 gallon black trash bags
20 Gauge Wire
Wire Cutters

TUTORIAL | Halloween Door Garland

  • You first want to determine how you will attach the garland around your door. I have C hooks located every 2 feet or so around the outside frame of my front door.
  • Measure the height of your door to determine the length of wire you need for each side...taking into account that the bags will hang down.
  • I created separate pieces for each side of the door and another one for the top.
  • I then wrapped the wire ends around the C hooks to attach them and hold them in place.


Remove a black trash bag from roll and unwind. Do NOT unfold it.

Dollar Tree Halloween Door Garland Tutorial by Juliana Michaels

Take a pair of scissors and cut along the folded outside edges.

Dollar Tree Halloween Door Garland Tutorial by Juliana Michaels

Cut strips from the bottom to the top of the bag, leaving about 2 inches at the top.

Dollar Tree Halloween Door Garland Tutorial by Juliana Michaels

Repeat until you have cut 5-6 strips on each bag.

Dollar Tree Halloween Door Garland Tutorial by Juliana Michaels

Separate the cut strips and layers with your fingers.

Dollar Tree Halloween Door Garland Tutorial by Juliana Michaels

Wad all of the strips together in your hand to help crinkle and wrinkle the plastic.

Dollar Tree Halloween Door Garland Tutorial by Juliana Michaels

Dollar Tree Halloween Door Garland Tutorial by Juliana Michaels

Repeat this process for each bag. This is the time consuming part. I did this over several evenings while watching TV!

Next, take a roll of 20 gauge wire and thread the end through the uncut top of the plastic bag.

Dollar Tree Halloween Door Garland Tutorial by Juliana Michaels

Dollar Tree Halloween Door Garland Tutorial by Juliana Michaels

Dollar Tree Halloween Door Garland Tutorial by Juliana Michaels

Repeat this with each bag, threading them onto the wire. Add enough bags to nicely fill in each length of wire. I used about 17 bags for the sides and about 16 across the top of my door.
(My front door measures 8 feet high and 5.5 feet wide.)

I then attached each length to the top and sides of the door by winding the ends of the wire around the C hooks and occasionally looped it around the other C hooks along the way.


For more great Halloween Front Door Decorations check out my Dollar Tree Halloween Door Decor Part 2.


LINKED AND SHARED
Friday Link Party at The Pin Junkie
Link Party Palooza at Tatertots & Jello

ThePinJunkie
Subscribe