Some Bunny Loves You Easter Card | Nested Peeps

Spring feels like it's right around the corner here and it's definitely gotten me into the mood for creating some spring and Easter themed cards. Today I'm sharing this Some Bunny Loves You Easter Card that features a fun set of dies from Scrapbook.com including their Nested Peeps Die Set. Keep reading as I walk you through how I created this mixed media shabby style Easter card and make sure to take a close look at the background. There is so much detail there and photos don't seem to do it the justice it deserves!

Some Bunny Loves You Easter Card by Juliana Michaels featuring Scrapbook.com  Nested Peeps Dies, Sunny Lane Floral Dies and Hippity Hoppity Stamp Set

Speaking of backgrounds, let's start there. I began with a piece of Distress Watercolor Paper cut to 4.25 x 5.5 inches. Using the Scrapbook.com Mosaic A2 Coverplate Die, I embossed the paper. If you are new to the technique I share the details about it here. After embossing the paper, smooshed my Old Paper Distress Ink Pad onto my craft mat, spritzed it with water and smooshed the paper into the ink. I dried it with my heat tool. I then repeated this process with Spun Sugar Distress Ink.

I then took a palette knife and applied Distress Crackle Paste around the edges and here and there on the background to add a little texture. I then set the background to the side to air dry and allow the paste to crackle.


Next I took a piece of Distress Watercolor Paper and die cut it using the a bow from the Scrapbook.com Bow Toppers Die Set and the Scrapbook.com Sunny Lane Florals Die Set. I then colored the various die cuts using Distress Oxide Ink in the following colors: Peeled Paint, Forest Moss, Spun Sugar, Worn Lipstick, Mustard Seed, Wild Honey, Broken China, Uncharted Mariner and Iced Spruce. I applied the ink using a blending brush. I applied the lighter color first to the entire die cut and then added the darker color to the edge to create some shadows. I then splattered the pieces with water, dabbed the water with a paper towel to lift off some of the ink and then dried them with my heat tool. The final step was to add some ink splatters to them using Distress Oxide Sprays. To do this, shake the bottle well and then remove the nozzle and use it to flick the ink onto the paper. You would also use a long thin paint brush to do this as well. I then dried the ink with my heat tool.


Now for that Peep! The Nested Peeps Die Set is SO fun and versatile. Whether you are a card maker, scrapbooker or creating party decor, this set has you covered! There are 5 dies and they range in size from 7.6 inches tall to just over 1 inch tall! This die set is part of an awesome Peeps Bundle that is available now at Scrapbook.com.  The Peeps dies coordinate with the stamps so you can use the dies to cut out the peep shaped stamps! I've also used the stamp set from this bundle on this card!

GRAB YOUR PEEPS BUNDLE NOW!


Here I've used the middle size and die cut a piece of Distress Watercolor Paper and inked it using Spun Sugar Distress Oxide Ink. I added a little Worn Lipstick Distress Oxide to the edges and then added some splatters using Kitsch Flamingo Distress Oxide Spray Stain and dried the ink with my heat tool. I wanted this to look like a Peep, so I then applied Glossy Accents to the entire die cut and while this was still wet, I sprinkled it with Distress Rock Candy Glitter. I tapped off the excess glitter and then set the piece to the side to dry. I applied the Glossy Accents a little too thick, so when it was finally dry, the paper was a little bowed. As I tried to flatten it out, the Glossy Accents cracked here and there. The end result added a nice touch of distress to my Peep and I love how it turned out.


Once all the die cutting was completed, I adhered the Peep to the background using Therm O Web Super Tape. I then adhered the various flowers and leaves using a combination of liquid adhesive (I prefer Distress Collage Medium) and double sided foam squares.


For the final touch, I stamped the sentiment from the Scrapbook.com Hippity Hoppity Stamp Set onto Distress Watercolor paper using Distress Archival Ink in Frayed Burlap. I trimmed it into a strip and inked the edges with Old Paper Distress Ink. I then adhered it to the card using double sided foam adhesive.


Thanks so much for stopping by today to take a closer look at my Some Bunny Loves You Easter Card featuring the Scrapbook.com Nested Peeps, Sunny Lane Florals, Bow Toppers and Hippity Hoppity Stamp Set.

SUPPLIES

Below you can find the products I used to create this card along with compensated affiliate links to Scrapbook.com. These links are at absolutely no cost to you. When you shop through the links below, I receive a small commission from Scrapbook.com. These links are at absolutely no cost to you and the commission I receive helps me cover the costs of my blog and other expenses, which allows me to continue to provide you with FREE inspiration and tutorials. If you want to learn more about what an affiliate link is, you can see my full affiliate and product disclosure statement here. Thank you so much for your love and support!

Spring Card Ideas | Scrapbook.com Sunny Lane & Spring Sprigs

Today I'm sharing some Spring Card Ideas using the new Sunny Lane Paper Pad from Scrapbook.com. I've combined these papers with a mix of other Scrapbook.com Exclusives including the Sunny Lane Stamp Set, Spring Sprigs Stamp Set (which now has a coordinating die set!) and Thank You Sentiments III Die Set.

Thanks So Very Much Card by Juliana Michaels featuring Scrapbook.com Sunny Lane Paper Pad, Thank You Sentiments III Die Set and Sunny Lane Stamp Set

THANKS SO VERY MUCH CARD

On this first card, I began with the idea of creating a "quilt" for my background using the Nested Hexagons Die Set and the Sunny Lane Paper Pad. I took the 3 smallest die and cut out a bunch of hexagons from several of the patterns from the Sunny Lane Paper Pad. To give them a bit of a vintage feel, I added some stamping using the Tim Holtz Eccentric Stamp Set and Hickory Smoke Archival Ink. I then inked all of the edges with Walnut Distress Ink by using a foam ink blending tool. I then debated for a bit about adding machine stitching around the edge of each hexagon because of how long it would take. In the end I knew the stitching would give me the "quilt" look I was after, so I took the time to add the stitching and I'm so glad I did.

Next, I took a piece of cardstock cut to 4.25 x 5.5 inches and applied double sided tape to the paper. I then began laying out the hexagons to create my quilt. Once I had them all laid out, I used a paper trimmer to trim off an 1/8 inch around, inked the edges with Walnut Stain Distress Ink and then adhered the quilt to a piece of Distress Blackout Kraft Stock.


For the sentiment, I used the Thank You Sentiments III Die Set. I took a piece of Distress Blackout Kraft Stock and embossed it using the Tim Holtz 3D Woven Embossing Folder. I then die cut the embossed paper using the thanks die. Next, I took a Distress Sanding Disk (you can also just use regular sand paper) and lightly sanding the paper to reveal some of the kraft core. I then die cut the shadow layer from a piece of blue cardstock from the Scrapbook.com Playful Paper Pad. To finish off the sentiment I used the Scrapbook.com Sunny Lane Stamp Set and stamped "so very much" onto the same blue paper, trimmed it size. I then adhered both pieces to the card with foam adhesive.


LOVE YOU BUNCHES CARD

On this second card I used the Scrapbook.com Spring Sprigs Stamp Set. This came out awhile back, but they just recently came out with a coordinating Spring Sprigs Die Set for it, so with the stamp and die set in hand, I stamped out multiples of some of the florals onto Distress Watercolor Paper using Tsukineko VersaMark Watermark Ink. I sprinkled it with Distress Embossing Glaze in Vintage Photo, tapped off the excess and heat embossed it with my heat gun. I then used the coordinating Spring Sprigs die set to cut out the florals.  To add some color I used Distress Watercolor Pencils and a waterbrush. When working with these pencils, I prefer to touch the waterbrush to the pencil to pick up the color and then apply it to the paper. You can also color direct to paper with the pencil and then add the water, but I prefer the look you get when taking the color from the pencil with the waterbrush. After coloring each of the images, I added some ink splatters using Distress Ink in Old Paper, dried the ink with my heat tool. I then inked the edges of each die cut with Walnut Stain Distress Ink.

Love You Bunches Card by Juliana Michaels featuring Scrapbook.com Sunny Lane Paper Pad, Spring Sprigs Stamp Set and Sunny Lane Stamp Set

Next, I took a piece of patterned paper from the Scrapbook.com Sunny Lane Paper Pad and trimmed it to 4.25 x 5.5 inches using the Tim Holtz Deckle Edge Paper Trimmer. I added some machine stitching around the outer edge and then inked the edges with Walnut Stain Distress Ink. I adhered this to a piece of Distress Watercolor Paper that I had lightly ink splattered with Old Paper Distress Ink.


For the sentiment, I used the Scrapbook.com Sunny Lane Stamp Set. I stamped the sentiment onto Distress Watercolor Paper using waterproof ink and then die cut it using the Nested Circle Die Set. Next, I smoosed the Old Paper Distress Ink Pad onto my craft mat, spritzed the ink with water, and smooshed the paper into the ink. I then dried the paper with my heat tool and inked the edges of the circle with Walnut Stain Distress Ink.


To assemble the stamped floral images, I first adhered the sentiment piece to the center of the card background with a small foam adhesive square. I then took the florals and began arranging them around the sentiment. I used my scissors to trim off the ends on most of the flowers so that I could easily tuck them behind the sentiment and adhered them using an adhesive tape runner. This allowed me to more easily rearrange the florals if I wasn't quite happy with their placement. Once I was totally happy with the arrangement, I went back and added some Distress Collage Medium behind the die cuts to secure them a little more permanently.


Thanks so much for stopping by today to check out these Spring Card Ideas featuring the Scrapbookc.om Sunny Lane Paper Pad and Spring Sprigs Stamp Set.

SUPPLIES

Below you can find the products I used to create this card along with compensated affiliate links to Scrapbook.com. These links are at absolutely no cost to you. When you shop through the links below, I receive a small commission from Scrapbook.com. These links are at absolutely no cost to you and the commission I receive helps me cover the costs of my blog and other expenses, which allows me to continue to provide you with FREE inspiration and tutorials. If you want to learn more about what an affiliate link is, you can see my full affiliate and product disclosure statement here. Thank you so much for your love and support!

Tim Holtz Brushstroke Flowers Mini Video

Today I'm sharing a video with you over on my YouTube channel with some tips and tricks for working with the Tim Holtz Brushstroke Flowers Mini Thinlits Die Set. This set is part of his Sizzix Everyday 2023 Release and I had quite a few of you request a little tutorial/video for working with it. You can check it out HERE or watch below.

Tim Holtz Brushstroke Flowers Mini Tag and Video by Juliana Michaels

TIM HOLTZ BRUSHSTROKE FLOWERS MINI VIDEO


The video focuses on tips and tricks for working with the die set including adhesives, paper, and tools that might help you during the making process. Here's a tag I created using some of the flowers I assembled during the video. I don't share how to complete this project in the video, but I wanted to give you a little bit of inspiration on how you can cluster and group these flowers to create your own floral bouquets to use on your makes.

SUPPLIES

Below you can find the products I used to create this card along with compensated affiliate links to Scrapbook.com. These links are at absolutely no cost to you. When you shop through the links below, I receive a small commission from Scrapbook.com. These links are at absolutely no cost to you and the commission I receive helps me cover the costs of my blog and other expenses, which allows me to continue to provide you with FREE inspiration and tutorials. If you want to learn more about what an affiliate link is, you can see my full affiliate and product disclosure statement here. Thank you so much for your love and support!

Tim Holtz Tailored Vintage Valentine's Day Card

Happy Valentine's Day! Even if you don't celebrate this holiday, there's always a reason to let someone you know that you love them and what better way than with a mixed media vintage styled card. On this card I've incorporated a mix of Scrapbook.com and Tim Holtz products including stencils, stamps, and dies. 

Tim Holtz Tailored Vintage Valentine's Day Card by Juliana Michaels

TIM HOLTZ TAILORED VINTAGE VALENTINE'S DAY CARD

So let's start off with the background. I began with the Scrapbook.com Scattered Hearts Stencil and used it to create a monoprint. Do this, I placed the stencil in my Splat Box and sprayed it with Tim Holtz Tart Cranberry Mica Stain (this is a seasonal product, but you can use any color of spray ink). Off to the side, I had a piece of Distress Watercolor Paper placed on top of a paper towel and an extra paper towel as well. I placed the inked stencil on top of the paper and used the extra paper towel to push down while at the same time dabbing up any ink that seeped under the stencil openings. To see this technique in action make sure to check out my How To Monoprint with Stencils video.

I lifted off the stencil and they dried the ink with my heat gun. Once the ink was dry, I added some stamping using Frayed Burlap Archival Ink and stamps from the Tim Holtz Field Notes, Merchant and Christmas Postmarks. I then inked in the edges with a little Walnut Stain Distress Ink and added some machine stitching around the border. I then adhered this to a piece of red metallic Kraft Stock that I had lightly sanded and then inked with Walnut Stain Distress Ink.

For the focal point, I used the Tim Holtz Tailored Thinlits Die Set and cut the various layers from colored and metallic cardstock and adhered them together using Distress Collage Medium. Before adhering the metallic papers, I lightly sanded them, and inked them with Walnut Distress Stain using a foam blending tool. The small flower is from the Mini Brushstroke Flowers Thinlits and was cut from Distress Watercolor Paper and then watercolored using a waterbrush and Distress Ink in Lumberjack Plaid and Fossilized Amber.

The embossed heart was created using the Tim Holtz Lucky Love 3D Impresslits Embossing Folder. Impresslits,  actually cut and emboss all in one step!  I used it with a piece of red metallic Kraft Stock and to give it the slightly grungy look I used a technique that Tim shared recently. After die cutting the shape,  I painted it with Black Soot Distress Paint. Allowed it to start to dry and then used a paper towel to wipe off some of the excess paint. You have to let the paint slightly dry so it will start to stick to the paper but still wet enough that you can wipe some of the paint away and reveal the metallic paper. The end result is so good! If you want to see this technique in action check out Tim's Sizzix Everyday 2023 Release YouTube Live at around the 3:05 mark.

To frame the focal point, I used one of dies from the Scrapbook.com Nested Oval Dies and cut it from a piece of Tim Holtz Idea-ology paper and inked the edges with Walnut Stain Distress Ink. To give it a more vintage valentine feel, I added some paper lace around the edge using the Tim Holtz Crochet Thinlits. I cut it from printer paper, very lightly inked the edges with a little Walnut Distress Stain. I then wrapped it around the backside of the oval die cut letting it bend as needed and even trimmed it here and there to make it wrap around a little easier. 

The final touch was the sentiment...love you to the moon and back. This is a stamp from the Tim Holtz Tiny Text Stamp Set which I stamped onto Distress White Heavystock with Black Soot Archival Ink, trimmed it into a strip and then inked the edged with Walnut Stain Distress Ink. I then adhered it to the card with a bit of foam tape on the two ends so that it was the supported as it went over the embossed heart.

Thanks as always for stopping by and taking a closer look at this Tim Holtz Tailored Valentine's Day Card!

SUPPLIES

Below you can find the products I used to create this card along with compensated affiliate links to Scrapbook.com. These links are at absolutely no cost to you. When you shop through the links below, I receive a small commission from Scrapbook.com. These links are at absolutely no cost to you and the commission I receive helps me cover the costs of my blog and other expenses, which allows me to continue to provide you with FREE inspiration and tutorials. If you want to learn more about what an affiliate link is, you can see my full affiliate and product disclosure statement here. Thank you so much for your love and support!

Tim Holtz Lost Shadow Distress | Thinking Of You Card

Today I'm sharing a card I created that was inspired by 2 other makers...Stacy Hutchison and Lene Kjems.
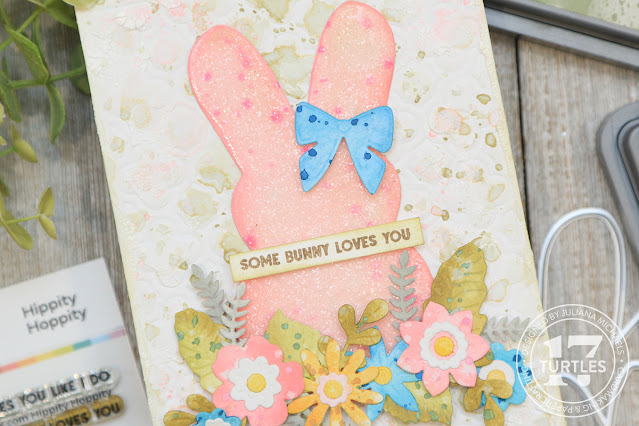
I was inspired by Stacy's use of the new Lost Shadow Distress Ink and the color combination and technique she used with the Dotted Embossing Folder. Lene inspired me with how she used the gorgeous Blossom Thinlits Die Set. Keep reading to learn more on how I used their inspiration to create my card.

Thinking of you card by Juliana Michaels featuring Tim Holtz Lost Shadow Distress Ink, Blossom Thinlits and Dotted Embossing Folder

THINKING OF YOU CARD | TIM HOLTZ LOST SHADOW DISTRESS


Before I begin, I wanted to also share that the finished size of this card is 4.5 x 6.5 and while not a standard size, it will easily fit into a 5x7 envelope for mailing.

For the background, I followed Stacy's tutorial from her blog. You can check that out here. I inked the Dotted Embossing Folder with Lost Shadow Distress Oxide, spritzed the paper with a little water and ran it through my Sizzix Foldaway. Next, I did some ink smooshing using Speckled Egg Distress Oxide, Uncharted Mariner Distress Oxide and Brushed Corduroy Distress Oxide. And I must admit this is the first time I've ever used Oxide inks to do ink smooshing. I have always only ever done this technique with Distress Inks. After finally giving it a try, I have to admit I am a fan of the look and will definitely be doing this more in the future! 

Stacy used Oxide Sprays for her ink smooshing, but I don't have Brushed Corduroy Oxide Spray, so I just used my ink pads and did one color at a time and dried between each color. As you will notice I dabbed the colors in different areas across the background so that some of the Lost Shadow could be seen. I then finished off the background by inking the edges with a little Brushed Corduroy Distress Oxide Ink.


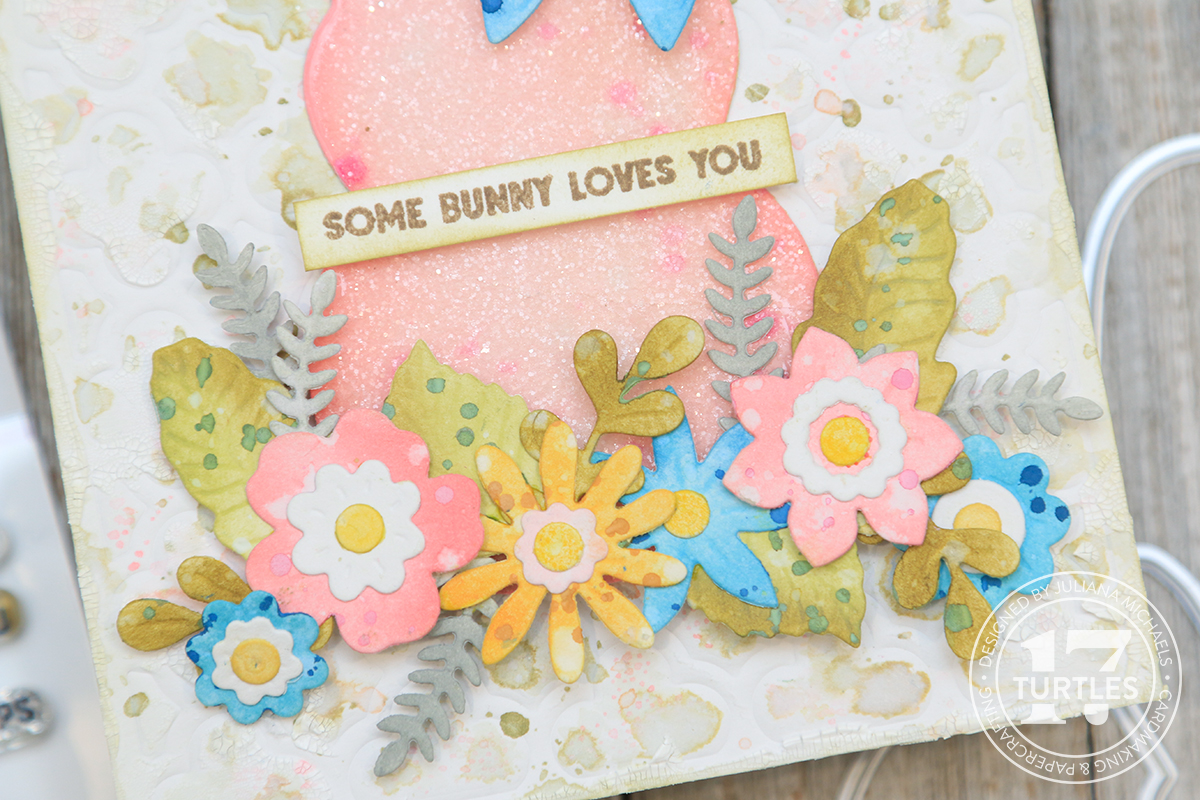
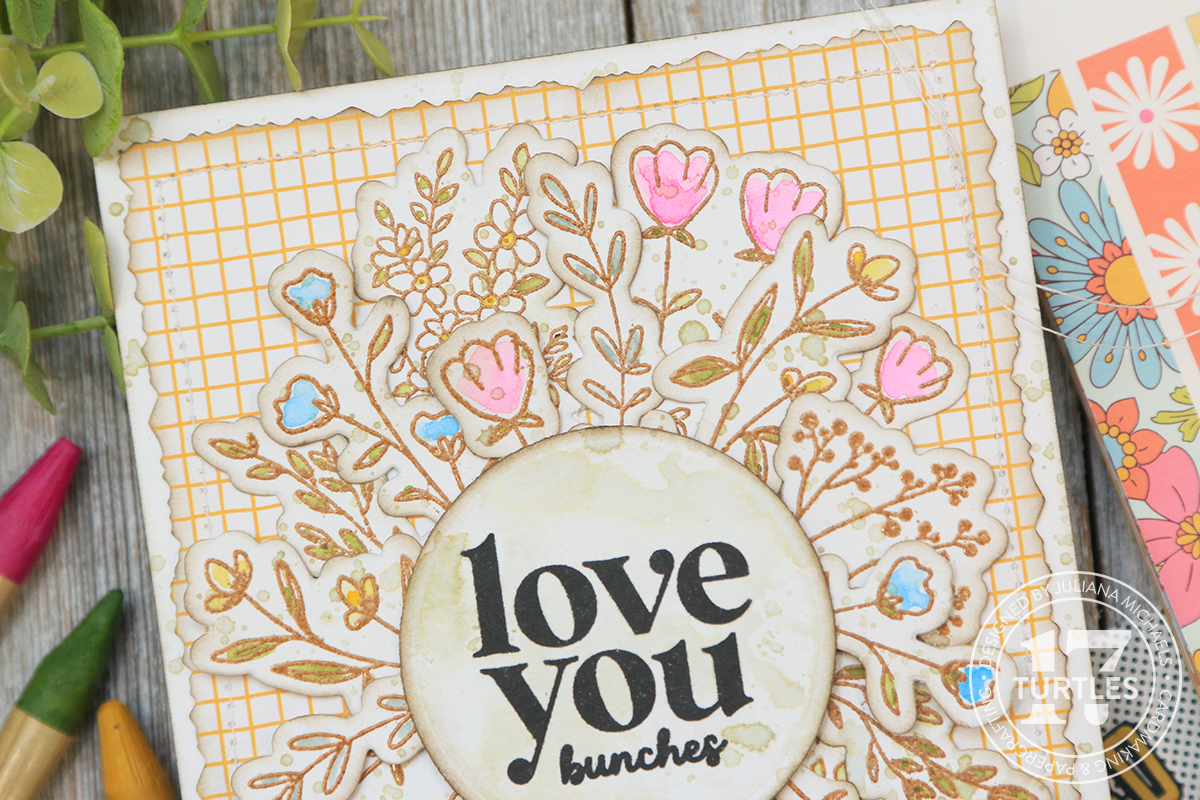
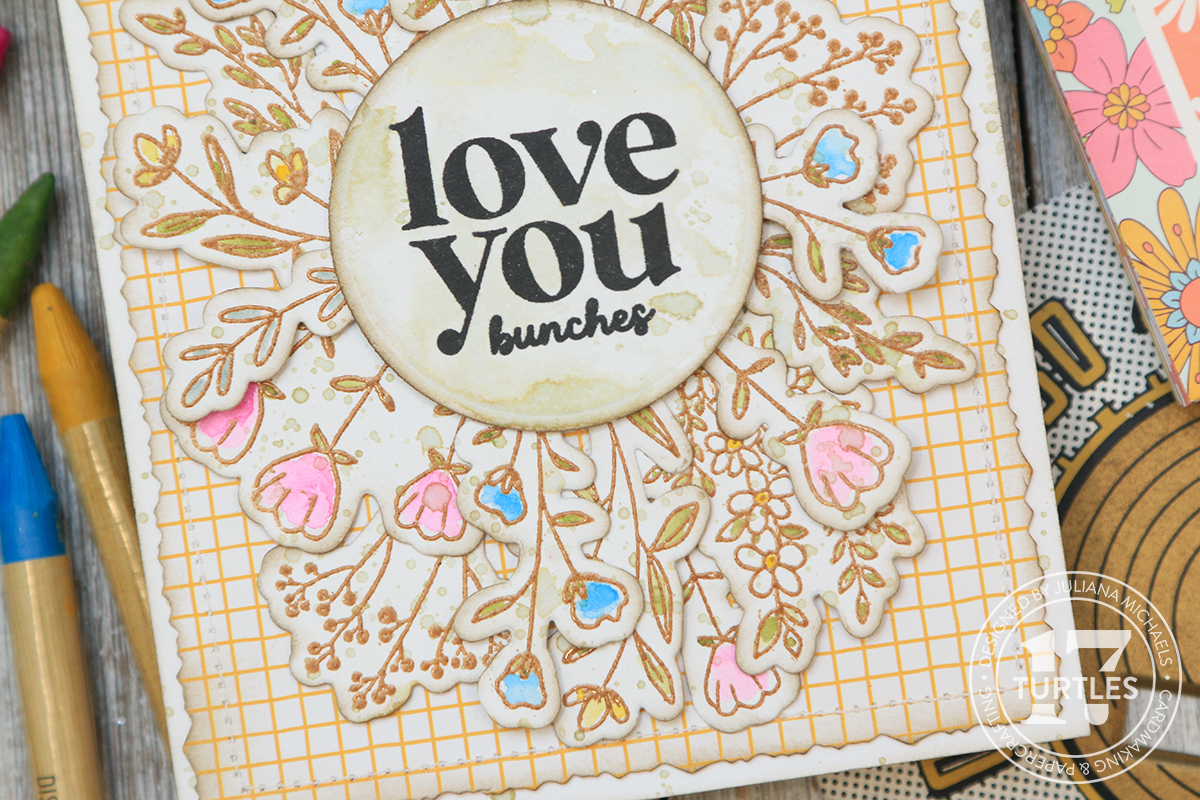
As I mentioned, I loved the way Lene used the Blossom Thinlits Die. I loved the black accents, how she used a book page and that she used some additional greenery dies - the Wildflower Stems 1 and Wildflower Stems 2 Thinlits Dies.

For my card, I cut the Wildflower 1 stem from Black Kraft Stock and then gently sanded it to reveal some of the kraft core. I cut the Wildflower 2 stem from Distress Watercolor paper and lightly spritzed it with Lost Shadow Distress Spray Stain.


To achieve the book page look, I stamped the Newsprint image from the Tim Holtz Newsprint and Type Stamp Set with Black Soot Archival Ink onto Distress White Heavystock. I stamped the image twice so that I would have enough paper to die cut the second layer of the Blossom and the base layer of the leaves.

I die cut the base of the flower from Black Kraft Stock and sanded it like I did the stems. For the top layer, I die cut it from Distress White Heavystock and inked the edges with Lost Shadow Oxide Ink. 

The flower center is cut from Distress Watercolor paper with pieces ink smooshed into Brushed Corduroy Distress Oxide. I also had some left over pieces of Distress Watercolor paper from a previous project that I had sprayed with Uncharted Mariner Distress Spray and I used this for the details on the leaves and the flower center. I also had another piece from a previous project that had been sprayed with Speckled Egg Distress Spray that I used as well.

I adhered the base and second flower layers and the layers for the flower center with Distress Collage Medium. I then adhered the top flower layer and the flower center with double sided foam adhesive for some dimension.

The sentiment is from the Hero Art Message Strips Stamp Set. I stamped it with Embossing Ink onto Black Kraft Stock and heat embossed it with white embossing powder. I trimmed it to size, sanded the edges and adhered it to a piece of chipboard for a little dimension before adhering it to the card.

To finish off the card, I mounted the completed panel onto a piece of Black Kraft Stock after I sanding the edges.


Thanks so much for stopping by today to take a closer look at my Thinking Of You Card featuring the Tim Holtz Lost Shadow Distress Ink.
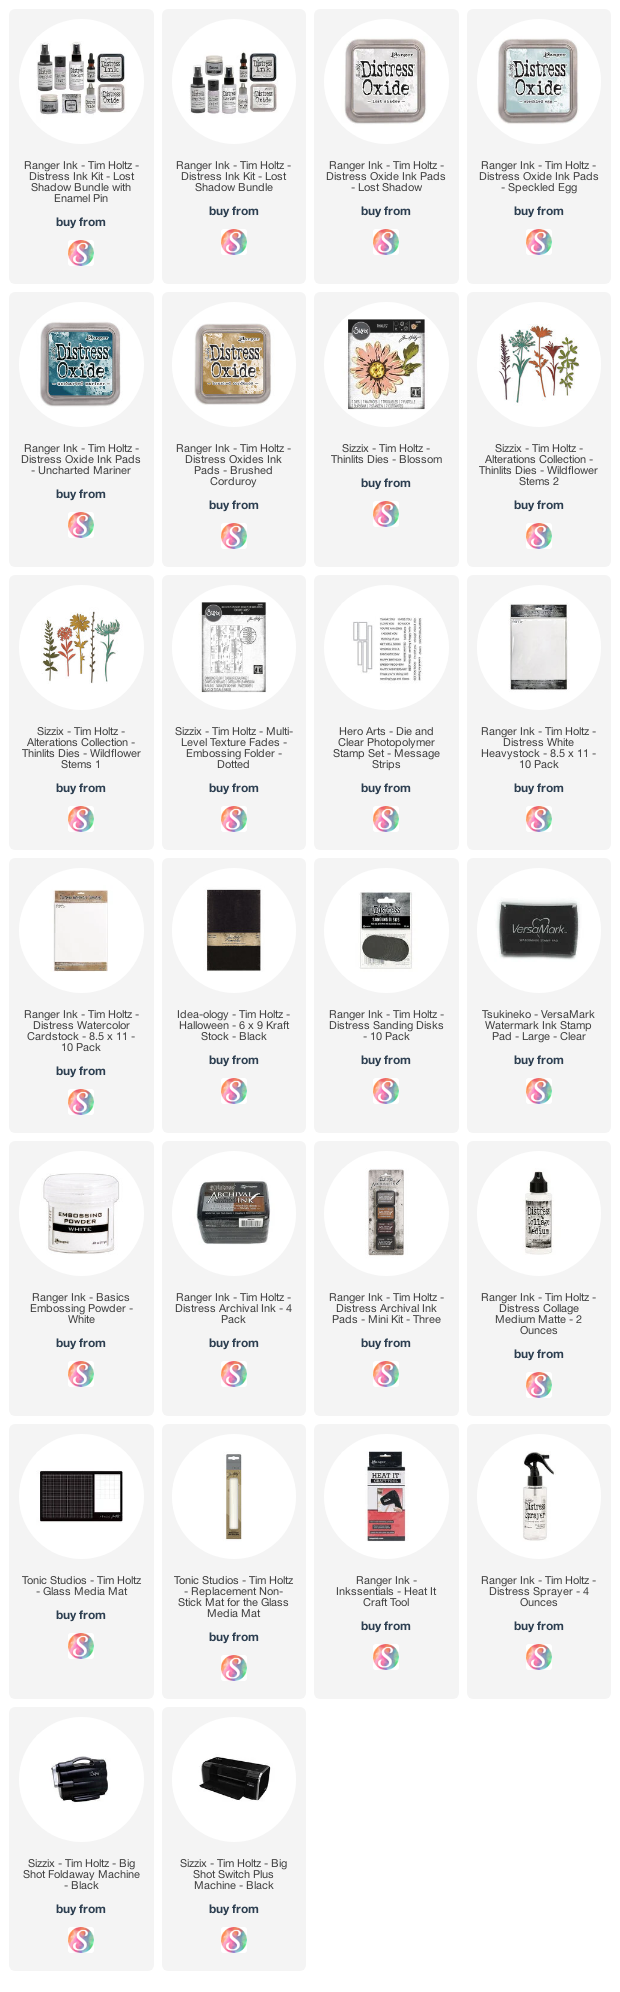
SUPPLIES

Below you can find the products I used to create this card along with compensated affiliate links to Scrapbook.com. These links are at absolutely no cost to you. When you shop through the links below, I receive a small commission from Scrapbook.com. These links are at absolutely no cost to you and the commission I receive helps me cover the costs of my blog and other expenses, which allows me to continue to provide you with FREE inspiration and tutorials. If you want to learn more about what an affiliate link is, you can see my full affiliate and product disclosure statement here. Thank you so much for your love and support!

Let's Make A Mixed Media Valentine's Day Card

Today I've got something a little different for you. Over on my YouTube channel I'm sharing a new video that's a more live version of me crafting. Not truly live, but it's me crafting and chatting in real time. It's the first time I've recorded a video in this way. Normally, I do a voiceover which means I record what I'm doing then go back and record my voice explaining what I'm doing and then put them together. I thought it might be fun to mix it up a little and share a video that's not perfectly edited and with all the oops moments deleted! With that said, this video is a bit longer than my normal videos because of this. I hope you will check it out and I hope you enjoy what you see. If you all seem to enjoy it, I'll consider doing another one in the future.

Happy Valentine's Day Mixed Media Card by Juliana Michaels featuring Tim Holtz Embossing Glaze, Entangled Embossing Folder, Tailored Thinlits, Scrapbook.com Love Block Word Dies and Creative Expressions Stamp Set

In the video I'm sharing how I created this Mixed Media Valentine's Day Card, so I'm not going to go into too many details in this post. I will share some of the main techniques and you can still find a complete supply list at the bottom of this post.
 

HAPPY VALENTINE'S DAY CARD

For the background, I used the Tim Holtz Entangled 3D Embossing Folder to emboss a piece of Distress Watercolor Paper. I then applied embossing ink over the embossed paper, sprinkled it with Antique Linen Embossing Glaze and embossed it with my heat gun.
Next, I applied Walnut Stain Distress Crayon over the entire surface using a stencil brush to push the pigment from the crayon into all of the cracks and crevices. I then wet my finger and rubbed lightly over the surface to remove some of the crayon and better reveal the details of the embossed design.


For the focal point, I die cut a heart from a piece of Idea-ology paper and inked the edges with Walnut Stain Distress Ink. I then die cut the word love using the Scrapbook.com Block Word Die Set from gold Metallic Kraft Stock (which I distressed by rubbing a sanding block over) and red cardstock. I also used the Tim Holtz Tailored Die Set and cut it out from colored cardstock as well. I used Distress Collage Medium to adhere the various layers together and then adhered them to the die cut heart. For a little dimension, I used double sided foam adhesive to adhere the hat and coat.


Next up, I added the sentiment which is from the Scrapbook.com Celebrate Everyday Stamp Set. It is stamped onto white cardstock using Black Soot Archival Ink, trimmed into a strip and then adhered with a strip of foam tape.

The final step was to layer the panel onto a piece gold Metallic Kraft Stock which I distressed with a sanding block.


Thanks so much for stopping by today and checking out my Mixed Media Valentine's Day Card.

SUPPLIES

Below you can find the products I used to create this card along with compensated affiliate links to Scrapbook.com. These links are at absolutely no cost to you. When you shop through the links below, I receive a small commission from Scrapbook.com. These links are at absolutely no cost to you and the commission I receive helps me cover the costs of my blog and other expenses, which allows me to continue to provide you with FREE inspiration and tutorials. If you want to learn more about what an affiliate link is, you can see my full affiliate and product disclosure statement here. Thank you so much for your love and support!

>
Subscribe