Spring Coffee Lovers Blog Hop | Simon Says Stamp

I'm playing along again with the Spring Coffee Lovers Blog Hop. Today I'm featuring the Simon Says Stamp February Card Kit Coffee, Tea and Cocoa. As soon as I saw the coffee theme, I knew I had to have this kit. While the kit is no longer available, most of the pieces of it are still available, including the adorable Coffee and Tea Stamp Set.
Spring Coffee Lovers Blog Hop 2017

I stamped and colored the images using Prismacolor Colored Pencils and blended it with Gamsol and an blending stump. I then fussy cut the images and added them to the die cut circle. Using my MISTI and my How to Stamp a Sentiment on a circle die cut perfectly every time tutorial, I was able to curve the sentiment stamp around the circle.

Coffee and Friends Card by Juliana Michaels featuring Simon Says Stamp Coffee and Tea Stamp Set

The adorable patterned paper is from the Doodlebug Cream and Sugar 6x6 paper pad that was part of the original kit. I only got one sheet of each piece of paper, but I'm thinking I might need more!

Coffee and Friends Card by Juliana Michaels featuring Simon Says Stamp Coffee and Tea Stamp Set

That's all for today. Just a quick share and a reminder to leave a comment on my Blog Candy Post for your chance to win this fabulous prize package generously donated by Jillibean Soup!

Spring Coffee Lovers Blog Hop | Newton's Nook

Hello Friends! I'm playing along with a couple more coffee cards for the Spring Coffee Lovers Blog Hop! Newton's Nook is one of the Super Sponsor for the hop and being the lover I am of their stamps, I had to get the Newton Loves Coffee Stamp Set just for this hop!
Spring Coffee Lovers Blog Hop 2017

For my first card, I went super springy with a fun rainbow patterned paper. I then added Newton hugging the coffee mug. There are certainly times when I need some coffee right meow! How about you?

Coffee Right Meow Card by Juliana Michaels featuring Newton's Nook Designs Newton Loves Coffee

After stamping, coloring and die cutting Newton, I adhered him on top of a heart that I die cut using the Darling Hearts Die Set.

Coffee Right Meow Card by Juliana Michaels featuring Newton's Nook Designs Newton Loves Coffee

For my second card using this set, I didn't quite hit the spring color palette, but I love how it turned out. I used the Distress Ink Smooshing Technique to create a coffee stained background for Newton and his cups of coffee.

Purrfect Blend Coffee Card by Juliana Michaels featuring Newton's Nook Designs Newton Loves Coffee

The background panel on the right hand side was created by stamping some of the images from the Newton Loves Coffee set with Versamark Watermark Embossing Ink. I then used one of the Land Border dies to cut the blue plaid paper.

Purrfect Blend Coffee Card by Juliana Michaels featuring Newton's Nook Designs Newton Loves Coffee

Thanks so much for hopping by today! Don't forget to check out my Jillibean Soup Coffee Cup Giveaway.

Spring Coffee Lovers Blog Hop | Coffee Shaker Card + Blog Candy

Hello friends and welcome to the Spring Coffee Lover's Blog Hop! I'm so excited to be participating again with this fun and inspirational blog hop. I look forward to this hop each season and I know this one will be just as amazing as all of the others, if not even better! Keep reading to learn about the Coffee Shaker Card I created to share with you today and for your chance to win a fabulous prize package from Jillibean Soup!

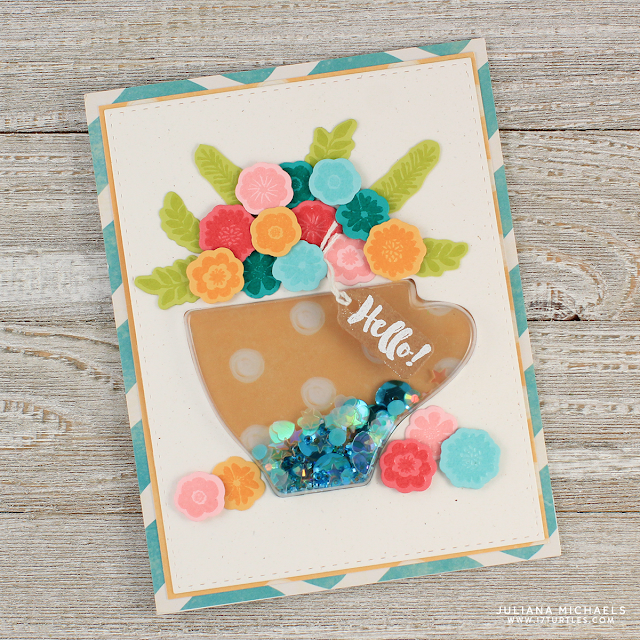
The card I'm sharing with you today is a fun Coffee Shaker Card I created using the new Jillibean Soup Latte Stamp and Die set and coordinating Coffee Cup Shape Shaker. These are seriously the easiest shaker cards to make! There is no foam, no layering and no die cutting to worry about. All you have to do is fill the shaker, place it in the opening on the card and stick it down.

Hello Coffee Shaker Card by Juliana Michaels featuring Jillibean Soup Coffee Cup Shake Card and Latte Stamp Set

To decorate my card, I began by stamping a bunch of the little flowers from the Latte stamp set onto colored cardstock with Versamark Watermark Embossing Ink and heat set them with clear embossing powder. I then die cut them using the coordinating die that comes with the stamps.

Hello Coffee Shaker Card by Juliana Michaels featuring Jillibean Soup Coffee Cup Shake Card and Latte Stamp Set

Using double sided foam tape, I adhered the flowers to the card front to give them a little dimension. 

I did slightly modified the card by cutting off the front panel. I trimmed it down using a stitched rectangle die and then layered some patterned paper from the new Jillibean Soup Bowl of Dreams collection behind it. The sentiment is stamped and heat embossed with white embossing powder onto a Kraft Jewelry Tag.

Hello Coffee Shaker Card by Juliana Michaels featuring Jillibean Soup Coffee Cup Shake Card and Latte Stamp Set

Check out all the bling inside the shaker...that is one of the new Watercolor Shaker Fillers, a beautiful combo of jewels and sequins, along with some of their Blue Sequins. Seriously the new Jewels and Sequins are just gorgeous!!!

Hello Coffee Shaker Card by Juliana Michaels featuring Jillibean Soup Latte Coffee Cup Shake Card and Stamp Set

Spring Coffee Lovers Blog Hop Details:
To play along all you have to do is create a new spring themed coffee, tea and/or cocoa project and then head over over to the Coffee Loving Cardmakers Blog to link it up. While you're there, make sure to check out all of the details. There are loads of great prizes being given away for playing along. Anyone is welcome to link up any time between Friday, March 24 - Friday, March 31. There are no limits to the number of entries - in fact, the more the merrier and the more chances you have of winning some of the prizes from the many amazing sponsors! By linking up your project, you become eligible to win a prize from one the amazing Super Sponsors! If you share your project on social media, make sure to tag it with #spring2017clh

Giveaway Details: 
And now, let's get to the fun giveaway I mentioned! Jillibean Soup has generously provided me with a fabulous prize package for one lucky winner! This package includes the new Latte Stamp and Die Set, Coffee Cup Shaker, Coffee Cup Shaker Card and a variety of their beautiful sequins including a pack of their new Watercolor Shaker Fillers. Everything you need to get started creating your own gorgeous shaker cards!

To win, all you need to do is leave a comment on this post and please make sure to leave a way for me to contact you if you're the winner. Commenting will be open until March 31 at 11:59 EST.

Jillibean Soup Coffee Cup Shaker Card,  Latte Stamp and Die Set, Shaker Fillers, Sequins

Thanks so much for stopping by and I hope you have a great hop!

Happy Easter Basket Card | Newton's Nook Designs

Hello friends! I'm sharing a Happy Easter Card with you. It features the new Newton's Nook Designs Beautiful Spring stamp and coordinating die set.

Happy Easter Basket Card by Juliana Michaels featuring Newton's Nook Designs Beautiful Spring

It's been a while since I did a card without any coloring. (I do love my colored pencils!) However, for this card, I decided to do some simple stamping, heat embossing and die cutting. 

I stamped the beautiful swirly eggs onto a variety of cardstock in Easter egg colors using Versamark Watermark Ink. I then heat embossed them with clear embossing powder and die cut them using the coordinating die. Don't you just love how the beautiful swirl designs pop on the cardstock with this simple technique?

Happy Easter Basket Card by Juliana Michaels featuring Newton's Nook Designs Beautiful Spring

Since I knew I was going to make an Easter card, those cute little eggs had to have a basket. I created the basket by weaving 1/2 inch strips of kraft cardstock. 

Happy Easter Basket Card by Juliana Michaels featuring Newton's Nook Designs Beautiful Spring

The grass is die cut using the Newton's Nook Designs Land Borders grass die. I trimmed off little pieces of it and stuck them in between the eggs, as I filled the basket. I used double sided foam tape to give the eggs, grass and basket a bit of dimension.

Happy Easter Basket Card by Juliana Michaels featuring Newton's Nook Designs Beautiful Spring

The final touches were a die cut a banner for the Happy Easter sentiment and a piece of jute tied around the basket.

Now it's time to finish up some more cards for the Spring Coffee Lover's Blog Hop using the Newton's Nook Newton Loves Coffee set!

Stamping with the Back of your Clear Stamps | Sunny Studio Turtley Awesome

Happy Saturday! I'm so happy to share with you that I'm guesting for Sunny Studio Stamps with their Spring release. Included in that release is the Turtley Awesome stamp and die set and if you don't know, I kind of have a thing for turtles! Today, I'm going to share a quick step by step tutorial with you on how to create a repeat background like I did and how to add color using the back of your clear stamps.

Turtlely Awesome Birthday Card by Juliana Michaels featuring Sunny Studio Stamps Turtley Awesome Stamp Set and a tutorial on How to Create a Stamped Background Pattern & Stamp with the Back of your Clear Stamps

How to Create a Stamped Background Pattern & Stamp with the Back of your Clear Stamps 


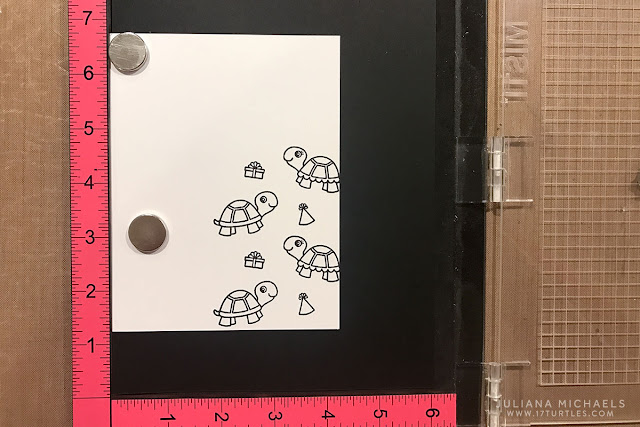
For this technique, I used a MISTI stamp positioning tool, but you could also use a large stamp block and grid paper to achieve the same look. My cardstock is 4.25 x 5.5 inches. I later trimmed it to 3.75 x 5 inches to adhere to my card front.

How to Create a Stamped Background Pattern and How to Stamp with the Back of your Clear Stamps tutorial by Juliana Michaels featuring Turtley Awesome stamp set by Sunny Studio Stamps

Begin by creating a small cluster with the stamps. Position them so they will stamp on the bottom right hand side of your paper. Close the lid to pick up the stamps, ink your stamps, close the lid and stamp the image.

How to Create a Stamped Background Pattern and How to Stamp with the Back of your Clear Stamps tutorial by Juliana Michaels featuring Turtley Awesome stamp set by Sunny Studio Stamps

Using the ruler on the side of the tool, slide your paper down 1.5 inches and stamp your image again.

How to Create a Stamped Background Pattern and How to Stamp with the Back of your Clear Stamps tutorial by Juliana Michaels featuring Turtley Awesome stamp set by Sunny Studio Stamps

Slide your paper down another 1.5 inches and again stamp your image.

How to Create a Stamped Background Pattern and How to Stamp with the Back of your Clear Stamps tutorial by Juliana Michaels featuring Turtley Awesome stamp set by Sunny Studio Stamps

Repeat this process until you have reached the top edge of your paper. And yes, it's totoally OK if your paper hangs over the edge of the tool when you stamp!

How to Create a Stamped Background Pattern and How to Stamp with the Back of your Clear Stamps tutorial by Juliana Michaels featuring Turtley Awesome stamp set by Sunny Studio Stamps

Now let's stamp the left side of the paper. Create another cluster with your stamps.

How to Create a Stamped Background Pattern and How to Stamp with the Back of your Clear Stamps tutorial by Juliana Michaels featuring Turtley Awesome stamp set by Sunny Studio Stamps

Play around with the placement of the stamps to fill in the space. Stamp your image.

How to Create a Stamped Background Pattern and How to Stamp with the Back of your Clear Stamps tutorial by Juliana Michaels featuring Turtley Awesome stamp set by Sunny Studio Stamps

This time, slide your paper down 1.75 inches using the ruler on the side of the tool as your guide and stamp again.


How to Create a Stamped Background Pattern and How to Stamp with the Back of your Clear Stamps tutorial by Juliana Michaels featuring Turtley Awesome stamp set by Sunny Studio Stamps

Slide your paper down another 1.75 inches and again stamp your image.

How to Create a Stamped Background Pattern and How to Stamp with the Back of your Clear Stamps tutorial by Juliana Michaels featuring Turtley Awesome stamp set by Sunny Studio Stamps

Repeat this process until you have reached the top of the paper. Now you have a fun little background pattern ready to color!

How to Create a Stamped Background Pattern and How to Stamp with the Back of your Clear Stamps tutorial by Juliana Michaels featuring Turtley Awesome stamp set by Sunny Studio Stamps

To add some color, I decided to stamp the turtles with the back side of the stamp. As you know, the back side of all stamps is solid and usually a little larger than the detailed stamp image. This particular set, works really well for this technique because there are 2 turtles facing each other that are the same size. Other shapes that work well for this are designs that are more symmetrical, such as flowers.

How to Create a Stamped Background Pattern and How to Stamp with the Back of your Clear Stamps tutorial by Juliana Michaels featuring Turtley Awesome stamp set by Sunny Studio Stamps

Simply line up the back side of the stamp with the detailed stamp image. Close the MISTI to pick up the stamp, apply some ink and stamp. You'll have to play around with how much to slide the paper down to stamp each image, but if you start at the bottom like you did for the pattern above, you can use the same slide down method.

How to Create a Stamped Background Pattern and How to Stamp with the Back of your Clear Stamps tutorial by Juliana Michaels featuring Turtley Awesome stamp set by Sunny Studio Stamps

There you have it! I fun and trendy looking stamped background that is sure to put a smile on your face when you try this technique. And be prepared for the person you give this card to, to be amazed!

Turtlely Awesome Birthday Card by Juliana Michaels featuring Sunny Studio Stamps Turtley Awesome Stamp Set and a tutorial on How to Create a Stamped Background Pattern & Stamp with the Back of your Clear Stamps

Thanks so much for stopping by and I hope you enjoying learning about how to create a stamped background pattern and how to stamp with the back of your clear stamps.

Thanks Card by Juliana Michaels featuring Sunny Studio Stamps Daffodil Dreams Stamp and Die Set and Vintage Jar Stamp and Die Set

I now invite you to head over to the Sunny Studio blog to see 3 more cards I created. Above is a little sneak peek of one of them using the beautiful Daffodil Dreams stamp set.

Happy St. Patrick's Day | Newton's Nook Designs

Just a quick post to wish everyone a very Happy St. Patrick's Day! I actually happen to be a wee bit Irish...there is an Irish princess on my Dad's side of the family. Because of this, I've always had a bit of thing for this special day. We don't do much with regards to celebrating, but we'll definitely be enjoying a nice bit of corned beef, cabbage and soda bread for dinner.

Happy St. Patrick's Day Shaker Card by Juliana Michaels featuring Newton's Nook Designs Newton's Pot of Gold Stamp Set

I created this card using Newton's Nook Designs Pot of Gold stamp set. The background paper was made by stamping some of the stamps from the set with Versamark Watermark Embossing Ink. I stamped and colored Newton using Prismacolor colored pencils and blended them with Gamsol and a blending stump.


The shaker part was created using the We R Memory Keepers Fuse Tool. This was one of my first attempts at creating a shaker card using this method. I placed the stamped/die cut circle image inside the page protector along with the sequins. I'm not sure if it's my favorite say, but it is a lot less time consuming if your tool is already preheated and ready to go.

Speaking of Newton's Nook Designs, all this week on my blog I've been sharing cards created using stamps and dies from their March release.  Guess what? All of these new goodies are available in their online store starting today. Happy Shopping!

Newton's Nook Designs March Release | Day 4

Hello friends! Welcome to Day 4 of the Newton's Nook March Release! Today we are sharing the new Newton's Rainy Day stamp and coordinating die set. Keep reading to learn about the card I created and then how to enter for your chance to win the Newton's Rainy Day Stamp set!

Newton's Nook Designs March Release 2017

I stamped the adorable Newton image using Black Versafine Ink and colored it with Prismacolor colored pencils. I then die cut the image using the coordinating die.

I'm Here For You Card by Juliana Michaels featuring Newton's Nook Designs Newton's Rainy Day Stamp and Die Set

To create the rainy looking background being the image, I used a new to me technique called "smooshing"!

I'm Here For You Card by Juliana Michaels featuring Newton's Nook Designs Newton's Rainy Day Stamp and Die Set

Distress Ink Smooshing Background

For this technique all you have to do is take a piece of acetate, "smoosh" a Distress Ink pad onto the acetate, spritz it with water and then rub the acetate together a little to mix the ink and water and the "smoosh" it onto your paper. Repeat the "smooshing" to get the amount of coverage you desire. I only used one color - Salty Ocean, but you can do this same technique with multiple colors. Just allow it to dry between each application to build up the layers of color.

I'm Here For You Card by Juliana Michaels featuring Newton's Nook Designs Newton's Rainy Day Stamp and Die Set

Now that you've learned all about smooshing, how about some fun? Would you like to win the “Newton's Rainy Day” Stamp Set? This set will be given away to ONE lucky winner!

Newton's Nook Designs Newton's Rainy Day Stamp Set

Here's how to win:

Comment on the NND blog and Design Team blogs (see list below)! The winner will be chosen at random from the collective reveal posts. Make sure to check out each of their blogs and comment for your chance to win. You will not know which blog has been chosen so the more you comment on the better your chances are of winning! You have until Thursday March 16th at 9pm CST to comment -- winners will be announced on the blog post on Friday, March 17th.

Check out all the awesome Design Team Blogs below to enter:

Newton's Nook Designs March Release | Day 3

Hello friends and welcome to Day 3 of the Newton's Nook March Release! Today we are sharing the new Cottage Garden stamp and coordinating die set. It has a lovely Scandinavian style to it and that certainly inspired the cards I created to share with you. Make sure to keep reading to learn about the card I created and then how to enter for your chance to win the Cottage Garden Stamp set!

Newton's Nook Designs March Release 2017

Thinking Of You Card by Juliana Michaels featuring Newton's Nook Designs Cottage Garden Stamp Set

One of my favorite places to look for inspiration is Pinterest, and that is where I headed before I started to create with this stamp set. I typed Scandinavian designs into the search bar and came across this fun tote bag image. Immediately, I was inspired to create a similar type pattern using a bunch of the images from the stamp set.


Stamped Scandinavian Pattern Card Design | Featuring Newton's Nook Cottage Garden Stamp Set, MISTI and Distress Ink

To create the pattern, I began by placing a piece of watercolor paper, cut to 4x5.25 inches, into the corner of my MISTI. I then played around with where to position all of the images and one sentiment until the card was covered with images. To fill the space to the right of the little flower, I stamped that image 2 more times to create a row of flowers. Once I had my pattern figured out, I was ready to start stamping.

Stamped Scandinavian Pattern Design | Featuring Newton's Nook Cottage Garden Stamp Set, MISTI and Distress Ink

The entire pattern is stamped with Versamark Watermark Embossing Ink and then heat embossed with white embossing powder. I then applied Distress Ink using a foam blending tool.

Stamped Scandinavian Pattern Card Design featuring Newton's Nook Cottage Garden Stamp Set, MISTI and Distress Ink by Juliana Michaels

Next, I flicked a little water onto the paper using a paint brush and then dabbed it dry with a paper towel. The final touch was to tie a piece of jute around the panel and attach it to my card base.

Stamped Scandinavian Pattern Card Design featuring Newton's Nook Cottage Garden Stamp Set, MISTI and Distress Ink by Juliana Michaels

By using the MISTI to create this pattern, I was able to easily stamp this image multiple 

Stamped Scandinavian Pattern Card Design featuring Newton's Nook Cottage Garden Stamp Set, MISTI and Distress Ink by Juliana Michaels

Don't you just love it when you can quickly and easily create a great set of cards? Beside being super simple and fast, think of all the fun colors you could use to create your own set!

Stamped Scandinavian Pattern Card Design featuring Newton's Nook Cottage Garden Stamp Set, MISTI and Distress Ink by Juliana Michaels

Now let's have some fun with a little giveaway! Would you like to win the “Cottage Garden” Stamp Set? This set will be given away to ONE lucky winner!

Newton's Nook Designs Cottage Garden Stamp Set

Here's how to win: Comment on the NND blog and Design Team blogs (see list below)! The winner will be chosen at random from the collective reveal posts. Make sure to check out each of their blogs and comment for your chance to win. You will not know which blog has been chosen so the more you comment on the better your chances are of winning! You have until Thursday March 16th at 9pm CST to comment -- winners will be announced on the blog post on Friday, March 17th.

Check out all the awesome Design Team Blogs below to enter:

Newton's Nook Designs March Release | Day 2

Welcome to Day 2 of the Newton's Nook March Release! Today the new Lovable Laundry stamp and coordinating Stitched Onesie die is being revealed. This set is perfect for welcoming and celebrating all the little ones that have arrived or who will soon be here. Make sure to keep reading to learn about the card I created and then how to enter for your chance to win the Lovable Laundry stamp set!

The little onesies in this set, just begged to be hung on a clothesline and I also couldn't resist creating both a little boy and little girl version.

Welcome Baby Cards by Juliana Michaels featuring Newton's Nook Designs Lovable Laundry Stamp and Die Set

To create my card, I began by creating the cloud background using the new Sky Border Die Set. I used a similar die cutting technique to create this background as the one I used in creating the Cloud Background on my Happy Birthday card featuring Winton Takes Flight set.


Welcome Baby Boy Card by Juliana Michaels featuring Newton's Nook Designs Lovable Laundry Stamp and Die Set

Once I had die cut the sky, I then die cut some grass using the grass die from the Lawn Borders Die Set. Next, I stamped and colored each of the onesies and then die cut them using the coordinating Loveable Laundry Die. I attached a length of jute to the card and then adhered the onesies with double sided foam tape to give them a little dimension.

Welcome Baby Card by Juliana Michaels featuring Newton's Nook Designs Lovable Laundry Stamp and Die Set

Here's a closer look at the little girl version. I used some of the same stamps, I just switched out the colors a bit to give it a more "feminine" color scheme.

Welcome Baby Girl Card by Juliana Michaels featuring Newton's Nook Designs Lovable Laundry Stamp and Die Set

Now onto the fun stuff! 
Would you like to win the “Lovable Laundry” Stamp Set? 
This set will be given away to ONE lucky winner!

Lovable Laundry Stamp Set by Newton's Nook Designs

Here's how to win:

Comment on the NND blog and Design Team blogs (see list below)! The winner will be chosen at random from the collective reveal posts. Make sure to check out each of their blogs and comment for your chance to win. You will not know which blog has been chosen so the more you comment on the better your chances are of winning! You have until Thursday March 16th at 9pm CST to comment -- winners will be announced on the blog post on Friday, March 17th.


Check out all the awesome Design Team Blogs below to enter:

Newton's Nook Designs March Release | Day 1

Welcome to Day 1of Newton's Nook March Release! I'm so happy to have you stop by for a visit. The first set being shared from this release is called Winton Takes Flight and a fun new die set called Sky Borders. Winston is adorable as he flies by and wishes you a variety of sentiments from Happy Birthday to Hello! Make sure to keep reading to learn about the card I created and then how to enter for your chance to win the Winton Takes Flight Stamp set!
Newton's Nook Designs March Release 2017

As soon as I saw Winston piloting that cute little airplane, I was immediately inspired to incorporate the Sky Borders Die Set to create a cloudy sky background. Here's how I did it:

Happy Birthday Card by Juliana Michaels featuring Newton's Nook Designs Winston Takes Flight Stamp and Die Set and Sky Border Dies

Inlaid Die Cut + Distress Ink Cloud Background

Cut a piece of watercolor paper to 4 x 5.25 inches. 
Use a piece of low tack tape to hold the die in place near the bottom of the card. Run it through your manual die cutting machine. 
Move the die up a little higher and slide it over a bit to the right or left on the paper, tape it in place and run it through your die cut machine.

Die Cut + Distress Ink Cloud Background Tutorial by Juliana Michaels featuring Newton's Nook Designs Sky Borders Die Set

Repeat this same process making sure to move the die a little bit to the left or right. You want to try to offset the shapes so that each cut doesn't line up exactly.
Die Cut + Distress Ink Cloud Background Tutorial by Juliana Michaels featuring Newton's Nook Designs Sky Borders Die Set

Next, use foam ink blenders to apply Tumbled Glass Distress Ink to the bottom edge of each cut piece. Remember to tap off some of the excess ink before you start applying the ink to the paper. Lightly blend the ink toward the top of each piece.

Die Cut + Distress Ink Cloud Background Tutorial by Juliana Michaels featuring Newton's Nook Designs Sky Borders Die Set

Now apply Salty Ocean Distress Ink to the bottom edge and again make sure to tap off some of the excess ink before you begin applying the ink. After you've completed the inking process, adhere your die cut & Distress Ink cloud background to your card front. 

Die Cut + Distress Ink Cloud Background Tutorial by Juliana Michaels featuring Newton's Nook Designs Sky Borders Die Set

I hope you enjoyed learning how to use the new Newton's Nook Sky Border to create a Die Cut + Distress Ink Cloud Background!

Happy Birthday Card by Juliana Michaels featuring Newton's Nook Designs Winston Takes Flight Stamp and Die Set and Sky Border Dies

Now for some fun! Would you like to win the “Winston Takes Flight” Stamp Set?
This set will be given away to ONE lucky winner!

Newton's Nook Designs Winston Takes Flight Stamp Set


Here's how to win:

Comment on the NND blog and Design Team blogs (see list below)! The winner will be chosen at random from the collective reveal posts. Make sure to check out each of their blogs and comment for your chance to win. You will not know which blog has been chosen so the more you comment on the better your chances are of winning! You have until Thursday March 16th at 9pm CST to comment -- winners will be announced on the blog post on Friday, March 17th.

Check out all the awesome Design Team Blogs below to enter:

Subscribe