Rainbow Stenciled Background

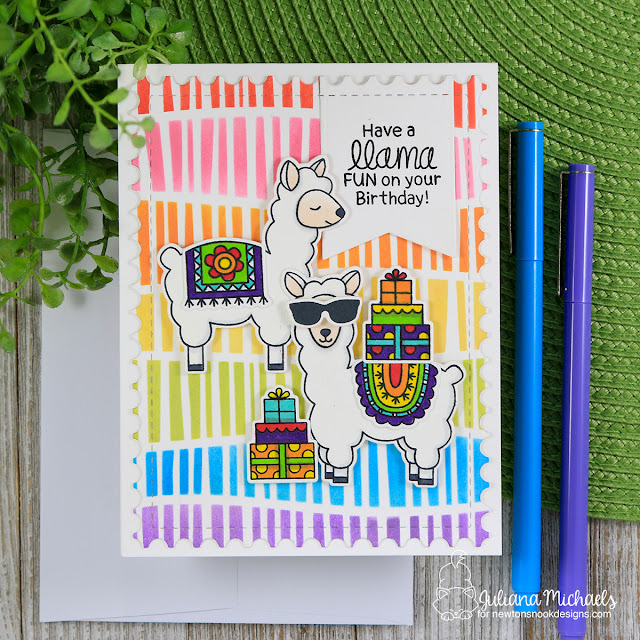
Thanks to Newton's Nook Designs, stenciled backgrounds have quickly become a favorite way for me to dress up a card. Today, I'm sharing how to create a Rainbow Stenciled Background using the Serene Stencil by Newton's Nook Designs.

Llama Fun Birthday Card with Rainbow Stenciled Background by Juliana Michaels featuring Newton's Nook Designs Loveable Llamas Stamp Set and Serene Stripes Stencil

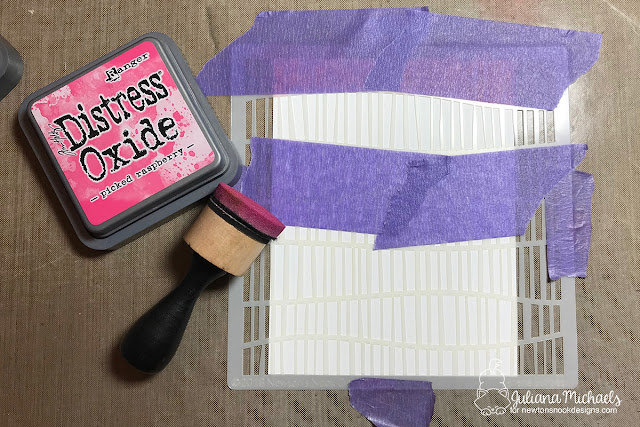
First, cut a piece of white cardstock to 4.25 x 5.5 inches. Apply a little bit of adhesive to the backside of the paper to hold it in place on top of your craft mat. Position the Serene Stripes Stencil on top of the paper and use Therm O Web Purple Tape to help hold it in place. Next use the Purple Tape to mask off each section and then blend on some Distress Oxide in rainbow order. Because there are 7 sections on the stencil, I added pink to fill out the rainbow. To minimize unwanted color blending, wipe off the excess ink before you move the tape to the next section.

Rainbow Stenciled Background by Juliana Michaels featuring Newton's Nook Designs Serene Stripes Stencil

After you have ink blended each section, die cut it using the postage edge die from the Fancy Frames Die Set. You are then ready to decorate your card with your favorite critters and sentiment. Here, I've used a couple of adorable llamas from the Loveable Llamas Stamp Set.  I then added a sentiment on a die cut banner from the Frames & Flags Die Set.

Llama Fun Birthday Card with Rainbow Stenciled Background by Juliana Michaels featuring Newton's Nook Designs Loveable Llamas Stamp Set and Serene Stripes Stencil

Do you have a favorite way to use stencils? I hope you enjoyed learning how to create a Rainbow Stenciled Background today!

Newton's Nook Designs 5 Year Celebration Blog Hop

Hello friends and welcome to the Newton's Nook Designs 5 Year Celebration Blog Hop! Today, I'm part of a very special blog hop to help Newton's Nook Designs celebrate their 5 year anniversary. As you visit each blog, you'll find a brand new project featuring products from this weeks July Release. You'll also have the chance to win one of five $25 gift certificates. You can find all the details down below. But first, I have a fintastic card to share with you using one of the new stamp sets from the July Release. Which are now available in the Newton's Nook Designs Shop!

Be A Mermaid Card | Narly Mermaid Stamp Set


For my bit of inspiration, I couldn't pass up creating a card using the Narly Mermaid Stamp Set. I stamped and colored all three mermaids using Chameleon Pens. I then die cut them using the coordinating Narly Mermaids Die Set.

Be A Mermaid Card by Juliana Michaels featuring Newton's Nook Designs Narly Mermaid Stamp Set

For the background, I die cut a piece of white cardstock using the scalloped edge die from the Frames & Flags Die Set. I then positioned a wave die from the Sea Borders Die Set onto this piece and ran it through my die cut machine.  I then positioned the die slightly higher and moved it a bit, so it didn't line up exactly with the first cut and die cut the paper again. I repeated this process three times. I then took a foam ink blending tool and applied Distress Oxide Ink in Mermaid Lagoon to the edges of each piece. To give it a more water-like look, I splattered water onto the paper and dabbed it dry with a paper towel.

Be A Mermaid Card by Juliana Michaels featuring Newton's Nook Designs Narly Mermaid Stamp Set


To complete the card, I put all of the die cut pieces back together and stamped the sentiment to the bottom section. I then adhered the background piece to the card base and attached the mermaid images with double sided foam adhesive.

Newton's Nook Designs 5 Year Celebration Blog Hop


As part of Newton's Nook 5 Year Celebration, they're running a special for one week only! If you spend $60 you can choose 1 of their brand new 2x3 stamp sets for free and if you spend $100 you can choose 2!


Blog Hop Details & Giveaway


Here are all of the Blog Hop and Giveaway details! As I mentioned above, Newton's Nook Designs is giving away a $25 store credit to spend in their online shop to 5 lucky winners! For your chance to win, all you have to do is comment on the NND Design Team and Special Guest blogs (see list below)! The winner will be chosen at random from the collective blog hop posts. Make sure to check out each of their blogs and comment for your chance to win. You will not know which blog has been chosen so the more you comment on the better your chances are of winning! You have until Sunday, July 22 at 9pm EST to comment. Winners will be announced on NND blog post on Monday, July 23 and will need to contact us to claim their prize so make sure you check back to see if you've won!

Special Guests:


Newton's Nook Design Team:

Newton's Nook Designs 5 Year Celebration | Day 4

Hello and welcome to Day 4 of the Newton's Nook Designs 5 Year Celebration! Today we're sharing the final set of stamps for this reveal. There have been so many great products revealed so far, and today is no different. However we do have something a little different for you...a new stamp size! We are showcasing 5 new Mini 2x3 Stamp Sets. Yes, you read it correctly! I'm sharing ideas for just 2 of these adorable new sets, but you'll find inspiration using all of them as you hop along to the other blogs.

Sending Hugs Card | Pina Koala Stamp Set


Ok, does it get any cuter than a koala hugging a pineapple?! I started off coloring this little cutie with Chameleon pens and then die cut him using the coordinating dies. The sentiment is from the Sending Hugs Stamp Set. I stamped it on a banner die cut using the Frames & Flags Die Set and heat embossed it with white embossing powder.

Sending Hugs Card by Juliana Michaels featuring Newton's Nook Designs Pina Koala Stamp Set and Tropical Leaves Stencil

I used the Tropical Leaves Stencil to create the background. To achieve this faded look, grab a foam blending tool and your favorite green color of Distress Oxide. Tap off excess ink onto a craft mat and then apply the ink heavily in one area and spread out from there. The ink with fade as you move away from the center point.

To complete the card I added a scallop edged frame die cut using the Framework Die Set. I then finished it off by layering on the other pieces and popping up the cute koala with double sided foam adhesive.

Sending Hugs Card by Juliana Michaels featuring Newton's Nook Designs Pina Koala Stamp Set and Tropical Leaves Stencil

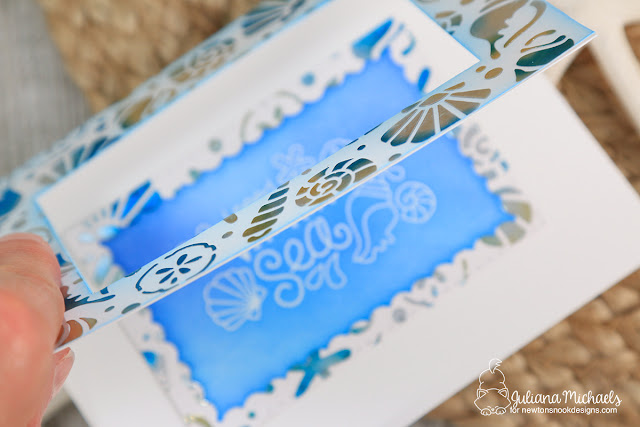
Vitamin Sea Foiled Window Card | Vitamin Sea Stamp Set


For my final card, I created a window card using the new Seashell Stencil and Therm O Web Deco Foil. To achieve the foiled background design, check out this step by step photo tutorial for Stencil and Foiled Backgrounds.

Vitamin Sea Foiled Window Card by Juliana Michaels featuring Newton's Nook Designs Vitamin Sea Stamp Set and Seashell Stencil

Once the background was completed I trimmed it to 4.25 x 5.5 inches to fit on the front of my card base. I then created the window by die cutting out the center of a card base using the inside scallop edged die from the Framework Die Set. I repeated this die cutting with the foiled piece making sure that the openings on the card base and foiled background would line up with each other.
 
Vitamin Sea Foiled Window Card by Juliana Michaels featuring Newton's Nook Designs Vitamin Sea Stamp Set and Seashell Stencil

I used this same die to cut another piece of white cardstock and stamped the sentiment in the center of it using Versamark Embossing Ink. I then heat embossed it with white embossing powder. To make it stand out, I then inked over the sentiment piece with a mix of Distress Oxide in Mermaid Lagoon and Blueprint and wiped off any excess ink from the embossed sentiment with a paper towel. I then adhered the foiled die cut frame on top of it and placed this entire piece inside the window on the inside of the card.

Vitamin Sea Foiled Window Card by Juliana Michaels featuring Newton's Nook Designs Vitamin Sea Stamp Set and Seashell Stencil

Blog Hop & Giveaway


Here's a peek at all 5 of the new 2x3 Mini Stamp Sets and Coordinating Die Sets!
So....now to the fun stuff! Would you like to win a $20 store credit to Newton’s Nook Designs?
ONE lucky comment will be chosen from each reveal day to win!

If you want to win, all you have to do is comment on the Newton's Nook Designs blog and each of the Design Team blogs! Make sure to check out each of their blogs and comment for your chance to win. The winner will be chosen at random from the collective reveal posts. You will not know which blog has been chosen so the more you comment on the better your chances are of winning! You have until Thursday July 19th at 9pm EST to comment -- winners will be announced on the blog post on Friday, July 20th.

Newton's Nook Designs 5 Year Celebration | Day 3

It's Day 3 of Newton's Nook Designs 5 Year Celebration and I'm so happy to have you join me today! We have 2 new stamp sets to share with you that join the family of giant stamp sets including Woof Pack and Company of Cats.

Be Fabulous Shaker Card | Flamingo Flock Stamp Set


First up we have Flamingo Flock! If one flamingo is fun, then you know a whole flock of them is bound to be fabulous! For this card and the second one I'm sharing today, I created a shaker card using Newton's Nook Designs  Double Sided Foam Adhesive and Acetate Sheets.

I began by stamping the Flamingo Flock image onto watercolor paper with Black Versafine Ink. I then heat embossed it with clear embossing powder. Next, I colored in the flamingos using Zig Clean Color Real Brush Markers and a water brush. Once all of the coloring was completed, I die cut the piece using the large scallop edged die from the Frames & Flags Die Set. For the sentiment piece, I die cut a piece of black cardstock using the ticket die from the Framework Die Set. I then stamped the sentiment with Versamark Embossing Ink and heat set it with white embossing powder. Finally, I adhered it with double sided foam tape to the center of the image.

Be Fabulous Shaker Card by Juliana Michaels featuring Newton's Nook Designs Flamingo Flock Stamp Set

To create the shaker part, I used Therm O Web Purple Tape to hold together the large scallop edged die and the stitched rectangle die from the Frames & Flags Die Set. I then die cut a piece of white cardstock and a piece of the Double Sided Foam Adhesive with this to create the shaker window. 
Next, I trimmed a piece of Acetate to size and adhered it to the top of the foam piece. For a touch of color, I inked the edges of the die cut scallop piece with Distress Oxide in Worn Lipstick. I then adhered this piece on top of the acetate.

I then poured some sequins and beads on top of the stamped Flamingo image making sure to keep them to the center of the piece.  Next, I adhered the shaker frame on top of the stamped image. I then finished off the card by adhered the shaker piece to a piece of coordinating cardstock.

• • • For a step by step photo tutorial on how I created this shaker card, feel free to check out this Valentine's Day Shaker Card I created using this same process. • • • 

Be Fabulous Shaker Card by Juliana Michaels featuring Newton's Nook Designs Flamingo Flock Stamp Set

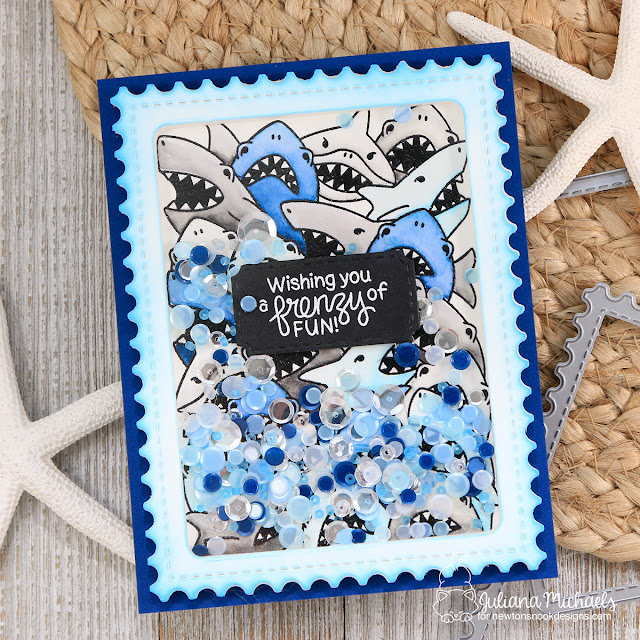
Frenzy of Fun Shaker Card | Shark Frenzy Stamp Set


As I mentioned, I also created a shaker card with the Shark Frenzy Stamp Set as well. The main difference here, besides the stamp set, is that I used the large postage edged die from the Framework Die Set to create the shaker box.

Frenzy Fun Shaker Card by Juliana Michaels featuring Newton's Nook Designs Shark Frenzy Stamp Set

For the coloring, I again used the Zig Clean Color Real Brush Markers. I find these to be a quick way to add color to such a large image. As you can see, I went with a blue and gray color theme to fit with the shark image. I carried the color theme through on the sequins, jewels, ink and cardstock.

Frenzy Fun Shaker Card by Juliana Michaels featuring Newton's Nook Designs Shark Frenzy Stamp Set

5 Year Celebration Blog Hop & Giveaway


Here is a full view of all of the new stamp sets being revealed today. They each have a coordinating die set to go along with them.

Flamingo Flock Stamp Set


Shark Frenzy Stamp Set


So....now to the fun stuff! Would you like to win a $20 store credit to Newton’s Nook Designs?
ONE lucky comment will be chosen from each reveal day to win!

If you want to win, all you have to do is comment on the Newton's Nook Designs blog and each of the Design Team blogs! Make sure to check out each of their blogs and comment for your chance to win. The winner will be chosen at random from the collective reveal posts. You will not know which blog has been chosen so the more you comment on the better your chances are of winning! You have until Thursday July 19th at 9pm EST to comment -- winners will be announced on the blog post on Friday, July 20th.
Newton's Nook Designs 5 Year Celebration | Day 2

Hello all and welcome to Day 2 of Newton's Nook Designs 5 Year Anniversary Celebration Blog Hop! Today we have 2 more fabulous stamp sets to share with you.

Ice Cream Card | Newton's Summer Treats Stamp Set


First up is Newton's Summer Treats. Newton and ice cream? Yes...the purrfect combination!!! To get started on this card, I stamped and colored the image using Chameleon Pens. I added some highlights using a white gel pen. I then die cut the image using the coordinating die set.

Ice Cream Solves Everything Card by Juliana Michaels featuring Newton's Nook Designs Newton's Summer Treats Stamp Set

The ice cream on Newton's cone looks like it could topple over at any moment. I thought it would be fun to create a background of what that might look like using Distress Oxide Ink.  I used the smooshing technique and combined Distress Oxide Ink in Twisted Citron, Picked Raspberry and Squeezed Lemonade. I think it turned out as the perfect background for the image. Once the ink was dry, I adhered the image of Newton with double sided foam adhesive and then stamped the sentiment. 

Ice Cream Solves Everything Card by Juliana Michaels featuring Newton's Nook Designs Newton's Summer Treats Stamp Set

Happy Camper Card | Cozy Camper Stamp Set


Next up is the most adorable little camper stamp set. I just love how you can create a cute little scene by adding a flamingo and table set!

After stamping, coloring and die cutting all the images, I knew I wanted to create a little outdoor camping scene.  To do this, I die cut a piece of white cardstock using the stitched rectangle from the Frames & Flags Die Set. I then took the Sunscape Stencil and inked over it using Distress Oxide in Squeezed Lemonade.

Happy Camper Card by Juliana Michaels featuring Newton's Nook Designs Cozy Camper Stamp Set and Sunscape Stencil

Next, I die cut a piece of white cardstock using the grass die from the Land Borders Die Set and inked it with Distress Oxide in Twisted Citron. I positioned the across the bottom of the panel and trimmed it to size using the stitched rectangle from the Frames & Flags Die Set. To complete the card, I stamped the sentiment in the center of the sun. How cool that it fit just perfectly?!

Happy Camper Card by Juliana Michaels featuring Newton's Nook Designs Cozy Camper Stamp Set and Sunscape Stencil

5 Year Celebration Blog Hop & Giveaway


Here is a full view of all of the new stamp sets being revealed today. They each have a coordinating die set to go along with them.

Newton's Summer Treats Stamp Set


Cozy Camper Stamp Set


So....now to the fun stuff! Would you like to win a $20 store credit to Newton’s Nook Designs?
ONE lucky comment will be chosen from each reveal day to win!

If you want to win, all you have to do is comment on the Newton's Nook Designs blog and each of the Design Team blogs! Make sure to check out each of their blogs and comment for your chance to win. The winner will be chosen at random from the collective reveal posts. You will not know which blog has been chosen so the more you comment on the better your chances are of winning! You have until Thursday July 19th at 9pm EST to comment -- winners will be announced on the blog post on Friday, July 20th.

Newton's Nook Designs 5 Year Celebration | Day 1

Hello friends and welcome to Day 1 of Newton's Nook Designs 5 Year Celebration! Every day this week we're celebrating the 5 year anniversary of Newton's Nook Designs with a fun blog hop and fabulous product release! There are SO many new products that are sure to get your creative juices flowing and they are just purrfect for a variety of summer themed cards and projects.

Mermaid Card | Purr-maid Newton Stamp Set


We start off today with a new set called Purr-maid Newton! I mean seriously does it get any cuter than Newton as a mermaid?!

Let's Be Mermaids Card by Juliana Michaels featuring Newton's Nook Designs Purrmaid Newton Stamp Set and Tropical Fish Stencil

To get started, I stamped and colored the images using Chameleon Pens. I then die cut them using the coordinating Purr-maid Newton Die Set. Next, I die cut a piece of white cardstock using the scalloped stitched die from the Framework Die Set. I then dry embossed it using the brand new Tropical Fish Stencil. It's super hard to photograph the embossed detail, but in real life it adds a wonderfully subtle touch of texture.


I then added the sentiment and popped up all of the images using double sided foam adhesive. To complete the card, I adhered the panel to a coordinating piece of patterned paper.

Let's Be Mermaids Card by Juliana Michaels featuring Newton's Nook Designs Purrmaid Newton Stamp Set and Tropical Fish Stencil

Manatee-rific Stamp Set


The next set we're revealing today is the Manatee-rific Stamp Set. This set is super adorable and I just love that one of the manatees has a die that cuts it arms and lets him hold a variety of images. I put a little seashell in his arms!

You're Manatee-rific Card by Juliana Michaels featuring Newton's Nook Designs Manatee-rific Stamp Set, Waves Stencils and Tropical Fish Stencil

The background was created by die cutting the stitched rectangle die from the Frames & Flags Die Set. I then stenciled over it with Distress Oxide Ink in Mermaid Lagoon using the Waves Stencil. I then dry embossed it using the new Tropical Fish Stencil. To help these images pop a bit, I very lightly inked over them with Distress Oxide in Blueprint. I then added a few splatters of water and dabbed them dry. I love how layering these 2 stencils created the look of an underwater scene!


For a fun twist on a card, I created a bit of a fold over design. If you would like the measurements and directions on how to create this, please let me know. I'd be happy to share it in a separate post.


As you can see, this bottom flap opens up revealing more space for your message.

Simply Mermazing Card | Narly Mermaids Stamp Set


The final stamp set we're sharing today is called Narly Memaids. Ok, I know the other sets are super cute, but check out this adorable narwhal! He just looks so hugable! For this card, I began by stamping the coloring the images using Chameleon Pens. I then die cut them using the coordinating Narly Mermaid Die Set. 


To create the background, I die cut a piece white cardstock using the scallop stitched frame from the Framework Die Set. I then used the grass die from the Land Borders Dies Set and the waves die from the Sea Borders Die Set to die cut this piece into sections. I inked the waves with Distress Oxide in Mermaid Lagoon and the sand with Antique Linen. For the back panel, I again dry embossed a piece of white cardstock using the Tropical Fish Stencil. And as I mentioned earlier, it's so hard to photograph this, but I promise it looks amazing in person!


5 Year Celebration Blog Hop & Giveaway


Here is a full view of all of the new stamp sets being revealed today. They each have a coordinating die set to go along with them. 

Narly Mermaids Stamp Set


Purr-maid Newton Stamp Set


Manatee-rific Stamp Set


Here is also a look at the 2 new stencils being added to the already amazing selection of stencils available from Newton's Nook Designs.

Tropical Fish Stencil


Seashells Stencil


So....now to the fun stuff! Would you like to win a $20 store credit to Newton’s Nook Designs?
ONE lucky comment will be chosen from each reveal day to win! 

If you want to win, all you have to do is comment on the Newton's Nook Designs blog and each of the Design Team blogs! Make sure to check out each of their blogs and comment for your chance to win. The winner will be chosen at random from the collective reveal posts. You will not know which blog has been chosen so the more you comment on the better your chances are of winning! You have until Thursday July 19th at 9pm EST to comment -- winners will be announced on the blog post on Friday, July 20th.

Subscribe