Showing posts with label Gift Wrap. Show all posts

Festive Bouquet Gift Bags and Tags | Tim Holtz Sizzix Christmas 2021

Hey crafty friends! The holidays are upon us and for many of this involves some gift giving. Today I'm sharing a set of handmade Festive Bouquet gift bags and tags featuring the gorgeous Tim Holtz Festive Bouquet Thinlits that were part of his 2021 Sizzix release. These are a perfect way to add a touch of handmade cheer as you wrap gifts for all the special people in your life!

Festive Bouquet Gift Bags and Tags by Juliana Michaels featuring Tim Holtz Sizzix Festive Bouquet Thinlits

I began by die cutting multiples of the poinsettia and greenery from Distress Heavystock. I then used a foam ink blending tool to apply Distress Ink to the various pieces. Here are the colors I used to create the two flowers:
Pink flowers - Kitsch Flamingo, Spun Sugar, Squeezed Lemonade, Twisted Citron, Mowed Lawn and inked the edges with Gathered Twigs
Red Flowers - Festive Berries, Aged Mahogany, Mustard Seed, Fossilized Amber, Peeled Paint, Rustic Wilderness, and inked the edges with Gathered Twigs

Festive Bouquet Gift Bags and Tags by Juliana Michaels featuring Tim Holtz Sizzix Festive Bouquet Thinlits

Once the flowers were assembled I adhered them to a die cut created using the Seal Switchlets Embossing Folder and Dies. This products puts a new twist on die cutting because the embossing folder uses embedded magnets to hold 3 different Framelits (die) in place. The designs are interchangeable and can be switched out to create 3 different looks.


The Seals, were die cut and embossed from Distress Heavystock. Using my finger, I lightly applied Sizzix Gold Luster Wax over the raised areas on the paper.


For the center part of each seal and the strips across each gift bag I took a piece of Distress Heavystock and stamped the music note stamp from the Tim Holtz Music and Advert Stamp Set with embossing ink and then heat embossed it with gold embossing powder. I then either cut a strip to fit across the bag or used the largest of the Stacked Circle Thinlits to die cut a circle.

Festive Bouquet Gift Bags and Tags by Juliana Michaels featuring Tim Holtz Sizzix Festive Bouquet Thinlits

To create the tag, I simply punched a hole in the top of the seal and tied it to the gift bag using a piece of hand dyed seam binding. This was dyed using Spun Sugar Distress Spray.

For the sentiments on each piece, I used the Tim Holtz Christmas Tiny Text Stamp Set and heat embossed them with gold embossing powder. I then trimmed them to size and adhered them to the seals.


I hope you enjoyed this bit of gift bag and tag inspiration featuring the Tim Holtz Festive Bouquet Thinlits.

Festive Bouquet Gift Bags and Tags by Juliana Michaels featuring Tim Holtz Sizzix Festive Bouquet Thinlits

Finished Sizes: Tags 3x3 inches, Gift Bags 4x5.25 inches

Supplies

You can find the products I used to create these Festive Bouquet Gift Bags and Tags below along with compensated affiliate links to Scrapbook.com. These links are at absolutely no extra cost to you. If you want to learn more about what an affiliate link is, you can see my full affiliate and product disclosure statement here.

Trick or Treat Halloween Gift Bags & Cards

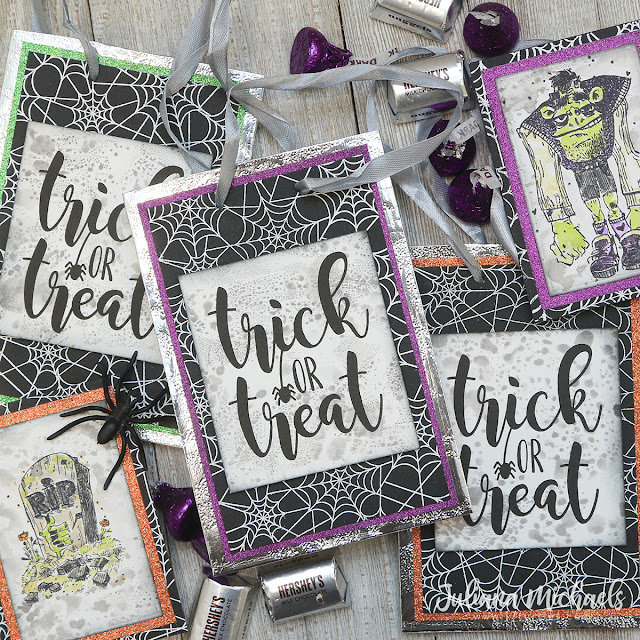
Yes, I know Halloween is almost here, but I'm still crafting away and looking for any excuse I can find to create with some Halloween themed products that I haven't had time to play with just yet. Today I'm sharing this set of Trick or Treat Halloween Gift Bags and Cards that I made for my husband to take to his coworkers. A great excuse right?!

Trick or Treat Halloween Gift Bags and Cards by Juliana Michaels featuring Scrapbook.com Spider Web Slimline Stamp, Rainbow Glitter Paper Pad and Tim Holtz Monster's Reunion Stamp Set

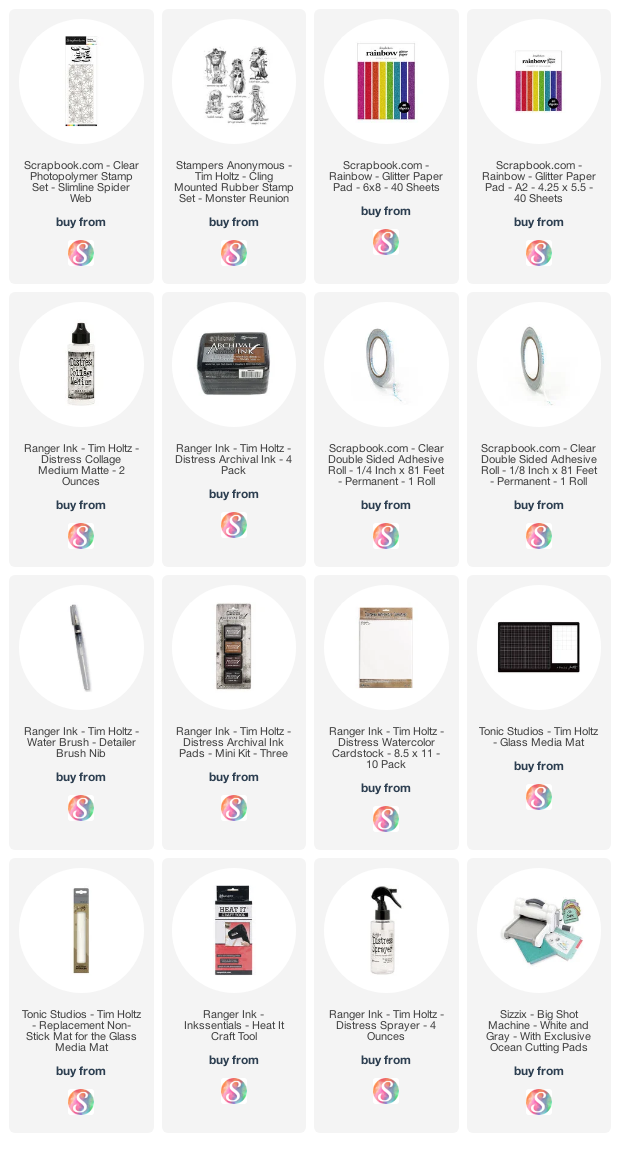
I began making the set of cards by stamping each of the monsters from the Monster's Reunion Stamp Set onto Distress Watercolor paper using Black Soot Archival Ink, making sure not to apply ink to the sentiment that is a part of each of these stamps. I then colored each image by smooshing some Distress Ink onto my craft mat and then using a waterbrush to apply the color to each area. To create the distressed background, I smooshed the edges into Hickory Smoke Distress Ink that I had smooshed onto my craft mat and added a bit of water to from the waterbrush so that the droplets of ink were small.


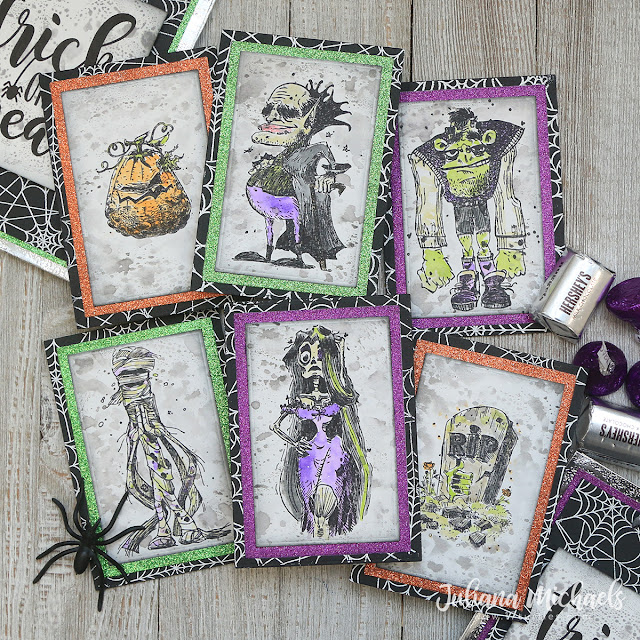
Once dry, I die cut the image using the Scrapbook.com Nested A2 Rectangle Dies. This was then adhered to another rectangle die cut from a glitter paper found in the Rainbow Glitter Paper Pad.  The final layer for the card was created by stamping the spider web from the Spider Web Slimline Stamp onto black cardstock using an embossing ink. I sprinkled it with white embossing powder and heat embossed it. This process was repeated for each image to create a total of 6 cards. 


I picked up the treat bags from the gift wrap section of my local dollar store. They are a silver metallic paper with a slightly funky embossed pattern on them, but I knew I was going to cover them with paper so that didn't really bother me.

To cover each bag, I once again used the Scrapbook.com A2 Nested Rectangle Dies and cut a piece of glitter paper and then a piece of the black cardstock that I stamped and heat embossed using the Spider Web Slimline Stamp. To finish off each bag, I stamped the Trick or Treat sentiment and ink smooshed it with a bit of Hickory Smoke Distress Ink. To adhere all of the layers of paper together I have found Scrapbook.com Double Sided Adhesive to be the perfect adhesive for adhering other papers to glitter paper. 


Well, there you have it...a set of Trick or Treat Halloween Gift Bags and Cards ready to use. It was so fun to be able to use a couple more Halloween stamps that I hadn't had a change to play with just yet to create this set.

Supplies

You can find the products I used to create these projects along with compensated affiliate links to  Scrapbook.com. These links are at absolutely no extra cost to you. If you want to learn more about what an affiliate link is, you can see my full affiliate and product disclosure statement here.

Coffee Gift Card Holders | Tim Holtz Cafe Colorize Thinlits

I'm a coffee lover. Black. No sugar or creamer. But on occasion, I do love a little treat and what better way to share a coffee treat with someone else than a coffee gift card! Today I'm sharing how I created this set of Coffee Gift Card Holders that I created using the new Tim Holtz Cafe Colorize Thinlits. And don't worry, if you prefer tea, you can easily switch it out for a tea cup.

Coffee Gift Card Holders by Juliana Michaels featuring Tim Holtz Cafe Colorize Thinlits

To create each gift card holder, I began by die cutting a piece of Distress White Heavystock paper using the largest tag from the Stacked Tags Thinlits and then scored each tag at 1.5 inches from the end. If you don't have a tag die, you could also use the Mixed Media Heavystock Number 8 Tags. 


I wanted to add a bit of texture and interest to each tag so I dry embossed each one using either the Bubbling or Falling Hearts Thinlits and a silicone rubber pad. I recommend playing around with the combination of plates and or shims to get just the right amount of pressure so that it only embosses and doesn't cut or crease the paper. The type of paper you use along with how old your machine is can impact the need for shims, etc.


After embossing each tag, I added some stamping using the Field Notes and Tiny Toadstools Stamp Sets and Vintage Photo Archival Ink. Next, I ink blended over each tag in one of the following colors: Barn Door, Peeled Paint or Peacock Feathers Distress Ink. For even more texture, I applied some Texture Paste through the Digits and Halftone Stencils.


Once the background for each tag was completed, I adhered strips of 1/8" double sided tape to the sides and and folded it up to create the pocket. And as always, I inked the edges with a bit of Vintage Photo Distress Ink.


Now onto the adorable coffee cups that were created using the Cafe Colorize Thinlit. I cut the various layers from either White Heavystock or various shades of blue, green and brown Classic Kraft Stock. I inked the edges of each of theses pieces with Hickory Smoke Distress Ink before assembling them and then finished each one off with a red heart from the Falling Hearts Thinlit.


With the gift card holders assembled, the final touch was the addition of a custom dyed ribbon using Old Paper Distress Spray and a Hinge Clip distressed with a bit of Mushroom Alcohol Ink. Then all that is left to do is to add your favorite coffee gift card and a little note!


Thanks so much for stopping by today and I hope you enjoyed learning how to create these Coffee Gift Card Holders using a tag and the Tim Holtz Cafe Colorize Thinlits.
 

Supplies

Below you can find the products I used to create this project along with compensated affiliate links to Scrapbook.com. These links are at absolutely no extra cost to you. If you want to learn more about what an affiliate link is, you can see my full affiliate and product disclosure statement here.

Happy Birthday Wrap Around Gift Box - Ocean Themed

Hey friends! I'm back today to share a Happy Birthday Wrap Around Gift Box featuring Sunny Studio Stamps Wrap Around Box Dies. I combined it with the Best Fishes Stamps and Oceans of Joy Stamps to create a fun ocean themed project. And you might remember, I recently shared a sloth themed birthday gift box featuring this Wrap Around Box Dies. Fill these up with treats or a small present and you have the prefect gift for that someone special!

Happy Birthday Wrap Around Gift Box by Juliana Michaels featuring Sunny Studio Stamps Wrap Around Box Dies, Catch A Wave Dies, Woodland Border Dies,Best Fishes Stamps and Oceans of Joy Stamps,

Happy Birthday Wrap Around Gift Box

Hello Friends, long time no post!  I'm so very happy to back with you after taking a break to move into our new home! Today I'm sharing a Happy Birthday Wrap Around Gift Box featuring Sunny Studio Stamps brand new Wrap Around Box Dies, Silly Sloths Stamps and Surprise Party Paper Pad! A full supply list can be found below.

Happy Birthday Wrap Around Gift Box featuring Sunny Studio Stamps Wrap Around Box Dies, Silly Sloth Stamps and Surprise Party 6x6 Paper Pad

Easter Treat Bag | Newton's Nook Designs

Hello Friends! Easter will be here soon and I for one am super excited that the Easter Candy is now available! My personal favorite are Reese's Easter Eggs and I've been known to hoard bags of them and eat on them for months after Easter has come and gone! Although Easter is about more than just the candy, it is fun to share these sweet treats with family and friends. While trying to think of a fun way to do this, I had a light bulb moment to create an Easter Treat Bag using Newton's Nook Designs Frames and Flags Die Set. And who doesn't love getting more out of their dies and using them in unexpected ways?! To learn how I created this Easter Treat Bag, keep reading for all the details!

Easter Treat Bag by Juliana Michaels featuring Newton's Nook Designs Frames & Flags Die Set and Newton's Easter Basket Stamp Set

To get started, die cut 2 scalloped frames using the large die from the Frames and Flags Die Set. Score each piece at 4 inches and fold along the score lines.

Easter Treat Bag Tutorial by Juliana Michaels featuring Newton's Nook Designs Frames & Flags Die Set

Overlap them slightly, making sure to line up the scallops, and adhere them together.

Easter Treat Bag Tutorial by Juliana Michaels featuring Newton's Nook Designs Frames & Flags Die Set

Next, die cut a panel using the smaller frame from the Frames and Flags Die Set. Dry Emboss it using the Cloudy Sky Stencil and your manual die cutting machine. (I use a Spellbinders Platinum 6 and just follow the instructions the come with the machine on how to layer the pieces and what platforms to use.) Apply Distress Oxide Ink using a foam blending tool to bring out the embossed design. Adhere this piece to the front of the treat bag and trim off the excess.

Easter Treat Bag Tutorial by Juliana Michaels featuring Newton's Nook Designs Frames & Flags Die Set

Layer on a piece of die cut grass using the grass die from the Lawn Borders Die Set. Stamp, color and die cut your image and adhere using double sided foam adhesive. For my Easter Treat Bag, I used one of the images from the Newton's Easter Basket Stamp Set.

Punch a 5/16 inch hole in the center top of the front of the treat bag. Die cut the tag hole using the Fancy Edges Tag Die Set from white cardstock and adhere over the punched hole.

Easter Treat Bag Tutorial by Juliana Michaels featuring Newton's Nook Designs Frames & Flags Die Set

Use a 1/8 inch punch to create 2 holes in the back of the treat bag. Thread a piece of ribbon through the holes.

Easter Treat Bag Tutorial by Juliana Michaels featuring Newton's Nook Designs Frames & Flags Die Set

Place your favorite candy, in my case it's Reese's Easter Eggs, in a cellophane bag and tie the ribbon around the bag to close it. Trim off any extra from the top of the bag.

Easter Treat Bag Tutorial by Juliana Michaels featuring Newton's Nook Designs Frames & Flags Die Set

Close the treat bag and thread the ribbon through the hole in the front of the treat bag. Thread the ribbon through a small tag with the sentiment and then tie a bow.

Easter Treat Bag Tutorial by Juliana Michaels featuring Newton's Nook Designs Frames & Flags Die Set

Your treat bag is now ready to give to friends and family as you celebrate Easter!

Easter Treat Bag by Juliana Michaels featuring Newton's Nook Designs Frames & Flags Die Set and Newton's Easter Basket Stamp Set

 Here's an up close look at the front of the treat bag.

Easter Treat Bag by Juliana Michaels featuring Newton's Nook Designs Frames & Flags Die Set and Newton's Easter Basket Stamp Set

I hope you enjoyed learning how to create this Easter Treat Bag and also how to think outside the box a bit, when it comes to using your dies for something different than their intended purpose!

Make Your Holiday Shine with Foil-Mates™ | Gina K. Designs

Hello friends and welcome to the Gina K. Designs Make Your Holiday Shine with Foil-Mates™ Blog Hop! Today the design team from Gina K. Designs is sharing ideas for creating Christmas Gift Wrap and Cards using the brand new Foil-Mates™ Holiday Release. All of the new products are perfect for creating easy, but elegant looking Christmas cards and gift wrap for the upcoming holiday season. You can check out all of these new products in the Gina K. Designs Shop under the Foil-Mates™ Collection.

Make sure to keep reading for some inspiration using these new products and then hop along for your chance to win a $25 gift certificate and to see more festive inspiration from the Gina K. Design Team. All of the details about the hop and giveaway are listed below.

Coordinating Christmas Gift Bag and Card | Gina K. Designs Foil-Mates™


To create the background on my coordinating Christmas gift bag and card I used a full sheet of the Foil-Mates™ Background - Holiday Flora on the bag and a half sheet on the card. I then trimmed each piece to size and matted it on a piece of Black Onyx cardstock.

I foiled both of these with a piece of Fancy Foils in Radiant Red. All of the new foils have the shimmer and shine of glitter, but without all the mess. You gotta love that! Make sure you hang onto the scraps of foil from both of these. Below, I have a bonus project to share with you on how to use some of these scraps.

Coordinating Christmas Gift Bag and Christmas Card by Juliana Michaels featuring Gina K. Designs Foil-Mates™ and Fancy Foils

The tag on the gift bag was created using the Foil-Mates™ Sentiments  - Tag Tidings. These sentiments were designed to be used with the new Gina K. Designs Decorative Tag Dies. I foiled the tag with a piece of Fancy Foils in Grass Green.

Detail Christmas Gift Bag by Juliana Michaels featuring Gina K. Designs Foil-Mates™ and Fancy Foils

The sentiment on the card was created using the Foil-Mates™ Sentiments - Holiday Cheer.  I die cut it using the Gina K. Designs Stitched Circle Dies and then foiled it with Fancy Foils in Grass Green.

Christmas Card by Juliana Michaels featuring Gina K. Designs Foil-Mates™ and Fancy Foils

For the final decorative touch on both the gift bag and card, I added some of the new Gingham Fancy Ribbon.

Christmas Card by Juliana Michaels featuring Gina K. Designs Foil-Mates™ and Fancy Foils

Bonus Project | Merry Christmas Card with Fancy Foil Scraps


I told you to hang onto those Foil Scraps and now I'm going to share with you a fun way to use them. I'll admit most of my scraps end up in the trash. However, after I created the Christmas card above, I knew I had to save that scrap to create another card. It was just too pretty to throw away!

If you've never used your scraps to foil with, I will walk you through the process. To start with, you will need some Therm O Web Deco Foil Toner Sheets. Cut the Toner Sheet to size, place the scrap of Fancy Foil on top of it, position it between a piece of parchment paper and run this through your preheated laminator. Peel off the transfer sheet to reveal the foiled design. The Toner Sheets are black and I wanted to add more color, so I trimmed a piece of Fancy Foils in Grass Green, placed it on top of the previously foiled toner sheet and ran it back through the laminator. Now it is covered in red and green foil! 

For more inspiration on using your Fancy Foil Scraps, check out these Birthday Cards I created with Gina K. Designs Foil-Mates™.

Merry Christmas Card by Juliana Michaels featuring Gina K. Designs Foil-Mates™ and Fancy Foils Scraps

For this card, I used the Foil-Mates™ Sentiments - Joyful Holiday and foiled it with Fancy Foil in Grass Green. I then die cut is using the Gina K. Designs Stitched Rectangles, which work perfectly with these sentiments.

Merry Christmas Card by Juliana Michaels featuring Gina K. Designs Foil-Mates™ and Fancy Foils Scraps

Blog Hop + Giveaway


Would you like to win a $25 gift certificate to Gina K Designs? If your answer is yes, then all you have to do is visit each blog along the hop (listed below) and leave a comment. One lucky winner will receive a $25 Gina K Designs gift certificate!

Juliana Michaels (you are here)

Supplies


Are you interested in the Gina K Designs supplies I used to create these cards? To make them easy for you to find, I have listed them below. Affiliate links are used at no additional cost to you.


Subscribe