Showing posts with label Sizzix Christmas 2021. Show all posts

Festive Bouquet Gift Bags and Tags | Tim Holtz Sizzix Christmas 2021

Hey crafty friends! The holidays are upon us and for many of this involves some gift giving. Today I'm sharing a set of handmade Festive Bouquet gift bags and tags featuring the gorgeous Tim Holtz Festive Bouquet Thinlits that were part of his 2021 Sizzix release. These are a perfect way to add a touch of handmade cheer as you wrap gifts for all the special people in your life!

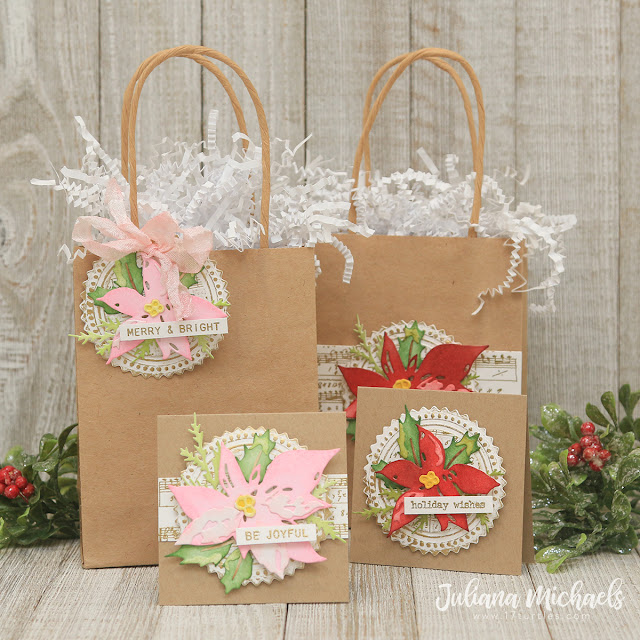
Festive Bouquet Gift Bags and Tags by Juliana Michaels featuring Tim Holtz Sizzix Festive Bouquet Thinlits

I began by die cutting multiples of the poinsettia and greenery from Distress Heavystock. I then used a foam ink blending tool to apply Distress Ink to the various pieces. Here are the colors I used to create the two flowers:
Pink flowers - Kitsch Flamingo, Spun Sugar, Squeezed Lemonade, Twisted Citron, Mowed Lawn and inked the edges with Gathered Twigs
Red Flowers - Festive Berries, Aged Mahogany, Mustard Seed, Fossilized Amber, Peeled Paint, Rustic Wilderness, and inked the edges with Gathered Twigs

Festive Bouquet Gift Bags and Tags by Juliana Michaels featuring Tim Holtz Sizzix Festive Bouquet Thinlits

Once the flowers were assembled I adhered them to a die cut created using the Seal Switchlets Embossing Folder and Dies. This products puts a new twist on die cutting because the embossing folder uses embedded magnets to hold 3 different Framelits (die) in place. The designs are interchangeable and can be switched out to create 3 different looks.


The Seals, were die cut and embossed from Distress Heavystock. Using my finger, I lightly applied Sizzix Gold Luster Wax over the raised areas on the paper.


For the center part of each seal and the strips across each gift bag I took a piece of Distress Heavystock and stamped the music note stamp from the Tim Holtz Music and Advert Stamp Set with embossing ink and then heat embossed it with gold embossing powder. I then either cut a strip to fit across the bag or used the largest of the Stacked Circle Thinlits to die cut a circle.

Festive Bouquet Gift Bags and Tags by Juliana Michaels featuring Tim Holtz Sizzix Festive Bouquet Thinlits

To create the tag, I simply punched a hole in the top of the seal and tied it to the gift bag using a piece of hand dyed seam binding. This was dyed using Spun Sugar Distress Spray.

For the sentiments on each piece, I used the Tim Holtz Christmas Tiny Text Stamp Set and heat embossed them with gold embossing powder. I then trimmed them to size and adhered them to the seals.


I hope you enjoyed this bit of gift bag and tag inspiration featuring the Tim Holtz Festive Bouquet Thinlits.

Festive Bouquet Gift Bags and Tags by Juliana Michaels featuring Tim Holtz Sizzix Festive Bouquet Thinlits

Finished Sizes: Tags 3x3 inches, Gift Bags 4x5.25 inches

Supplies

You can find the products I used to create these Festive Bouquet Gift Bags and Tags below along with compensated affiliate links to Scrapbook.com. These links are at absolutely no extra cost to you. If you want to learn more about what an affiliate link is, you can see my full affiliate and product disclosure statement here.
Woodland Santa Christmas Card | Tim Holtz Sizzix Christmas 2021

The days have been flying by and after a much needed vacation last week, I'm back and ready to begin sharing some more of my Tim Holtz Christmas projects with you. Today, I'm sharing this Woodland Santa Christmas Card and all the details on how it came together.

Woodland Santa Christmas Card by Juliana Michaels Tim Holtz Sizzix Christmas 2021

To get started, I created several backgrounds using Distress Watercolor paper, Distress Spray Stain (DS), and Distress Oxide Sprays (DO) to use for die cutting out the various pieces for the Woodland Santa Colorize. Here are the colors I used for the various layers: 
Santa's Suit: Festive Berry DS, Candied Apple DO, Aged Mahogany Distress Ink Pad to darken the edges
Tree: Rustic Wilderness DS, Peeled Paint DS
Tree Trunk/Santa's Bag: Vintage Photo DS, Gathered Twig DI, Vintage Photo DO
Boots/Belt: Black Soot DS and DO
Beard/Trim: Pumice Stone DS

Once the backgrounds were finished, I die cut all of my layers and assembled the Woodland Santa.
 

Next, I worked on the textured background behind him. For this, I embossed a piece of Distress Watercolor paper using the Cobblestone 3D Texture Fade. I rubbed the Prize Ribbon Distress Ink Pad over the paper, spritzed it with a bit of water, dried it and repeated the spritzing and drying. I then rubbed a touch of Prize Ribbon Distress Oxide over the paper and repeated the spritzing and drying until I was pleased with the look. To create the look of snow, I splattered a bit of white gesso onto the paper. I then die cut it using the largest Stacked Baroque Thinlits. 


I wanted to frame this piece, but since I had used the largest die, I hand cut a piece of Distress Watercolor to create a slightly larger shape to frame it. I ink smoosed it with a touch of Pumice Stone Distress Ink and used the Tim Holtz Paper Distresser to distress the edges.


The background is a piece of kraftstock stamped with the text stamp from the Tim Holtz Stripes and Holiday Type Stamp Set using Vintage Photo Distress Ink. I then inked the edges with Vintage Photo Distress Ink and a blending tool.


To complete the card, I added a sentiment from the Sketch Greenery Stamp Set.

Woodland Santa Christmas Card by Juliana Michaels Tim Holtz Sizzix Christmas 2021

As always, I super appreciate you stopping by and I hope you found a bit of inspiration in this project that you can use!

Supplies

You can find the products I used to create this project along with compensated affiliate links to  Scrapbook.com. These links are at absolutely no extra cost to you. If you want to learn more about what an affiliate link is, you can see my full affiliate and product disclosure statement here.

Winston Snowman Easel Christmas Card | Tim Holtz Sizzix Christmas 2021

Oh, the weather outside is frightful
But the fire is so delightful
And since we've no place to go
Let it snow, let it snow, let it snow!

The weather might not be frightful, but I'm definitely in a Christmas crafting mood! I love this time of year when it's time to start crafting all the things for my two favorite holidays...Halloween and Christmas! Today I'm sharing the Winston Snowman Easel Christmas Card I created for the Tim Holtz Sizzix Christmas 2021 YouTube Live.

I've never created an easel card before, but I was inspired to give it a try after seeing Jennifer McGuire share some recently. If you aren't familiar with them, it's a folded card that stands up, kind of like an art easel and is a super fun way to display your card! The actual easel part of the card is quick and easy to make. I'm going to walk you through the process and before you know it you'll be creating your own easel cards!
 
Snowman Easel Christmas Card by Juliana Michaels featuring the Tim Holtz Winston Colorize Thinlits

To get started, you will begin with the card size of your choosing. I prefer to cut and score my own cards, but you can also use premade card bases as well. Here I'm using an A2 size, cut and scored so it opens vertically. This means you need to cut your paper to be 4.25 inches wide by 11 inches tall. Score the paper at 5.5 inches and then again at 2.75 inches. You will attach your card front or the image of your choice on the half of the card that you have scored in half. Just make sure you only adhere it on the bottom section so that the easel function will work. Someone I know may be have forgotten this the first time they went to attach the card front. 

Once you have created the easel card base it's time to make something to help it stay open when on display. To achieve this all you have to do is place some sort of dimensional piece inside the card such as a strip, a panel or even an embellishment. You can use dimensional foam adhesive to adhere them or even a couple layers of cardstock will do the trick. For my card, I went with the layers of cardstock and placed my sentiment on the strip. Since this part of the card is visible when it's on display, feel free to get creative with this area.


Now that you know all the basics of how to create an easel card, I'm going to share a few details on how I created the front panel using the adorable Winston Colorize Thinlits. I die cut all of the pieces from Distress Watercolor paper. I then applied the various colors using the ink smooshing method except as noted on the body. I also inked all of the edges with Vintage Photo before adhering them together. Here are the Distress Ink colors I used for each piece:
Hat - Salvaged Patina
Scarf - Kitsch Flamingo and Salvaged Patina
Holly - Cracked Pistachio and Kitsch Flamingo
Nose - Carved Pumpkin
Body - Edges inked with Vintage Photo
Eyes - Black Soot


The background panel was created by ink smooshing a bit of Tumbled Glass on Distress Watercolor. Next, I added some stamping using the text image from the Stripes and Holiday Stamp Set using Old Paper Distress Ink and the tiny snowflakes from the Vintage Holidays Stamp Set using Kitsch Flamingo Distress Ink. The next step was the addition of some stencil work using the Dot Fade Layering Stencil and Tumbled Glass Distress Ink. I then inked the edges with Tumbled Glass and then Vintage Photo Distress Ink.


To give the project a bit of snowy sparkle, I die cut the snowflakes using the Mini Paper Snowflakes Thinlits and I used one of the layers from the Snowscape Colorize Thinlits to create the snowdrift. These were both die cut from white Pearl paper in the Sizzix Festive Colors Pearl and Glitter Cardstock Pack.
The back panel of the card front is a piece of Distress Watercolor ink blended just around the edges with Salvaged Patina Distress Ink to create a coordinating cardstock color. I used this same technique to color the paper used on the sentiment strip. Before coloring the paper, I stamped the sentiment from the Tiny Text Christmas Stamp Set using embossing ink and then heat embossed it with clear embossing powder. After I applied the Distress Ink to color the paper, I wiped over the stamped sentiment to remove the ink and reveal the words.

Thanks so much for stopping by today to check out my Snowman Easel Christmas Card featuring the Tim Holtz Winston Colorize Thinlits.

Supplies

You can find the products I used to create these projects along with compensated affiliate links to  Scrapbook.com. These links are at absolutely no extra cost to you. If you want to learn more about what an affiliate link is, you can see my full affiliate and product disclosure statement here.
Subscribe