
I know! I know! Halloween is over, but I didn't have a chance to play with any of the 2021 Tim Holtz Halloween Idea-ology until Halloween weekend. I finally finished up what I made and I decided it's better late than never when it comes to sharing. Today I'm sharing this Curious Things Accordion Junk Journal I made. I put it together using a similar technique as the accordion tag albums I've done in the past, such as this Ghost Town 2 Tag Book and Field Notes Tag Book. However, because these were a little bulkier, I made a few changes that I'll share with you below.

I began by laying out each page with the paper, layers, Ephemera and baseboards I wanted to include. I then inked the edges of everything using Vintage Photo Distress Ink. The top row is the back side and the bottom row is the front side of each page. With these accordion books, you can either decorate both the front and back or you can decorate just the front.

With the layouts planned, I knew I was going to have to figure out a way to accommodate the thickness of each page. Normally I place the pages pretty close together and use Fabric Tape to attach each page. With the bulk I added to these pages, I knew I had to have more space between them so that the book would fold as it should. But then, I realized that the tape was going to show. My solution...paint it using Black Soot Distress Paint.

Once the paint was dry, I adhered the front and back of each page together with just a touch of an adhesive tape runner to the center of each page. The adhesive just needs to be enough to hold them together while you add the Fabric Tape because we are going to sew everything together as you'll see below. When I adhered the Fabric Tape to the pages I made sure to leave about an 1/8" or so gap between the pages.

During this process I realized that the tape was going to show on both side (duh!) so I added a piece of washi tape to the center of the tape to cover up the design on that side. As you can see you still have enough Fabric Tape to stick to the next page. Just make sure your washi tape is not too wide.

I continued this process until all of the pages where connected and the base of my accordion junk journal was complete.

I had also planned to create some pockets. Here I used Scrapbook.com Mint Tape to temporarily hold this pocket in place until I added the machine stitching.

To create this pocket I used the Scrapbook.com Nested DIY Pocket Dies. I added the machine stitching to it before I adhered it to the page.

Once all of the pockets were added, it was time for the machine stitching. I stitched all around the edges of each page about 1/8" from the edge. This held the front and back papers together, but even more importantly, it secured the Fabric Tape. It also added a nice bit of texture and interest to the overall design.

Now let's take a closer look at some of the details. On this Halloween Word Plaque I used the technique that Paula Cheney shared on her Curious Things Project. It was super simple using some Distress Paint, Alcohol Ink and Distress Crayons.


Here is another pocket I made using this cool anatomy piece from the Halloween Layers. I added a bit of patterned paper to the bottom before I sewed along the edges to create the pocket. I then filled it with a couple of tags.

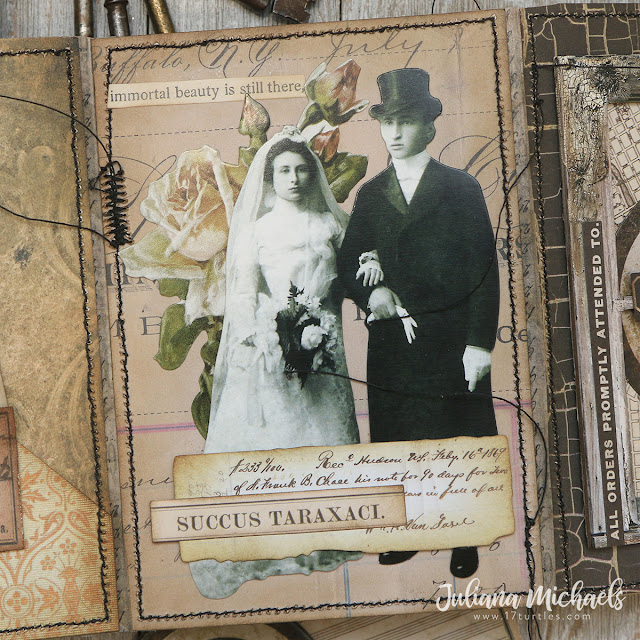
This page features one the frames from the Halloween Baseboards which I dressed up with a couple of floral Ephemera pieces.

Don't these two look dreadfully wicked?! On this page I added a couple of Halloween Paper Dolls along with one of the Halloween Mini Flair.

Now onto the back side of the junk journal.

To create this page, I used a mix of Stickers, Layers, Ephemera, and Baseboards.

On this page, I used that Scrapbook.com Nested DIY Pocket Die that I shared above and filled it with a tag.

Here is another pocket I created using a piece of Worn Wallpaper from a past Halloween release. Don't forget about your stash people!

This page features another Halloween Paper Doll along with some Ephemera and Layers.
Here I used another one of the Window Frame Baseboards that I grunged up with the Distress Crackle paste as I mentioned above.

Here are couple of photos showing the junk journal fully opened. This is the front....

and this is the back.

I hope you enjoyed your visit today and this better late than never Tim Holtz Halloween Idea-ology Curious Things Accordion Junk Journal inspiration!
Supplies
You can find the products I used to create this project along with compensated affiliate links to Scrapbook.com. These links are at absolutely no extra cost to you. If you want to learn more about what an affiliate link is, you can see my full affiliate and product disclosure statement here.


Keep um" coming, never too late for a project...we make when we have time, right?! Thanks for the pics on what all you used...lots of Tim Holtz goodies for sure....
ReplyDelete