Star Christmas Gift Tags Tutorial

Star Christmas Gift Tags Tutorial by Juliana Michaels

I hope your holidays are off to a good start. My December has started off busy as always, but I found the time to create a set of Star Christmas Gift Tags perfect for dressing up a gift bag or present.

Star Christmas Gift Tags Tutorial by Juliana Michaels detail

These tags are easy to create with only a few simple tools and will add a wonderfully festive and homemade feel to all of your gifts this year. If you are interested in creating a coordinating gift bag for these tags, please head over to the Pebbles blog where you will find my Star Christmas Gift Bag Tutorial.

Star Christmas Gift Tags Tutorial 1 by Juliana Michaels

Begin by gathering your supplies. As you can see in my photo, there are quite a few different Photo Hang Tags or Frames to choose from. I used the smaller sized frames that are part of the set. Most of them are neutral in color and pattern so they are perfect for this project. Remove the twine that comes with the frames before you start.

Star Christmas Gift Tags Tutorial 2 by Juliana Michaels

Take one of the smaller Photo Tags or Frames and cut it in half.

Star Christmas Gift Tags Tutorial 3 by Juliana Michaels

Cut a piece of Leaf Chevron patterned paper to 2 x 2.5" to fill the "window" of the frame.

Star Christmas Gift Tags Tutorial 4 by Juliana Michaels

Adhere the patterned paper to the back side of the frame.

Star Christmas Gift Tags Tutorial 5 by Juliana Michaels

Cut a piece of POW! Gold Glitter paper to 3 x 3.5" and center it inside the Knock Out Border Punch using the Mini Stars Border.

Star Christmas Gift Tags Tutorial 6 by Juliana Michaels

Punch the star border.

Star Christmas Gift Tags Tutorial 7 by Juliana Michaels

Apply Xyron Double Sided High Tack Tape to the back side of the frame piece and adhere it to the punched gold glitter paper piece.
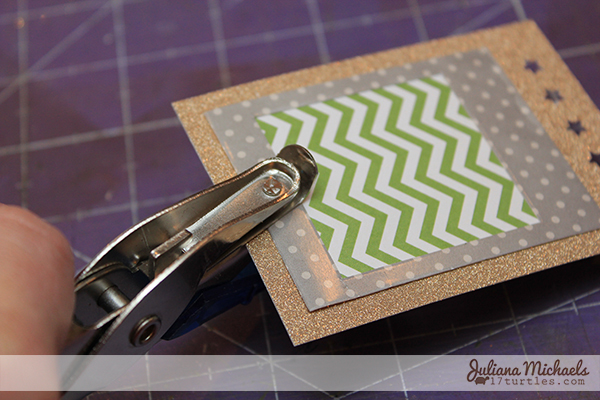
Star Christmas Gift Tags Tutorial 8 by Juliana Michaels

Punch a hole through the gold glitter paper using a 1/8" hole punch. Line up the punch with the existing hole in the Photo Tag/Frame.

Star Christmas Gift Tags Tutorial 9 by Juliana Michaels

Run a 12" length of ribbon through the punched hole creating a loop.

Star Christmas Gift Tags Tutorial 10 by Juliana Michaels

Pull the ends through the loop.

Star Christmas Gift Tags Tutorial 12 by Juliana Michaels

Tighten the loop. The extra length of ribbon can be used to tie your tag to a gift bag or other present as desired.

Star Christmas Gift Tags Tutorial 13 by Juliana Michaels

I knew I wanted to add a sentiment to the front of my tag and I loved that some of the ribbon in the Peppermint Express Ribbon Set was printed with the words "Merry Christmas". When I saw this ribbon, it gave me the idea to cut the ribbon and use it as my sentiment. I cut the ribbon in an inverted "V" shape on one end and then in a "V" shape on the other to cut out the sentiment.

Star Christmas Gift Tags Tutorial 14 by Juliana Michaels

Use Xyron Adhesive Dots to adhere the ribbon to the front of the tag.

Star Christmas Gift Tags Tutorial 15 by Juliana Michaels

I only had 3/8" Dots, so I cut them in half using my Tonic Studios Tim Holtz Craft Scissors. These are seriously the best scissors for cutting anything with adhesive because it won't stick to the blades.

Star Christmas Gift Tags Tutorial 17 by Juliana Michaels

Complete the tag by adding a Peppermint Express Dimensional Star sticker to the center of the frame and your tag is ready to use. Repeat this process with the other Photo Tags/Frames and the Rouge Chevron paper. To add the small gold star you see in the photo below, punch a small gold star from the gold glitter paper and adhere it to the center of the Star sticker using Xyron Adhesive Dots.

Star Christmas Gift Tags Tutorial by Juliana Michaels detail

I hope you enjoyed today's tutorial and are inspired to create your own set of tags to decorate your Christmas gifts this year. As I mentioned above, if you are interested in creating a coordinating gift bag, head over to the Pebbles Blog for my Star Christmas Bag Tutorial.


SUPPLIES

Frames: Pebbles Front Porch Photo Hang Tags
Patterned Paper: Pebbles Basics 12 x 12 Leaf Chevron and Rouge Chevron
Stickers: American Crafts Peppermint Express Remarks Dimensional Adhesive Stars
Ribbon: American Crafts Peppermint Express Value Pack Premium Ribbon
Cardstock: American Crafts POW! Glitter Paper 12 x12 Gold
Punch: American Crafts Knock Outs Border Punch Mini Stars, 1/8" Hole Punch
Scissors: Tonic Studios Tim Holtz Craft Scissors
Paper Trimmer: Tonic Studios 12" Small Base Trimmer
Adhesive: Xyron Mega Runner, Xyron 3/8" Dots, Xyron 1/2" Double Sided Tape

LINKED:
The Pin Junkie Friday Link Party #46
Tatertots & Jello

Julie Nutting Be Inspiring Canvas + Tutorial


I love creating handmade Christmas gifts. I do my best to get crafty with at least a few gifts each year. After seeing the 8" Julie Nutting Dolls by Leaky Shed Studio, I was inspired to create a pair of inspiration canvases...one for each of my nieces. They both love pink and glitter, so selecting a color palette was easy. Especially when I pulled out the BoBunny Isabella collection. Today I am sharing the first of the two canvases. Look for the second one in the coming weeks!

This is a rather involved project, so I thought I would share a detailed tutorial on how I created the canvas. I used a series of mixed media techniques including packing tape transfer, modeling paste with stencils, paper piecing and painting.

Packing Tape Transfer with Patterned Paper

Create the background piece by making your own packing tape transfer with patterned paper. Apply the packing tape in long strips across the paper, making sure to slightly overlap each piece of tape. Once the entire surface is covered. Wet the paper in your sink. Once the paper is saturated, begin rubbing the backside of the paper with your finger. The paper will begin to peel off. Continue rubbing until most of the paper is removed, but be careful not to rub to vigorously or you will remove all of the image and color. After you have removed most of the excess paper, set this piece to the side and allow it to dry.


Adhere the dried packing tape transfer patterned paper to your canvas by laying it over the front of the canvas and then fold the edges over the corners as if wrapping a gift. Use double sided tape or a hot glue gun to secure the packing tape transfer piece to the backside of the canvas.


Paint a coat of Matte Medium or Mod Podge over the surface of the packing tape transfer to help with adhering other media. I used modeling paste and a stencil from The Crafter's Workshop to create the "writing" on the background.


Embellish the canvas with stickers, die cuts, brads and layered chipboard stickers.

The white doily was misted with Tattered Angels Glimmer Mist in Pearl and Glacier. I then wrinkled it and dried it with my heat gun. Then I opened it up and smoothed out some of the wrinkles before attaching the Leaky Shed Studio Ring Frame Large to the top of it. 

The Leaky Shed Studio Ring Frame Large was painted silver using a Krylon Silver Leafing Pen. I then added silver glitter to the inside and outside edges using Glossy Accents as an adhesive for the glitter.


I wasn't quite sure how to "dress" my doll until I talked to a dear friend of mine and fellow Leaky Shed Studio Design Team Member - Robbie Herring. I owe this next technique that I am sharing with you to her! 

I love the details that are laser cut into the Julie Nutting chipboard dolls, and I wanted a way to keep that detail and give the doll's dress more dimension. I was able to achieve this effect by creating a dress using patterned paper and a copy machine. To create the dolls dress use a copy machine and make a two copies of each doll.


Cut the dress out with fine tip scissors. I love my EK Success Cutter Bee Scissors!


Cut out the second dress, but this time cut along all of the lines to create separate pieces.


After you have cut out all of the dress pieces, these are the pieces you will need to create the dress.


Trace around the small pieces with a pencil on the cream colored patterned paper.


Trace around the large dress piece with a pencil on the pink patterned paper.


Again, using scissors, cut around all of the pieces.


Ink the edges of each piece with Ranger Tim Holtz Distress Ink in Vintage Photo.


Use double sided foam tape to adhere the cream colored pieces to the large pink dress piece.
 

Create a lace piece by punching a strip of the cream patterned paper using a lace border punch. Ink the edges with Ranger Tim Holtz Distress Ink in Vintage Photo. 


Lightly mist the strip with water and then pleat it to create the gathers and folds and to help achieve a more dimensional looking skirt.


Adhere lace strip along back side of dress with liquid adhesive. If needed use double sided foam tape in places to help provide more dimension.


Trim off the excess paper, but leave a small amount on each side to fold behind and create a smooth edge. Your paper dress is now complete and ready for your doll.


I hope you enjoyed this rather extensive for me tutorial and give a try at creating some homemade Christmas gifts this year! Thank you for stopping by today!

JULIE NUTTING BE INSPIRING CANVAS | SUPPLIES

Chipboard: Leaky Shed Studio / Julie Nutting Princess 8" and Ring Frame Large
Patterned Paper: BoBunny Isabella / Isabella and Divine (used for the dress); Gossamer (used for the packing tape transfer)
Stickers, Layered Chipboard, Brads and Die Cuts: BoBunny Isabella
Adhesive: Scotch Double Sided Foam Mounting Tape, Xyron Double Sided High Tack Tape, Ranger Glossy Accents (used to apply glitter)
Paint: Krylon Silver Leafing Pen; Plaid Folk Art Acrylic Paint in Skintone and Coffee Bean
Modeling Paste: Liquitex
Matte Medium: Liquitex
Other Supplies: Pencil, Scissors, Copy Machine, Copy Paper, Silver Glitter, paint brush

BoBunny Pincushion and Doilies Layout

BoBunny Pincushion Love This Layout by Juliana Michaels

BoBunny recently released three new collections: Pincushion, Winter Woodland and Head Over Heels. Today I am sharing the first project I've created using their new Pincushion collection, a layout with photos of my sweet nieces at another of my nieces' weddings. She was too adorable blowing bubbles to wish the newly wedded couple a happily ever after!

This range is full of sweet doilies, hearts and banners. It really brings thread count and backstitching to life in a fun and trendy way. The color combination is on point as well with its minty greens, grays, peaches, creams and whites. Happiness is definitely handmade when you create with BoBunny's Pincushion collection!

BoBunny Pincushion Love This Layout by Juliana Michaels detail

I added some simple machine stitching to accent the edge of the main background paper. The tape measure strips were cut from the Pincushion Measurements paper. I cut strips that matched in color and then overlapped them slightly to give the illusion that they are wrapping around the page.

BoBunny Pincushion Love This Layout by Juliana Michaels detail

The title piece was created by combining a sticker from the 12 x 12 Combo Sticker sheet, a piece of the Noteworthy and a Layered Chipboard Sticker.

If you are looking for more Pincushion inspiration, make sure you check out the BoBunny blog this week for cards, layouts and more using this sew sweet collection!

BOBUNNY PINCUSHION LOVE THIS LAYOUT | SUPPLIES

Patterned Paper: BoBunny Pincushion / Measurements, Doilies, Backstitch
Chipboard: BoBunny Pincushion Layered Chipboard
Noteworthy: Pincushion
Doilies: BoBunny 4" Small and 6.5" Medium

Embossing Stickers with Your Cuttlebug

Looking for a simple and easy way to add some texture to your stickers? Try embossing them with your Cuttlebug and your favorite embossing folder!
  
Embossing Stickers with your Cuttlebug

Embossing Stickers with your Cuttlebug

That is exactly what I did with the layout I have up on the SRM Stickers blog today! Stop on by to check it out. Here is a little peek of my layout entitled The Thrill of the Catch using SRM Stickers Labels by the Dozen!!!

The Thrill of the Catch Scrapbook Layout detail by Juliana Michaels

Front Porch Thank You and Hello Cards

Thank you and Hello cards can be used any time of the year, especially during the holiday season. I recently created a few cards using the Pebbles Front Porch collection and I thought I would share them with you today. They all would coordinate perfectly with the Thank You Jar Brownie Mix I shared recently as well.  We actually used that jar and card just last week to thank some dear friends of ours for allowing us to stay with them as we traveled to visit my family in Missouri and Kentucky. It was a wonderful visit and I was reminded each day of the many things I have to be thankful for...most especially my family!

Front Porch Thank You Card by Juliana Michaels

Front Porch Thank You Card by Juliana Michaels detail

Just A Note Card by Juliana Michaels

Just A Note Card by Juliana Michaels detail

Thank You Kindly Card by Juliana Michaels

Thank You Kindly Card by Juliana Michaels detail

SUPPLIES | PEBBLES

Patterned Paper, Chipboard, Stickers, Library Pockets: Front Porch Collection
Twine: American Crafts
Seam Binding: Unknown
Wood Button: American Crafts
Cardstock: Unknown
Sewing Machine: Kenmore
Ink: Ranger Tim Holtz Distress Ink in Vintage Photo

I apologize for a short post today. The holiday season is sneaking up no me and I have lots to do to catch up after a week away! Thank YOU for stopping by and I hope you have a blessed day!!!

Subscribe
