Showing posts with label American Crafts. Show all posts

Today I Kissed A Fish

Yes, I kissed a fish! A big one too! But there is a reason for that kiss. This past summer I had the opportunity to going deep sea fishing, which is something that has been on my bucket list for years. When I was out fishing I was content to be fishing, but then I caught an 8 foot, 100 lb Sailfish and bucket list item number 2 was achieved! The photos are of me with my fish once we got back to shore and of course I had to create a scrapbook page with them. 

I shared some other layouts from the trip this past fall (Bucket List x 2 and Working Together using the BoBunny Zip-A-Dee-Doodle collection) and I plan on creating an entire album filled with photos and memories of this awesome trip.

To create this layout, I used a mix of Elle's Studio, American Crafts and Pink Paislee. I thought the "Rock Star" title was perfect for how I felt that day when I caught that fish!


SUPPLIES | ROCK STAR SCRAPBOOK PAGE

Patterned Paper: Elle's Studio| Cameron - Big Dots, Pink Paislee | Hey Kid - Simon Says, American Crafts | Cut and Paste - Blossom, Ticket To Ride
Die Cuts: Pink Paislee | Hey Kid, Elle's Studio | Cameron Tiny Tags
Jewels: BoBunny
Punch: Fiskars | Large Star
Chipboard: American Crafts | Cut and Paste

Star Christmas Gift Tags Tutorial

Star Christmas Gift Tags Tutorial by Juliana Michaels

I hope your holidays are off to a good start. My December has started off busy as always, but I found the time to create a set of Star Christmas Gift Tags perfect for dressing up a gift bag or present.

Star Christmas Gift Tags Tutorial by Juliana Michaels detail

These tags are easy to create with only a few simple tools and will add a wonderfully festive and homemade feel to all of your gifts this year. If you are interested in creating a coordinating gift bag for these tags, please head over to the Pebbles blog where you will find my Star Christmas Gift Bag Tutorial.

Star Christmas Gift Tags Tutorial 1 by Juliana Michaels

Begin by gathering your supplies. As you can see in my photo, there are quite a few different Photo Hang Tags or Frames to choose from. I used the smaller sized frames that are part of the set. Most of them are neutral in color and pattern so they are perfect for this project. Remove the twine that comes with the frames before you start.

Star Christmas Gift Tags Tutorial 2 by Juliana Michaels

Take one of the smaller Photo Tags or Frames and cut it in half.

Star Christmas Gift Tags Tutorial 3 by Juliana Michaels

Cut a piece of Leaf Chevron patterned paper to 2 x 2.5" to fill the "window" of the frame.

Star Christmas Gift Tags Tutorial 4 by Juliana Michaels

Adhere the patterned paper to the back side of the frame.

Star Christmas Gift Tags Tutorial 5 by Juliana Michaels

Cut a piece of POW! Gold Glitter paper to 3 x 3.5" and center it inside the Knock Out Border Punch using the Mini Stars Border.

Star Christmas Gift Tags Tutorial 6 by Juliana Michaels

Punch the star border.

Star Christmas Gift Tags Tutorial 7 by Juliana Michaels

Apply Xyron Double Sided High Tack Tape to the back side of the frame piece and adhere it to the punched gold glitter paper piece.

Star Christmas Gift Tags Tutorial 8 by Juliana Michaels

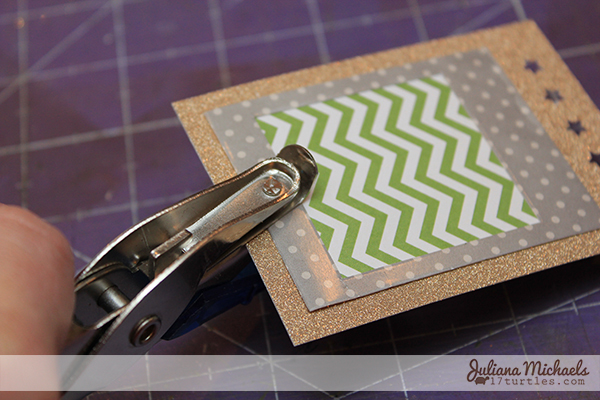
Punch a hole through the gold glitter paper using a 1/8" hole punch. Line up the punch with the existing hole in the Photo Tag/Frame.

Star Christmas Gift Tags Tutorial 9 by Juliana Michaels

Run a 12" length of ribbon through the punched hole creating a loop.

Star Christmas Gift Tags Tutorial 10 by Juliana Michaels

Pull the ends through the loop.

Star Christmas Gift Tags Tutorial 12 by Juliana Michaels

Tighten the loop. The extra length of ribbon can be used to tie your tag to a gift bag or other present as desired.

Star Christmas Gift Tags Tutorial 13 by Juliana Michaels

I knew I wanted to add a sentiment to the front of my tag and I loved that some of the ribbon in the Peppermint Express Ribbon Set was printed with the words "Merry Christmas". When I saw this ribbon, it gave me the idea to cut the ribbon and use it as my sentiment. I cut the ribbon in an inverted "V" shape on one end and then in a "V" shape on the other to cut out the sentiment.

Star Christmas Gift Tags Tutorial 14 by Juliana Michaels

Use Xyron Adhesive Dots to adhere the ribbon to the front of the tag.

Star Christmas Gift Tags Tutorial 15 by Juliana Michaels

I only had 3/8" Dots, so I cut them in half using my Tonic Studios Tim Holtz Craft Scissors. These are seriously the best scissors for cutting anything with adhesive because it won't stick to the blades.

Star Christmas Gift Tags Tutorial 17 by Juliana Michaels

Complete the tag by adding a Peppermint Express Dimensional Star sticker to the center of the frame and your tag is ready to use. Repeat this process with the other Photo Tags/Frames and the Rouge Chevron paper. To add the small gold star you see in the photo below, punch a small gold star from the gold glitter paper and adhere it to the center of the Star sticker using Xyron Adhesive Dots.

Star Christmas Gift Tags Tutorial by Juliana Michaels detail

I hope you enjoyed today's tutorial and are inspired to create your own set of tags to decorate your Christmas gifts this year. As I mentioned above, if you are interested in creating a coordinating gift bag, head over to the Pebbles Blog for my Star Christmas Bag Tutorial.


SUPPLIES

Frames: Pebbles Front Porch Photo Hang Tags
Patterned Paper: Pebbles Basics 12 x 12 Leaf Chevron and Rouge Chevron
Stickers: American Crafts Peppermint Express Remarks Dimensional Adhesive Stars
Ribbon: American Crafts Peppermint Express Value Pack Premium Ribbon
Cardstock: American Crafts POW! Glitter Paper 12 x12 Gold
Punch: American Crafts Knock Outs Border Punch Mini Stars, 1/8" Hole Punch
Scissors: Tonic Studios Tim Holtz Craft Scissors
Paper Trimmer: Tonic Studios 12" Small Base Trimmer
Adhesive: Xyron Mega Runner, Xyron 3/8" Dots, Xyron 1/2" Double Sided Tape

LINKED:
The Pin Junkie Friday Link Party #46
Tatertots & Jello

Embossing Stickers with Your Cuttlebug

Looking for a simple and easy way to add some texture to your stickers? Try embossing them with your Cuttlebug and your favorite embossing folder!
  
Embossing Stickers with your Cuttlebug

Embossing Stickers with your Cuttlebug

That is exactly what I did with the layout I have up on the SRM Stickers blog today! Stop on by to check it out. Here is a little peek of my layout entitled The Thrill of the Catch using SRM Stickers Labels by the Dozen!!!

The Thrill of the Catch Scrapbook Layout detail by Juliana Michaels

Halloween Label Jars with American Crafts and Target + A Giveaway

Today is my last and final American Crafts and Target Halloween project. I have really enjoyed sharing my Halloween Treat Cones and Rosette Wreath with you. The project I am sharing with your is very simple to make. I created a center piece for my dining room table with a collection of glass jars and the American Crafts Halloween Accent Stickers. This sheet of stickers contains some fun images perfect for putting on glass bottles and jars. I upcyled some glass jars from our recycle bin by painting the lids with black spray paint and then adding these fun stickers. I then filled each jar with water and added a couple drops of Distress Stain Ink to color the water. 

Halloween Jar Labels Centerpiece by Juliana Michaels

Halloween Jar Labels Centerpiece by Juliana Michaels

SUPPLIES | American Crafts
American Crafts: Halloween Accent Stickers

Other:
Glass Jar (I used 2 spaghetti sauce jars, a pickle jar and a jelly jar)
Black Spray Paint
Water
Ranger Distress Stain or Food Coloring

Halloween Jar Labels Centerpiece by Juliana Michaels


And now for the GIVEAWAY...

A Halloween Banner Kit from American Crafts!!!


Halloween Banner Giveaway image

For your chance to win all you have to do is leave me comment below and tell me your favorite holiday. This will give you one chance to win. 
If you do any of the following you will get another chance to win for each one you do. Just leave me a link to it in the comment section!


One lucky random winner will receive this Halloween Banner Kit from American Crafts to help decorate your home for Halloween. The giveaway is open from October 6 and will close at 12 midnight EST on October 9. I will announce the winner on Friday October 11. Good luck!!!

Halloween Rosette Wreath with American Crafts and Target

Welcome to day 2 of my American Crafts Halloween projects. Today I am sharing a wreath that I created using some of the new their new exclusive Target Halloween collection. I made the Halloween Treat Cones first. I had a hard time stopping the crafting once I had started. The result was this Halloween Rosette Wreath made from the 6x6 Halloween Paper Pad, Halloween Epoxy Stickers, one of the Halloween Witches Hats and some stickers from the Witch Hat Placecards Kit. I have a tutorial to share with you on how I created the doily rosettes and if you are interested in how I created the paper rosettes you can check out my blog post for my Halloween Treat Cones.

Halloween Rosette Wreath by Juliana Michaels

The base is an 18" grape vine wreath from my local craft store that I spray painted black. The paper rosettes were made from the American Crafts 6x6 paper pad. To create the larger rosettes I cut 2 pieces of the same 6x6 paper in half creating four 3x6" strips. For smaller rosettes, just cut your strips smaller. I then used either the American Crafts Zig Zag Border Punch or Fiskars Zig Zag Decorative Edge scissors on the edges of the paper strips before I scored or glued the papers together to create the rosettes.

Halloween Rosette Wreath by Juliana Michaels detail

As you can see, I used some of the gold chenille pipe cleaners left over from my Halloween Treat Cones to create the fun curly cues on the wreath!

Halloween Rosette Wreath by Juliana Michaels detail

Halloween Rosette Wreath by Juliana Michaels detail

This is the wreath hanging on the wall above my dining room buffet.

Halloween Rosette Wreath by Juliana Michaels

SUPPLIES | American Crafts and Local Craft Store

American Crafts: Target Halloween Collection/ 6x6 Paper Pad, Witches Hat Placecards, Epoxy Stickers
Heidi Swapp Color Shine in Gold
18" Grape Vine Wreath
Hot Glue Gun
Liquid Adhesive
4" White Paper Doilies
Gold Chenille Pipe Cleaners

Doily Rosettes Tutorial by Juliana Michaels

TUTORIAL | Doily Rosette

  1. Begin with two doilies. You will repeat the following steps with each doily.
  2. Fold the doily in half.
  3. Fold it in half again and again and again for a total of 4 times. 
  4. Unfold it.
  5. Cut a slit along one of the crease lines to the middle of the doily.
  6. Accordion fold the doily to look like this. Repeat all the steps with the other doily.
  7. Glue the ends together to create your rosette.


If you are looking for more inspiration using the American Crafts exclusive Target Halloween collection feel free to check out the blogs of several of my fellow crafty friends:

Amanda Coleman | Halloween Party Drinks
Nina Yang | Halloween Table Setting
Suzanna Lee | Embellished Witch Hat
Kathy Martin | Treat Wrap and Card
Samantha Taylor | Home Decoration and Card
Renee Zwirek | Witch Hat Treat Bags and Cards
Tater Tots and Jello | Halloween Straw Wreath

Have you made anything for Halloween? I'd love to see it! Leave me a link in the comments so that I can stop by and see it!

Halloween Treat Cones with American Crafts and Target

As I have already mentioned, I love Halloween and now that we are finally settled into our new home, I have really gotten into decorating for our upcoming Halloween party. Thanks to American Crafts, who sent me a box of some of their new exclusive Target Halloween collection, I was able to add to my Halloween decorations with some homemade crafty projects. I immediately fell in love with the new collection and started crafting. In the end, I ended up with three projects that I want to share with you. Today I am sharing my first of these three projects, which is a set of Halloween Treat Cones using their Halloween Witch Hat Placecards Kit. The idea behind this entire collection is to keep the decorating easy and simple. That is all well and good, but I always like to add my own touch to things. So, I couldn't resist doing just that with this kit. I think that I still kept it simple, but I definitely mixed it up a little bit when it came to using the kit.  Take a peek at what I created and then keep reading for a tutorial you can follow to create your own Halloween Treat Cones.

Halloween Treat Cones by Juliana Michaels

Halloween Treat Cones by Juliana Michaels

Halloween Treat Cones by Juliana Michaels

Halloween Treat Cones by Juliana Michaels

Halloween Treat Cones by Juliana Michaels

Halloween Treat Cones by Juliana Michaels detail

SUPPLIES | American Crafts and Local Craft Store
American Crafts: Target Halloween Collection/ 6x6 Paper Pad, Witch Hat Placecards
American Crafts: Black and White Bakers Twine (also available at Target)
Gold Pom Poms
Gold Chenille Pipe Cleaners
Hot Glue Gun
Liquid Adhesive
1/8" Hole Punch
Scoring Tool such as Scor-Buddy

TUTORIAL | HALLOWEEN TREAT CONES


Assemble the cones as instructed. Use a hole punch to punch a hole on opposite sides of the cones. Add the fringed trim per the instructions that come with the kit and set it to the side.

Halloween Treat Cones Tutorial by Juliana Michaels

Select a piece of patterned paper from the 6x6 paper pad.

Halloween Treat Cones Tutorial by Juliana Michaels

Cut 2 strips to 1.25". Score them at 0.25" increments with a scoring tool such as the Scor-Buddy.

Halloween Treat Cones Tutorial by Juliana Michaels

Accordion fold both pieces of paper.

Halloween Treat Cones Tutorial by Juliana Michaels

Glue the pieces end to end.

Halloween Treat Cones Tutorial by Juliana Michaels

Then glue them to create a circle. Lay the circle flat.

Halloween Treat Cones Tutorial by Juliana Michaels

Squish the center together from the outside and place the sticker on top.

Halloween Treat Cones Tutorial by Juliana Michaels

Flip the rosette over and apply a dab of hot glue to the center and hold the center together until the glue is dry.

Halloween Treat Cones Tutorial by Juliana Michaels

Now you will need a couple of supplies from your local craft store: gold pom poms and gold chenille pipe cleaners!

Halloween Treat Cones Tutorial by Juliana Michaels

Take one of the gold pipe cleaners and trim off 3 inches. Save this to tie around your treat bags that you place inside the cones. Stick one end of the pipe cleaner through the poked holes and bend it to hold it in place. Then take the other end and stick it in the other hole to create a handle.

Halloween Treat Cones Tutorial by Juliana Michaels

Next, take 2 pipe cleaners, twist them together and then wrap them around the hat. Twist the overlapping ends together and bend them to lay flat.
 
Halloween Treat Cones Tutorial by Juliana Michaels

Cut a 5" length of the pipe clean, bend it into a circle and glue it around the circle sticker. Adhere rosette to your cone covering up the overlapped pipe cleaners.

Halloween Treat Cones Tutorial by Juliana Michaels

Create a bow using the black and white baker's twine and hot glue below the sticker.

Halloween Treat Cones Tutorial by Juliana Michaels

Finally, hot glue one of the gold pom poms to the base of the cone.

Halloween Treat Cones Tutorial by Juliana Michaels


MORE PROJECTS COMING SOON

In the background here you have a little peek of the projects I will be sharing with you the next 2 days. Tomorrow I will be sharing a Halloween Rosette Wreath that I created with the American Crafts exclusive Target Halloween collection.

American Crafts Exclusive Target Halloween Decor by Juliana Michaels

American Crafts Exclusive Target Halloween Decor by Juliana Michaels

The next day I will be sharing how I created a group of fun Halloween Labeled Jars.

American Crafts Exclusive Target Halloween Decor by Juliana Michaels

I hope you enjoyed my Halloween Treat Cones and don't forget to check back the next 2 days for more Halloween projects!
Subscribe