Showing posts with label St. Patrick's Day. Show all posts

Tim Holtz Tailored Vintage St. Patrick's Day Card

Hello friend! Today I'm sharing a bit of vintage St. Patrick's Day inspiration with you! I happen to be part Irish and green happens to be one of my favorite colors, so I couldn't resist creating a card specifically for this holiday.

Tailored Vintage St. Patrick's Day Card by Juliana Michaels

You may recall seeing a similar-ish looking card that I shared around Valentine's Day, and if you do remember it, you have some made memory skills! I actually made both cards at the same time with the idea of using similar products to create a card for each of these holidays. If you missed that card, you can find more details on my Vintage Valentine's Day Card here.


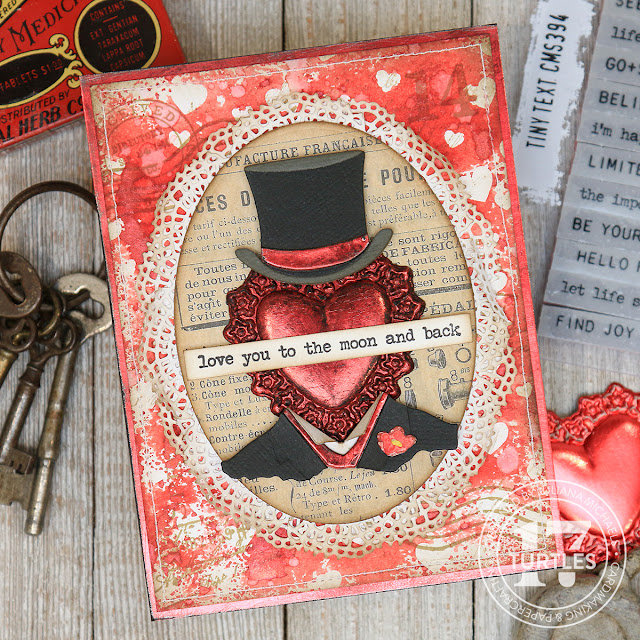
TIM HOLTZ TAILORED VINTAGE ST. PATRICK'S DAY CARD

As always, I like to start off with the background. I began with the Scrapbook.com Shamrocks Stencil and used it to create a monoprint. Do this, I placed the stencil in my Splat Box and sprayed it with Tim Holtz Tree Lot Mica Stain (this is a seasonal product that is sold out, but you can use any color of green spray ink). Off to the side, I had a piece of Distress Watercolor Paper placed on top of a paper towel and an extra paper towel as well. I placed the inked stencil on top of the paper and used the extra paper towel to push down while at the same time dabbing up any ink that seeped under the stencil openings. To see this technique in action make sure to check out my How To Monoprint with Stencils video.

I lifted off the stencil and they dried the ink with my heat gun. Once the ink was dry, I added some stamping using Frayed Burlap Archival Ink and stamps from the Tim Holtz Field Notes, Merchant and Christmas Postmarks. I then inked in the edges with a little Walnut Stain Distress Ink and added some machine stitching around the border. I then adhered this to a piece of green metallic Kraft Stock that I had lightly sanded and then inked with Walnut Stain Distress Ink.


As on Vintage Valentine's Day Card, I created the focal point using the Tim Holtz Tailored Thinlits Die Set and cut the various layers from colored and metallic cardstock and adhered them together using Distress Collage Medium. Before adhering the metallic papers, I lightly sanded them, and inked them with Walnut Distress Stain using a foam blending tool. The small flower is from the Mini Brushstroke Flowers Thinlits and was cut from Distress Watercolor Paper and then watercolored using a waterbrush and Distress Ink in Twisted Citron and Mowed Lawn.

To create the embossed four leaf clover or shamrock I used the Tim Holtz Lucky Love 3D Impresslits Embossing Folder. Impresslits, actually cut and emboss all in one step! I used it with a piece of green metallic Kraft Stock and to give it the slightly grungy look I used a technique that Tim shared during his Sizzix Everyday 2023 Release YouTube Live at around the 3:05 mark. After die cutting the shape, I painted it with Black Soot Distress Paint, allowed it to start to dry and then used a paper towel to wipe off some of the excess paint. You have to let the paint slightly dry so it will start to stick to the paper but still wet enough that you can wipe some of the paint away and reveal the metallic paper. I absolutley love the grungy end result!


To frame the focal point, I used the Tim Holtz Stacked Baroque Thinlit Dies and cut it from a piece of Tim Holtz Idea-ology paper and inked the edges with Walnut Stain Distress Ink. I then cut the next largest die from White Heavystock, added seom machine stitching and inked the edges with inked the edges with Walnut Stain Distress Ink.

The final touch was the sentiment...lucky is a state of mind. This is a stamp from the Tim Holtz Tiny Text Stamp Set which I stamped onto Distress White Heavystock with Black Soot Archival Ink, trimmed it into a strip and then inked the edged with Walnut Stain Distress Ink. I then adhered it to the card with a bit of foam tape on the two ends so that it was the supported as it went over the embossed four leaf clover


Thanks as always for stopping by and taking a closer look at this Tim Holtz Tailored Vintage St. Patrick's Day Card! And as always, if you have any questions please don't hesitate to reach out.

SUPPLIES

Below you can find the products I used to create this card along with compensated affiliate links to Scrapbook.com. These links are at absolutely no cost to you. When you shop through the links below, I receive a small commission from Scrapbook.com. These links are at absolutely no cost to you and the commission I receive helps me cover the costs of my blog and other expenses, which allows me to continue to provide you with FREE inspiration and tutorials. If you want to learn more about what an affiliate link is, you can see my full affiliate and product disclosure statement here. Thank you so much for your love and support!

Happy St. Patrick's Day | Newton's Nook Designs

Just a quick post to wish everyone a very Happy St. Patrick's Day! I actually happen to be a wee bit Irish...there is an Irish princess on my Dad's side of the family. Because of this, I've always had a bit of thing for this special day. We don't do much with regards to celebrating, but we'll definitely be enjoying a nice bit of corned beef, cabbage and soda bread for dinner.

Happy St. Patrick's Day Shaker Card by Juliana Michaels featuring Newton's Nook Designs Newton's Pot of Gold Stamp Set

I created this card using Newton's Nook Designs Pot of Gold stamp set. The background paper was made by stamping some of the stamps from the set with Versamark Watermark Embossing Ink. I stamped and colored Newton using Prismacolor colored pencils and blended them with Gamsol and a blending stump.


The shaker part was created using the We R Memory Keepers Fuse Tool. This was one of my first attempts at creating a shaker card using this method. I placed the stamped/die cut circle image inside the page protector along with the sequins. I'm not sure if it's my favorite say, but it is a lot less time consuming if your tool is already preheated and ready to go.

Speaking of Newton's Nook Designs, all this week on my blog I've been sharing cards created using stamps and dies from their March release.  Guess what? All of these new goodies are available in their online store starting today. Happy Shopping!

Newton's Nook Designs February Release | Day 1

Welcome to Day 1of Newton's Nook February Release! I'm so happy to have you stop by for a visit. The first set being shared from this release is Newton's Pot of Gold! Newton is ready for St. Patrick's Day or for wishing someone good luck. Make sure to keep reading to learn about the card I created and then how to enter for your chance to win the Newton's Pot of Gold Stamp set!

For today's card, I did lots of fun stamping techniques - including stamping and coloring with colored pencils, stamping with Versamark to create a patterned background and stamping a sentiment on a circle die cut. Read on to learn all about how to stamp a sentiment on a circle die cut perfectly every time!

Happy St. Patrick's Day Card by Juliana Michaels featuring Newton's Nook Designs Newton's Pot of Gold Stamp Set

How to stamp a sentiment on a circle die cut perfectly every time!

I don't know about you, but trying to curve a stamp sentiment on a circle die cut is kind of challenging for me. While creating my St. Patrick's Day card, I came up with a way to curve it perfectly every time using a stamp positioning tool such as the MISTI or Stamp Perfect.

1.  Die cut a circle from cardstock.

2.  Place the circle on your stamp tool and hold it in place with the magnets. As always, when using a stamp tool, position the paper firmly into the corner to help secure it in place in case you need to stamp the image more than once.


How to stamp a sentiment on a circle die cut perfectly every time - tutorial by Juliana Michaels

3.  Close the lid and place the same circle die on top and line it up with the die cut circle. Use a piece of tape, such as Post-It Tape, to help hold it in place.

How to stamp a sentiment on a circle die cut perfectly every time - tutorial by Juliana Michaels

4.  Open the lid and line your sentiment up on the inside lid of the stamping tool, using the circle die on the outside as a guide. 


How to stamp a sentiment on a circle die cut perfectly every time - tutorial by Juliana Michaels

5.  Ink up your sentiment and stamp it onto the circle die cut!

How to stamp a sentiment on a circle die cut perfectly every time - tutorial by Juliana Michaels

With this technique, you can stamp it perfectly onto the circle die cut every time!

Happy St. Patrick's Day Card by Juliana Michaels featuring Newton's Nook Designs Newton's Pot of Gold Stamp Set

Along with all the fun stamping, I also used a new to me coloring tool - Sakura Glaze Pens and Metallic Pens! I used a Gold Metallic one to color the gold coins and the buckle on Newton's hat and I used a green Glaze Pen to color the shamrock. I love the shimmer and tiny bit of texture that they add!

Happy St. Patrick's Day Card by Juliana Michaels featuring Newton's Nook Designs Newton's Pot of Gold Stamp Set

 Now, onto some fun! How would you like to win the “Newton’s Pot of Gold” Stamp Set?

Newton's Nook Designs Newton's Pot of Gold Stamp Set

This set will be given away to ONE lucky winner!

Here's how to win: Leave a comment on the NND blog and each of the Design Team blogs (see list below)! The winner will be chosen at random from the collective reveal posts. Make sure to check out each of their blogs and comment for your chance to win. You will not know which blog has been chosen, so the more you comment on the better your chances are of winning! You have until Thursday February 16th at 9pm CST to comment -- winners will be announced on the NND blog post on Friday, February 17th.


Check out all the awesome Design Team Blogs below to enter:

Great Scrapbook Page Ideas | St. Patrick's Day

Top o' the morning to ya! St. Patrick's Day is right around the corner, so today I'm sharing some great St. Patrick's Day scrapbook page ideas to help inspire you when it's time to scrapbook your wearing o' the green and other St. Patrick's Day festivities.


Here are 12 great St. Patrick's Day scrapbook page ideas. 


A Lucky Birthday St. Patrick's Day Scrapbook Page @Doodlebug


3 Lucky Clovers St. Patrick's Day Scrapbook Page @Scrapbook and Cards Today


We Are So Lucky St. Patrick's Day Scrapbook Page @Doodlebug


Lucky March St. Patrick's Day Scrapbook Page @Juliana Michaels


Lucky U St. Patrick's Day Scrapbook Page @Suzanna Lee

Suzanna used the Plaid Plaid Christmas 17turtles Digital Cut File with her Silhouette Cameo to create the plaid design on this layout.  If you'd like this cut file, just click on the clink below to download it now for free.

Digital Cut File Download | Plaid Plaid Christmas

Plaid Plaid Christmas Free Digital Cut File by Juliana Michaels 17turtles


Lucky St. Patrick's Day Scrapbook Page @SVG Cuts


Lucky Me St. Patrick's Day Scrapbook Page @Snippets By Mendi


Lucky You St. Patrick's Day Scrapbook Page @Juliana Michaels

These next four ideas aren't truly scrapbook pages, however I think they can each be used to inspire some great ideas for your next layout.


Lucky 4 Leaf Clover St. Patrick's Day Scrapbook Page Idea @The DIY Club

Wouldn't this make the cutest embellishment?


Pot of Gold St. Patrick's Day Scrapbook Page Idea @Literally My Joy


Lucky You St. Patrick's Day Scrapbook Page Idea @Stampin' Pretty


Happy St. Patrick's Day Scrapbook Page Idea @Sandy Stamper

Subscribe