
Is there anything better than a beautiful floral stamp set that you can color? In my book, this is definitely up there at the top of the list of things I enjoy crafting with. There are so many options for how to color them. From alcohol markers, to colored pencils and of course, watercoloring! Today, I'm sharing two cards I created using some gorgeous new floral stamp sets from Scrapbook.com.

THANKFUL FOR YOU CARD
On this first card, I stamped this image from the Scrapbook.com Rose Blossoms Stamp Set using embossing ink onto Distress Watercolor Paper. I sprinkled it with white embossing powder and heat embossed it. I then used Distress Ink in Saltwater Taffy, Abandoned Coral, Fossilized Amber and Peeled Paint to watercolor the image. I love how the embossed image, contains the ink into each section, allowing you to control your coloring a little better. This is an especially easy way to watercolor if you are new to using them.
You don't have to use Distress Ink, you could also use watercolor markers or actual watercolors. I prefer to use the Distress Inks because I love the color palette and they work great for this technique. To use them, I tap the ink pad onto my silicone craft mat, pick up the ink with a water brush (you could also use a paint brush) and then color in each area. I usually start by trying to use more water than ink to get a light layer of color down first and then I add a little more color to darken the areas and create some contrast and shadows. If you happen to have the Distress Reinkers, you can also use them for this technique, but the color will be much more intense since the ink is coming straight from the bottle.

After I had finished coloring the image, I used a pair of scissors to cut it out. To give the image a more distressed look, I added a few splatters of Vintage Photo Distress Ink and also inked the edges with the same ink. I applied some double sided foam adhesive to the backside and used this to adhere it to the card front while giving the image some dimension.

The background on this card was created by ink smooshing various colors of Distress Ink onto my craft mat, spraying them with water and then smooshing a piece of Distress Watercolor paper into the ink. I then used a heat gun to dry the ink and repeated the process with the next color. For this background, I used Salvaged Patina, Vintage Photo, and Saltwater Taffy in that order. I recommend only applying one color at a time and drying in between each color to avoid creating mud!
I added some stamping with a script stamp from the Tim Holtz Dearly Departed Stamp Set and Vintage Photo Archival Ink. To complete the background, I inked the edges of the paper with a foam blending tool using Vintage Photo Distress Ink.
To finish of the background, I added some metallic splatters using Tim Holtz Foundry Wax in Statue. To do this, I squeezed out a bit of the Foundry Wax onto my craft mat, added a tiny bit of rubbing alcohol, mixed it together and then splattered it onto my background using a paint brush. I then heat set it using my embossing tool. If you aren't familiar with Foundry Wax, make sure to check out my Tim Holtz Distress Foundry Wax Blog Post and Video for some great tips and tricks.
For the sentiment on this card, I used the Scrapbook.com Hi Fall Stamp Set. I stamped it onto white cardstock using Vintage Photo Archival Ink and then trimmed around it using scissor.
The final touch was the addition of some Matte Gold Pearls from Pink Fresh Studio that I adhered with Distress Collage Medium.

WONDERFUL YOU CARD
This next card uses all of the same techniques that I used on the first card, just with different stamps and colors. The floral stamp set I used is called Wildflowers from Scrapbook.com.

I watercolored this floral image using Distress Ink in Fossilized Amber, Dusty Concord and Peeled Paint. I also added some ink splatters and inked the edges after I fussy cut it, using Vintage Photo Distress Ink.

To create the background on this card, ink smooshed the following Distress Ink colors: Fossilized Amber, Vintage Photo and Villainous Potion. I then added some stamping using various images from the Tim Holtz Field Notes Stamp Set and Vintage Photo Archival Ink. I then added some Gilded Foundry Wax splatters.
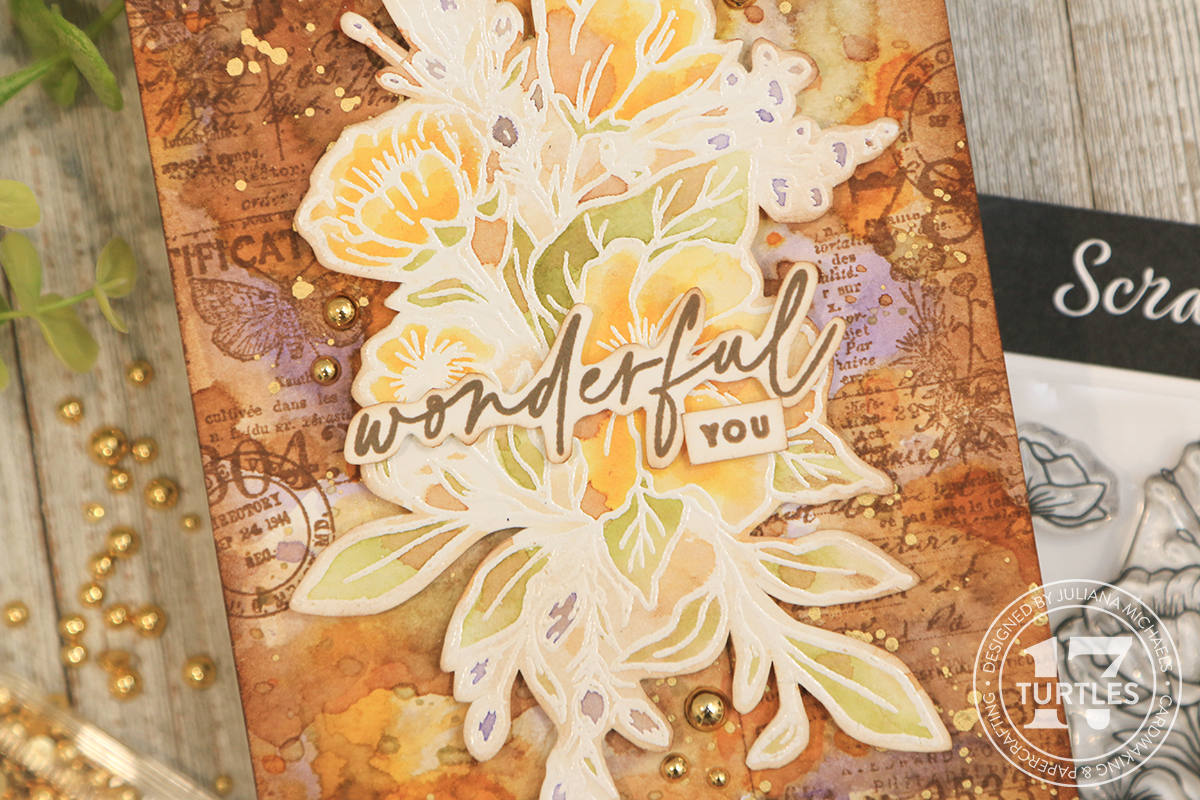
The sentiment on this card is also from the Scrapbook.com Hi Fall Stamp Set. The final touch on this card was the addition of some Gold Pearls from Pink Fresh Studio.

So what is your favorite way to color floral stamped images? Have you ever tried watercoloring them like I did? Thanks for your visit today and I hope you enjoyed this bit of inspiration featuring watercoloring Floral Stamps.
Supplies
Below you can find the products I used to create these cards. Each product is attached to an affiliate link with Scrapbook.com. When you shop through the links below, I receive a small commission from Scrapbook.com. These links are at absolutely no cost to you. These commission I receive helps me cover the costs of my blog and other expenses and it allows me to continue to provide you with FREE inspiration and tutorials. If you want to learn more about what an affiliate link is, you can see my full affiliate and product disclosure statement here. Thank you so much for your love and support!


I love that you can use Distress ink to watercolor to make matching colors for other elements easy! I've loved used Distress ink for watercolor, but also have a sizable stash of watercolor pans (many handmade by a small business) so I do tend to play with those the most. Thanks so much for sharing!!!
ReplyDeleteYes, it's so nice for matching colors! Thanks for stopping by!
Delete