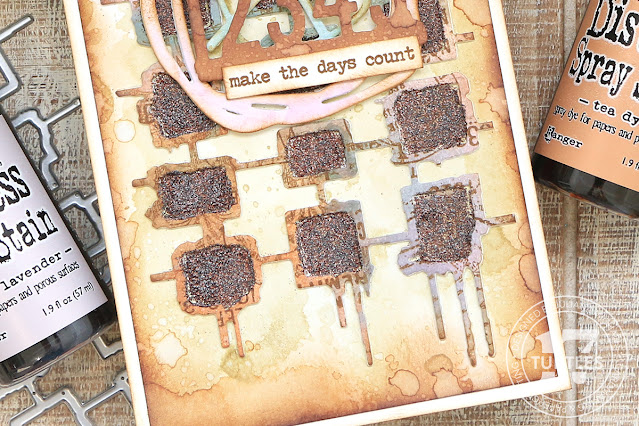
Card One: Layered Texture & Floral Accents
I started with a panel of Distress Watercolor Cardstock cut to 5.5 x 8.5 inches—big enough to work with the Seth Apter Waffles Die. I sprayed the panel with Distress Spray Stains in Milled Lavender, Tea Dye, and Speckled Egg, plus a bit of Milled Lavender Distress Oxide Spray for that chalky glow.
After the background dried, I stamped some texture using Tim Holtz stamps with Vintage Photo Archival Ink, then die cut the panel using the Waffles Die—making sure to save every little negative piece.
For the top layer, I die cut a second Waffles piece from watercolor cardstock, applied embossing ink, sprinkled on Seth Apter Brick Embossing Powder, and heat embossed it. This became my dimensional focal point, which I layered onto two die cuts from Scrapbook.com Mixed Media Cardstock (super thick = great dimension), and trimmed to fit.
The base panel—cut to 3.75 x 7.75 inches—was ink blended with Vintage Photo Distress Oxide Ink, spritzed with water, and edged with Vintage Photo Distress Ink. I glued the stacked Waffles die cut on top and began the fun part—inlaying all those tiny sprayed and stamped negative pieces. It’s a tight fit, but the Scrapbook.com Craft Pick Pro made it much easier. A little liquid glue kept everything locked in.
To finish it off, I sprayed three panels of watercolor cardstock—each with a different Spray Stain (Milled Lavender, Tea Dye, Speckled Egg)—then die cut them with Tim Holtz Wildflower Stems 03.
A stamped sentiment from the Tiny Text Stamp Set, some inked edges, and a foam strip for dimension wrapped it up. I mounted everything onto a 4 x 8 inch white card base inked around the edges with—you guessed it—Vintage Photo.
Card Two: Inky Layers & Heat Embossed Details
This time, I ink smooshed a panel (3.75 x 7.75 inches) into Old Paper Distress Ink, splattered it with water, and inked the edges with Vintage Photo Distress Oxide Ink.
I trimmed down the leftover Waffles die cut from the sprayed/stamped panel and layered it onto two thick cardstock pieces, just like before. To add something new, I used the Ranger Embossing Pen to apply ink inside the open areas and heat embossed them with Brick Embossing Powder.
For embellishments, I sprayed more panels in the same trio of colors and die cut pieces from the Seth Apter Borderlines and Twisters die sets.
I finished with another stamped and foam-mounted sentiment from the Tiny Text set, and mounted the final panel to a white 4 x 8 inch card base inked with—say it with me—Vintage Photo.
And there you have it—one die, two unique cards! You could easily keep going by changing the size, colors, or leftover pieces. I hope this inspires you to stretch your supplies and mix up styles.
Want to see this in action? Let me know in the comments if you'd like a video tutorial!
Supplies Used
Below you can find the supplies I used to create these cards. When you shop through those links and whether you purchase that exact item or something else entirely, you’re supporting me at no extra cost to you. The commission I receive helps me cover the costs of my blog and other expenses, and allows me to continue to provide you with FREE inspiration and tutorials. If you want to learn more about what an affiliate link is, you can see my full affiliate and product disclosure statement here. Thank you so much for your love and support!


No comments
Every time you smile at someone, it is an action of love, a gift to that person, a beautiful thing. ~Mother Teresa
HUGS!
JULIANA