
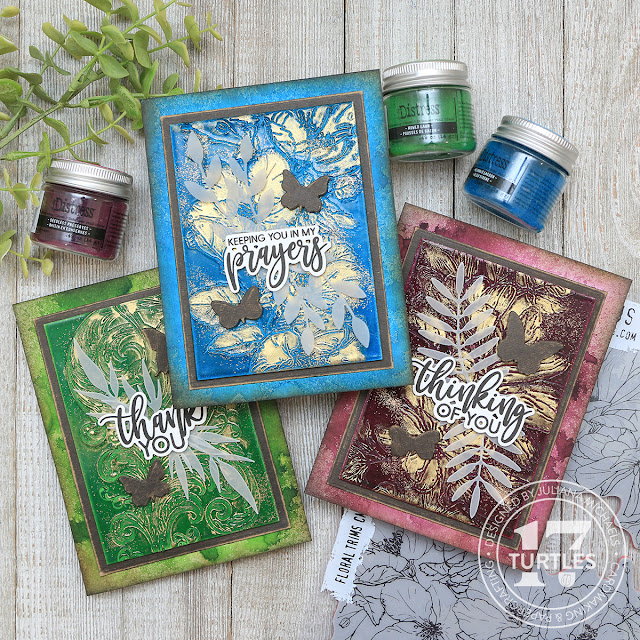
Hello crafty friend! In this blog post I'm sharing a fun technique using some of the new Tim Holtz Distress Embossing Glaze colors brought to you by Ranger Ink. For this technique I'm going to be stamping IN the embossing glaze! As you'll see it's an amazing technique that adds loads of texture and shine to your card.
If you aren't familiar with Embossing Glaze it's similar to embossing powder in that it needs something to stick to and then you must heat set it using a heat tool. It's different from embossing powder though, in that it's transparent, which means you can see through it. This property gives you the opportunity to layer this medium and create some really amazing effects.
If you're interested in using the exact products I have used, they will be linked in the supplies list below and when you shop through those links, it helps support me and I really appreciate that so much!

BUILDING UP THE LAYERS OF EMBOSSING GLAZE
To get started I cut a piece of heavy weight white cardstock to 3.25 x 4.5 inches. I then attach a piece of thin chipboard to the backside of the cardstock using an adhesive sheet cut to the same size. The chipboard keeps the paper from warping. During the process of playing around with this technique, I found that the thicker the chipboard the less warping I had, but as long as I used a piece that was at least the thickness of a cereal box, I was ok. I also recommend staying with at this size of paper and no larger, so that you have the best success when using this technique. I'll explain more as I get into the technique.
Next, I apply Versafine Watermark Ink directly to the paper, making sure to cover the entire surface with ink. I then pour Seedless Preserves Embossing Glaze over the surface of the paper. I tap off the excess powder and heat set the powder with my heat tool. I allow the paper and melted glaze time to cool and then repeat this process of inking the cardstock, adding a layer of embossing glaze, tapping off the excess and heat setting it. I do this three more times for a total of four layers.

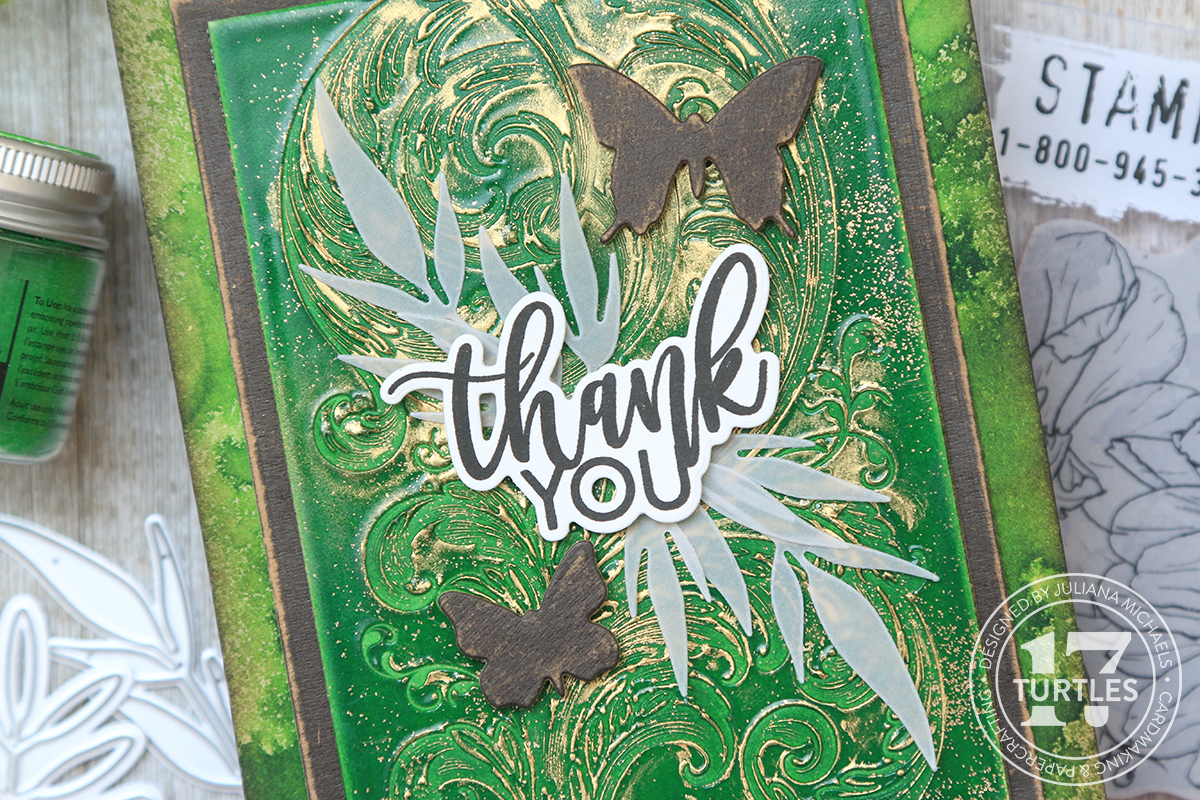
For the fifth and final layer I add a little something extra...Superfine Gold Embossing Powder. I start off by inking the paper as before, but when I go to add the gold embossing powder I pinch out the tiniest amount of powder and even tap off some of that before I sprinkle it randomly onto the ink. Because embossing powder is opaque, even if you can barely see what you have sprinkled on, it will really show up once you start to apply heat with your heat tool.
Next, I tap off the excess gold powder and then sprinkle more of the Embossing Glaze over the ink. If you are worried about getting gold embossing powder mixed in with your glaze, you can always just throw out the excess powder.
As I start to heat this layer you can see what I mean. The gold you could barely see, really begins to pop as the powder melts. And here's how it looks when the powder is completely melted. I really love the shine and sparkle the gold embossing powder added.

STAMPING IN THE EMBOSSING GLAZE
The next step is the stamping part. For this you will need to use rubber stamps. I used one of the images from the Tim Holtz Floral Trims Stamp Set. I would not recommend clear stamps as they may get damaged from the amount of heat this step requires.
I also recommend using a stamping platform because you will need to do the stamping very quickly. Just make sure to remove all of the stamp inserts and magnets, because you won't be needing them during this step and you don't want to accidently melt the foam pad.
To help hold my embossing glaze piece in place in my stamping tool I applied a tiny bit of repositionable adhesive to the backside of the piece. It can be handy to be able to restamp the image if needed.

During this step is where working with a smaller piece is easier. The larger the piece you try for this technique the harder it is to get a good impression because the glaze starts to cool so quickly.
After I push down, I give it a few seconds to cool, and then open the stamping platform to reveal the impression that was created.
If the impression isn't as good in a couple of areas that can be easily fixed. Because the paper didn't move all I have to do is reheat just those areas, making sure the glaze is remelted and restamp the image. If your paper does happen to move it's not the end of the world. You can also reheat the entire piece and repeat the entire process to get your impression.

ADDING MORE SHINE WITH LUSTER WAX
To add another layer of fun and interest, I next applied Sizzix Gold Luster Wax. I used the tip of my finger to apply the wax over the open areas of the floral design. As you can see, the wax really makes the impression pop even more!
COMPLETING THE CARD
To create the card background, I took a piece of Distress Watercolor Paper cut to 4.25 x 5.5 inches and applied Seedless Preserves Distress Spray Stain to it. I then spritzed the paper with water using my Distress Sprayer and used my heat tool to dry the ink and a paper towel to dab up any excess ink or large droplets.
Once the paper was dry, I inked the edges with Seedless Preserves Distress Ink to fill in the white spaces. Next I inked the edges with a bit of Walnut Stain Distress Ink and then followed that with a bit of Black Soot Distress Ink.
With the background completed, I'm moved onto the next layer which is a piece of Black Kraftstock cut to 3.5 x 4.75 inches. I sanded the edges of it using a Sanding Disk, but you could also use a piece of sandpaper. Just make sure to work on a scrap piece of paper or chipboard so that you don't damage your work surface or craft mat.
To adhere the various layers, I used Scrapbook.com Clear Double Sided Adhesive. This tape is one of my favorites because you can easily tear or cut it to the length you need.
To complete the card, I used one of the leaf dies from the Scrapbook.com Layered Roses Die Set and cut that from vellum. I cut it out twice and used Artis Glue to adhere them together. I then trimmed off any of the stem that was might show behind the sentiment. I then glued the leaves to the card.
Next, I attached the sentiment using double sided foam adhesive for a little dimension. For the final touch I added a couple of butterflies from the Scrapbook.com Butterflies 2 Die Set that I cut from Black Kraftstock and sanded before I adhered them with double sided foam adhesive.
SUPPLIES


No comments
Every time you smile at someone, it is an action of love, a gift to that person, a beautiful thing. ~Mother Teresa
HUGS!
JULIANA