Handmade Holiday Parade 2021 | Scrapbook.com

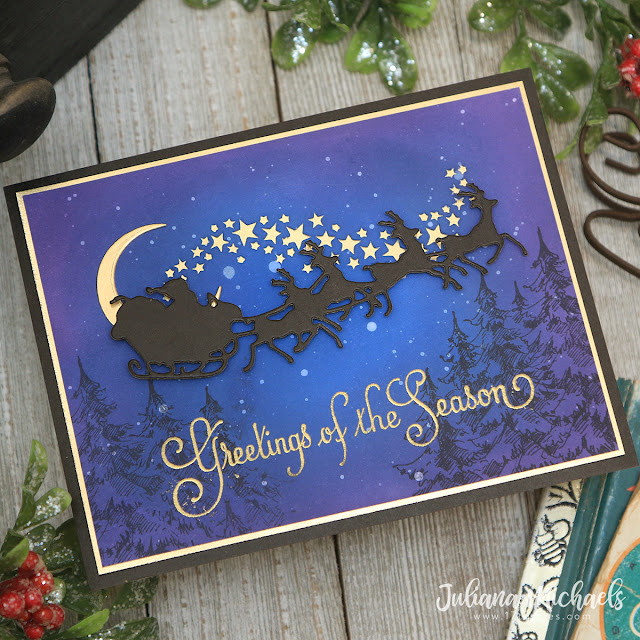
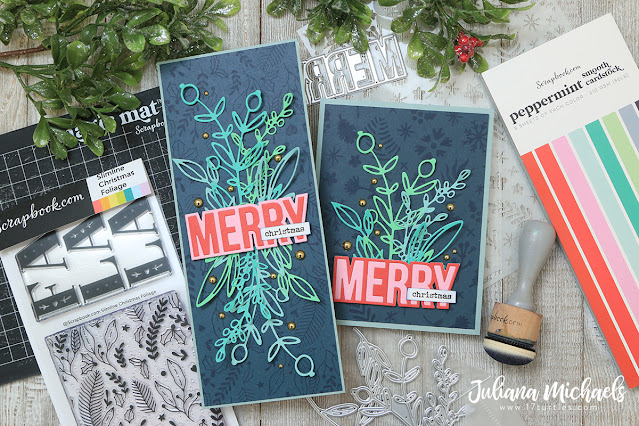
Ho ho ho friends and welcome! I'm super excited to be participating with the Scrapbook.com Handmade Holiday Parade 2021. I created a slimline and A2 size version of the same card using some of my favorite new Scrapbook.com products. Initially, I started with the idea of creating a slimline card, however when I realized how many leftover die cuts I had, I didn't want them to go to waste!

One Design 2 Card Sizes

Merry Christmas Cards by Juliana Michaels featuring Scrapbook.com Christmas Block Word Dies, Winter Floral Stencil, Slimline Christmas Foliage Stamp Set, Sprigs Decorative Die Set, and Peppermint Paper Pad

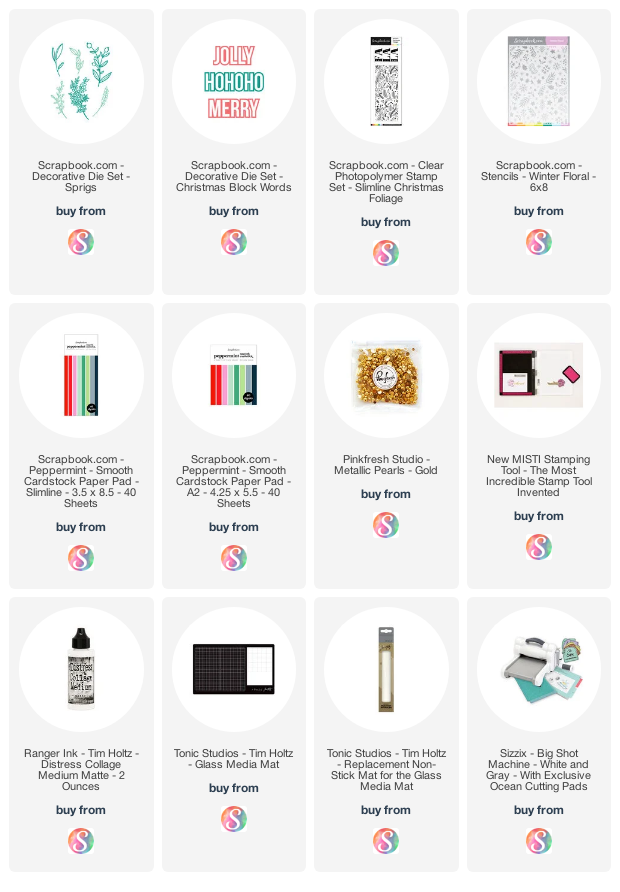
Before I began, I had pulled out some Christmas themed supplies from Scrapbook.com that I wanted to play with. This included the Slimline Christmas Foliage Stamp Set, Winter Floral Stencil, Sprigs Decorative Dies, Christmas Block Words Decorative Dies and Peppermint Paper Pads in both slimline and A2 sizes.

Merry Christmas Slimline Card by Juliana Michaels featuring Scrapbook.com Christmas Block Word Dies, Winter Floral Stencil, Slimline Christmas Foliage Stamp Set, Sprigs Decorative Die Set, and Peppermint Paper Pad

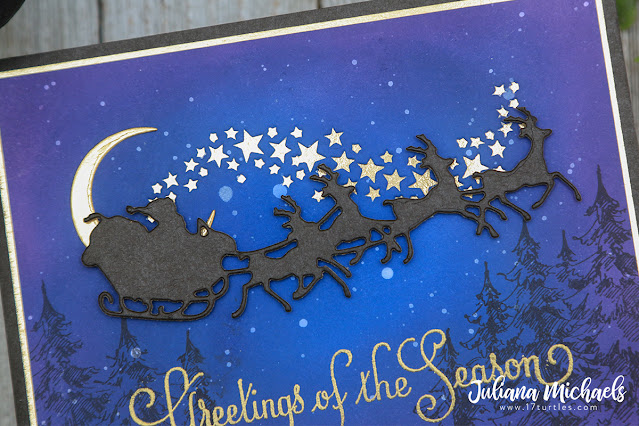
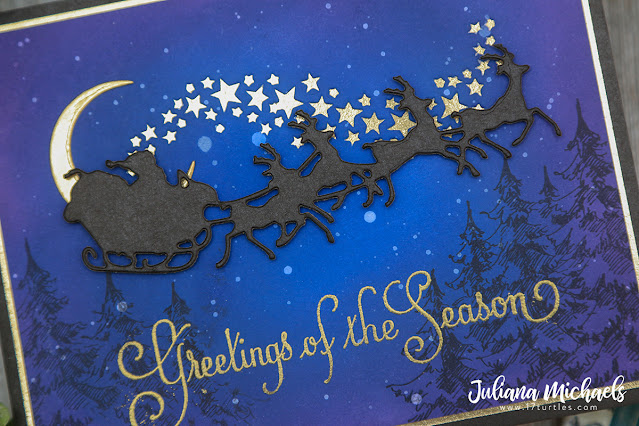
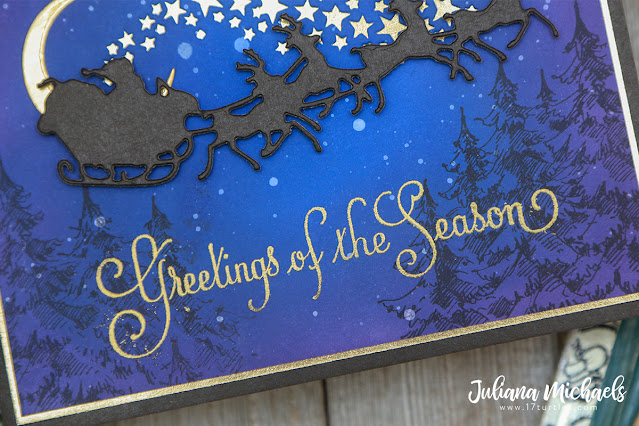
To get started, I selected a sheet of the dark blue paper from the Peppermint Slimline Paper Pad. I placed it inside my stamping tool and stamped it using the large background image from Slimline Christmas Foliage Stamp Set using Chipped Sapphire Distress Ink. I then trimmed this down to 3.25 x 8.25 inches and layered it onto a piece of the lighter blue paper from the same paper pad. Just a fun side note...I actually ended up using all of the colors in this paper pad to create these cards!


Next, I grabbed the three green shades of paper and die cut multiples of some of the shapes from the Sprigs Decorative Dies. I knew I wanted to use several of them on the card, I just wasn't sure how many.


For the sentiment, I used the Merry die from the Christmas Block Words Decorative Dies and cut it once from the pink and once from the red paper so I could mix and match them. This is when I came up with the idea of making a second, but smaller card since I had all these leftovers and I didn't want them to go to waste.


I took several of the sprigs and layered them together and attached them to the top and bottom of the slimline card. I then took the Merry die cut and adhered that using double sided foam tape to the center of the card. This covered up where the sprigs overlapped and created a pretty transition. I then finished it off by stamping the word Christmas using the Christmas Expressions Stamp Set.

Merry Christmas Card by Juliana Michaels featuring Scrapbook.com Christmas Block Word Dies, Winter Floral Stencil, Slimline Christmas Foliage Stamp Set, Sprigs Decorative Die Set, and Peppermint Paper Pad

To use up the extra die cuts I then made a background for an A2 size card. Here I took the dark blue paper and the Winter Floral Stencil. I applied Chipped Sapphire Distress Ink through the stencil using a blending tool.


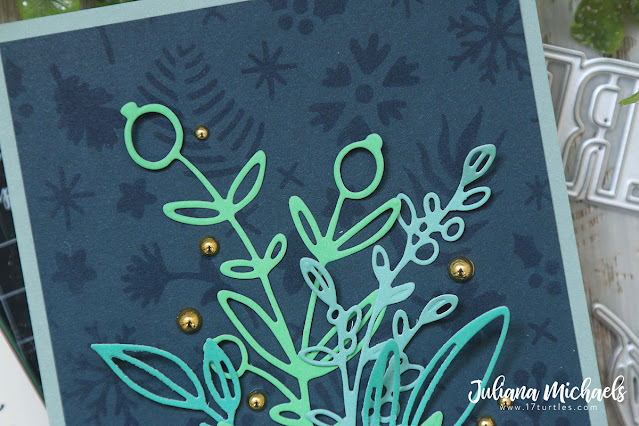
 I trimmed the paper down to 4 x 5.25 inches and layered it onto a piece of the lighter blue paper from the same paper pad. I then layered on the die cuts in a similar design as the slimline card and placed them toward the bottom of the card.


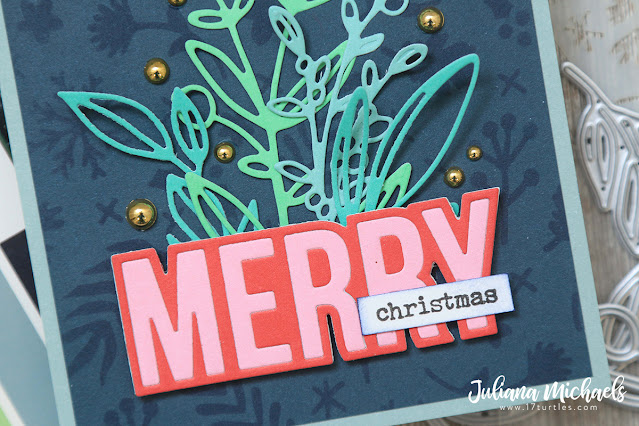
For a touch of shine, I finished off both cards by adding some Pinkfresh Studio Gold Pearls which I adhered with Distress Collage Medium. Just a tiny bit of this adhesive is all you need and I love that it dries clear so you don't see the adhesive if you get a tiny bit extra on things.


Thanks so much for stopping by today for the Scrapbook.com Handmade Holiday Parade! Make sure you head over to my Instagram where you can check out the rest of the stops along the parade route! Each one will be filled with holiday inspiration!


Also, make sure you check out the Scrapbook.com Instagram post as they will be giving away a $25 gift certificate. There are also some AMAZING Cyber Monday Sales and freebies going on as well!


For even more scoop about the Scrapbook.com Handmade Holiday Parade you can also check out this article!

Supplies

You can find the products I used to create these cards along with compensated affiliate links to Scrapbook.com. These links are at absolutely no extra cost to you. If you want to learn more about what an affiliate link is, you can see my full affiliate and product disclosure statement here.

Tim Holtz Simon Says Stamp DieCember 2021 | Dash Away All

Seasons Greetings friends! I'm so excited to be sharing some more holiday inspiration with you today and to celebrate a special event. Tim Holtz has revealed a brand new, limited edition, exclusive die set designed for Simon Says Stamp! Customers who purchase at least $25 of any Tim Holtz product and get this die set as a gift from Simon Says Stamp while supplies last!

Now that you know all the details let me share this Greetings of the Season Christmas Card I created using this new die set.

Greetings of the Season Christmas Card by Juliana Michaels featuring Tim Holtz Simon Says Stamp Diecember Die

I started by die cutting the Santa and his reindeer from black Kraftstock and the Moon from gold Metallic Kraftstock.  I then played around with the placement of these pieces to determine where I wanted to position the stars on a piece of Distress Heavystock. Once I had that figured out, I used temporary adhesive to hold the die in place and ran it through my die cutting machine. Because I used Heavystock, (which is a thicker paper) I had to use a die pick to poke out the stars. Yes, this takes a little time, but it is so worth it! I then ink blended the paper using Distress Oxide in Prize Ribbon, Chipped Sapphire and Villainous Potion using a blending tool.


Next, I stamped some trees along the bottom using the Tim Holtz STAMPtember Stamp Set (designed exclusively for Simon Says Stamp) using Black Soot Archival Ink. This stamp set was a limited edition, so it is sold out, but if you don't have it you could also use the Winterscape Stamp Set to create the same look.


Before starting on the sentiment, I made sure the ink was thoroughly dry. I knew I was going to emboss the sentiment and I didn't want embossing powder sticking everywhere. I also rubbed over the entire piece with an anti-static pouch just to be on the safe side. I then stamped the sentiment from Christmastime Number Three Stamp Set with embossing ink and then heat embossed it with gold embossing powder.


To complete the card, I trimmed the card front down and adhered it to a piece of gold metallic kraftstock and then onto another layer of black kraftstock.


Thanks so much for stopping by today! I hope you enjoyed this Greetings of the Season Christmas Card I created featuring the Tim Holtz Simon Says Stamp Diecember Die!
Finished Card Size: A2 - 4.25 x 5.5 inches
 

Supplies

You can find the products I used to create these cards along with compensated affiliate links to Simon Says Stamp. These links are at absolutely no extra cost to you. If you want to learn more about what an affiliate link is, you can see my full affiliate and product disclosure statement here.

Jolly Santa & Distress Christmas Mica Stains

Holiday Greetings my friends! Today I'm back to share a bit more holiday inspiration with this Jolly Santa Christmas Card I created for the Tim Holtz Stampers Anonymous Christmas 2021 YouTube Live. This Jolly Santa definitely stole my heart and ended up featuring him on some Jolly Santa Slimine Christmas Cards. For even more inspiration from this release, make sure you check out Tim Holtz Stampers Anonymous Christmas 2021 YouTube Live and his blog post where the other makers have linked to their projects.

The card I'm sharing today has a more textured and distressed feel with the help of some stamps, Mica Stains, a stencil and Grit Paste. Keep reading to see how I've combined these products to create this yummy textured background.

Jolly Santa Christmas Card by Juliana Michaels featuring Tim Holtz Stampers Anonymous Jolly Santa Stamp Set and Ranger Ink Christmas Mica Stains

I began with a piece of Distress Watercolor cut to 4 x 5.25 inches and stamped several of the images from the Jolly Santa Stamp Set using Black Soot Archival Ink. I then placed the Festive Layering Stencil on top and applied Translucent Grit Paste through the stencil using a palette knife. I gently removed the stencil and washed it.


Once the Grit Paste was dry, I sprayed the paper with a combination of Peeled Paint Distress Spray Stain, Iced Spruce Distress Spray Stain and Frosted Juniper Distress Mica Stain. The Mica Stain adds a touch of shimmery goodness that is difficult to capture in photos, but I promise you it is absolutely gorgeous in real life!


To create the Santa, I stamped the Santa image onto Distress Watercolor using Black Soot Archival Ink and then cut it out using scissors. To color in the image I used Distress Ink and applied it using a waterbrush. I apply just a bit of ink to my craft mat by tapping the ink pad directly to the mat and then I used the waterbrush to pick up the ink for coloring. I then inked the edges with Vintage Photo Distress Ink.
 
I used the following Distress Ink colors:
Hat/Berries - Festive Berries, Aged Mahogany
Face - Antique Linen, Spun Sugar
Beard - Hickory Smoke
 Holly Leaves - Peeled Paint
 

You might notice a bit more dimension on my Jolly Santa from this angle. I actually stamped him twice and cut out the mustache and holly and adhered them with double sided foam adhesive for a another touch of dimension. Once the Santa was completed, I adhered the entire piece to the card front using double sided foam adhesive.

To complete the card, I layered everything onto a 4.25 x 5.5 inches piece of Distress Heavystock and inked the edged with Vintage Photo Distress Ink.


Finished card size: 4.25 x 5.5 inches

Supplies

You can find the products I used to create this card along with compensated affiliate links to Scrapbook.com. These links are at absolutely no extra cost to you. If you want to learn more about what an affiliate link is, you can see my full affiliate and product disclosure statement here.

Woodland Santa Christmas Card | Tim Holtz Sizzix Christmas 2021

The days have been flying by and after a much needed vacation last week, I'm back and ready to begin sharing some more of my Tim Holtz Christmas projects with you. Today, I'm sharing this Woodland Santa Christmas Card and all the details on how it came together.

Woodland Santa Christmas Card by Juliana Michaels Tim Holtz Sizzix Christmas 2021

To get started, I created several backgrounds using Distress Watercolor paper, Distress Spray Stain (DS), and Distress Oxide Sprays (DO) to use for die cutting out the various pieces for the Woodland Santa Colorize. Here are the colors I used for the various layers: 
Santa's Suit: Festive Berry DS, Candied Apple DO, Aged Mahogany Distress Ink Pad to darken the edges
Tree: Rustic Wilderness DS, Peeled Paint DS
Tree Trunk/Santa's Bag: Vintage Photo DS, Gathered Twig DI, Vintage Photo DO
Boots/Belt: Black Soot DS and DO
Beard/Trim: Pumice Stone DS

Once the backgrounds were finished, I die cut all of my layers and assembled the Woodland Santa.
 

Next, I worked on the textured background behind him. For this, I embossed a piece of Distress Watercolor paper using the Cobblestone 3D Texture Fade. I rubbed the Prize Ribbon Distress Ink Pad over the paper, spritzed it with a bit of water, dried it and repeated the spritzing and drying. I then rubbed a touch of Prize Ribbon Distress Oxide over the paper and repeated the spritzing and drying until I was pleased with the look. To create the look of snow, I splattered a bit of white gesso onto the paper. I then die cut it using the largest Stacked Baroque Thinlits. 


I wanted to frame this piece, but since I had used the largest die, I hand cut a piece of Distress Watercolor to create a slightly larger shape to frame it. I ink smoosed it with a touch of Pumice Stone Distress Ink and used the Tim Holtz Paper Distresser to distress the edges.


The background is a piece of kraftstock stamped with the text stamp from the Tim Holtz Stripes and Holiday Type Stamp Set using Vintage Photo Distress Ink. I then inked the edges with Vintage Photo Distress Ink and a blending tool.


To complete the card, I added a sentiment from the Sketch Greenery Stamp Set.

Woodland Santa Christmas Card by Juliana Michaels Tim Holtz Sizzix Christmas 2021

As always, I super appreciate you stopping by and I hope you found a bit of inspiration in this project that you can use!

Supplies

You can find the products I used to create this project along with compensated affiliate links to  Scrapbook.com. These links are at absolutely no extra cost to you. If you want to learn more about what an affiliate link is, you can see my full affiliate and product disclosure statement here.

Tim Holtz 2020 Christmas Review

Hey crafty friends! Today I've got something fun to share with you... a review of all the makes I created for Tim Holtz in 2020 as a maker for his Sizzix and Stampers Anonymous Releases. I thought it would be fun to go back and look through what I created and then share them all in one place with you! It was so fun to go back through my projects and be reminded of all the awesome products and fun techniques.
 
Some of the products may be retired, such as some of the dies, but the stencils, stamps and other basic supplies are still available. I've linked to each project and it's original blog post where you can find a complete supply list for that specific project. However, if you just want to shop you can click each image and go directly to the shopping list for each project. Affiliate links to Scrapbook.com are used at absolutely no cost to you. You can learn more about affiliate links here.

First up are the projects I created for the Tim Holtz Christmas 2020 Sizzix Release.

Making Spirits Bright Christmas Tag by Juliana Michaels Tim Holtz Sizzix


Baby It's Cold Outside Card by Juliana Michaels Tim Holtz Sizzix


Christmas Greetings Card by Juliana Michaels Tim Holtz Sizzix


Season's Greetings Card by Juliana Michaels Tim Holtz Sizzix


Santa Tag by Juliana Michaels Tim Holtz Sizzix


Merry Embroidery Hoop Christmas Decor by Juliana Michaels Tim Holtz Sizzix


Joy Shaker Card by Juliana Michaels Tim Holtz Sizzix


Merry Card by Juliana Michaels Tim Holtz Sizzix


Next up are the projects I created for the Tim Holtz Christmas 2020 Stampers Anonymous Release.

Striped Santa Christmas Card by Juliana Michaels Tim Holtz Stampers Anonymous


Season's Greetings Card by Juliana Michaels Tim Holtz Stampers Anonymous


Snarky Cats Christmas Tree Card by Juliana Michaels Tim Holtz Stampers Anonymous


Joy To The World Card by Juliana Michaels Tim Holtz Stampers Anonymous


Poinsettia Tags by Juliana Michaels Tim Holtz Stampers Anonymous


A Merry Christmas Vintage Holidays Card by Juliana Michaels Tim Holtz Stampers Anonymous


Peace On Earth Christmas Card by Juliana Michaels Tim Holtz Stampers Anonymous


Special Delivery Christmas Card by Juliana Michaels Tim Holtz Stampers Anonymous


Thanks so much for stopping by today and I hope you enjoyed this Tim Holtz 2020 Christmas Review!

PIN ME!!!

Tim Holtz Sizzix Christmas 2020 Review


PIN ME!!!

Tim Holtz Stampers Anonymous Christmas 2020 Review


Holiday Things & Mini Bold Tidings Gift Tags | Tim Holtz Stampers Anonymous Christmas 2021

Christmas will be here before you know it, so now's the time to start working on your Christmas gift tags! I created these for the Tim Holtz Stampers Anonymous Christmas 2021 YouTube Live Release and today I want to share all the details about them with you. These are perfect for an assembly line set up and you could easily do a bit each day to get your tags made and ready to go! I've even broken down the steps to give you an idea on how to do them this way.

Holiday Things & Mini Bold Tidings Gift Tags

Holiday Things & Mini Bold Tidings Gift Tags by Juliana Michaels featuring Tim Holtz Stampers Anonymous Christmas 2021

To get started, I began by die cutting the tags from kraft cardstock using a tag die. You could also cut these using a paper trimmer. These tags are 2x4 inches.


Next, I stamped took the greenery images from the Holiday Things Stamp Set and stamped them around the edges of the tags using Picket Fence Distress Ink.


I then added the sentiment from the Mini Bold Tidings Stamp Set, which I stamped in either Festive Berries or Rustic Wilderness Distress Oxide Ink.


Before continuing with any other embellishments, I used my sewing machine to add some stitching around the edges.


For the die cuts, I began by creating some background using Distress Sprays and Distress Mica Stains. I made one using Peeled Paint and Crushed Olive Distress Spray and Holly Branch Distress Mica Stain. For the other I used Mowed Lawn and Rustic Wilderness Distress Sprays and Tree Lot Distress Mica Stain.
I then die cut the holly leaves and one of the pieces of greenery from the Festive Bouquet Thinlits and trimmed them to create a little cluster to place at the top of each tag.


The ribbon is a piece of seam binding that I dyed using Festive Berries Distress Spray and a tiny bit of Aged Mahogany Distress Spray.

I then finished off each tag with a metal charm from my stash of Tim Holtz Christmas Idea-ology. Every year Tim releases some fabulous new goodies, so feel free to either use your stash or grab some of the new options such as the Tiny Bells or Snowflake Adornments.


Assembly Line Production

Here is an example of how you could break down each of the steps to create your tags over multiple days or slots of time that you have available.

1. Create backgrounds with sprays/inks - you could also just use colored cardstock and splatter with gold ink for a touch of shimmer
2. Custom dye and dry seam binding ribbon then create bows - you could also just use red ribbon
3. Die cut the tags and greenery
4. Stamp the backgrounds and sentiments
5. Add the machine stitching
6. Adhere the ribbon and charms

Holiday Things & Mini Bold Tidings Gift Tags by Juliana Michaels featuring Tim Holtz Stampers Anonymous Christmas 2021

Whether you sit down and do it all at once or spread it out over several days, I hope you found some inspiration for creating your Christmas gift tags this year! Thanks so much for stopping by today!

Supplies

You can find the products I used to create this project along with compensated affiliate links to  Scrapbook.com. These links are at absolutely no extra cost to you. If you want to learn more about what an affiliate link is, you can see my full affiliate and product disclosure statement here.

Subscribe