New Tim Holtz Distress Color | Lost Shadow

Hello friend! Today I'm going to share all about the new Tim Holtz Distress Color Lost Shadow. Before I get started, I want to thank Scrapbook.com for their generosity in sending this new color to me to create with. It's a beautiful, light cool gray color that fits in perfectly with the Distress Palette! As always, it's available in all the regular formats including the Distress Ink, Oxide Ink, Distress Spray, Oxide Spray, Distress Paint and Distress Embossing Glaze. In this blog post, I'm going to share some swatches I created and then take you step by step through how I created this Choose Happy card using the Lost Shadow Distress Color.

Choose Happy Card by Juliana Michaels featuring Tim Holtz Lost Shadow Distress Color

LOST SHADOW DISTRESS SWATCHES

When I got the new color, the first thing I did was create some swatches. I've done these same swatches for the last several new colors and I've found it really helpful for getting to know the new color and how I might want to use it. You can check out my red swatches for Lumberjack Plaid, pinks for Saltwater Taffy and blue for Uncharted Mariner. I plan to do this for all of the colors and then I want to display all of the tags somehow in my craft room. Along with the Lost Shadow swatches, I also made swatches for Hickory Smoke, Pumice Stone and Black Soot to show you a comparison of the color.

Lost Shadow Distress Color Swatches

CHOOSE HAPPY CARD | TIM HOLTZ DISTRESS COLOR LOST SHADOW

Besides creating the swatches, I also made a card. I used the Lost Shadow Distress Ink, Distress Oxide Ink, Distress Spray Stain and the Embossing Glaze. Keep scrolling to read all the details OR you can check out this video I created to show you how I created it.

The first thing I started with was the background. I began with a piece of Distress Watercolor Paper cut to 4.25 x 5.5 inches and embossed it with the Scrapbook.com Mosaic A2 Die. Yep, you read that correctly. I'm going to use the die to emboss.

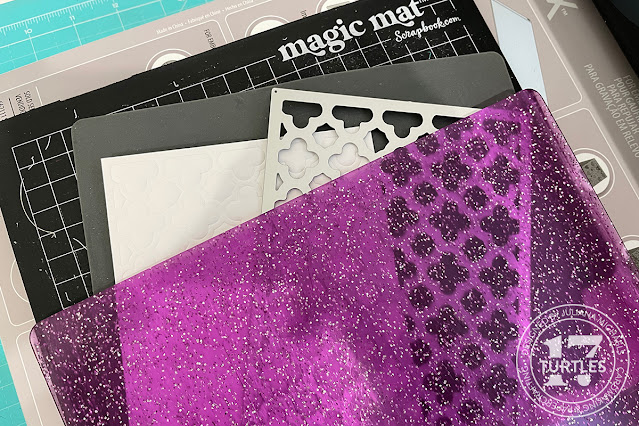
The sandwich I used with my Sizzix Foldaway die cutting machine (you can also use this same sandwich with the Sizzix Switch) is as follows: Base plate, Scrapbook.com Magic Mat, Silicone Mat, Paper, Die, Top Plate. If you have a different machine, please refer to your machine's instructions for the proper sandwich. I also used a piece of Mint Tape to hold the die in place since the paper was the same size as the die and I didn't want it to accidentally move as I ran it through the die cutting machine.

Die cutting sandwich used for embossing with a die

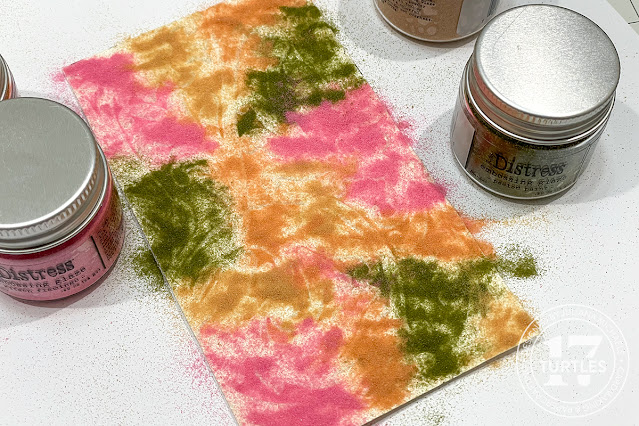
After embossing the paper I added some color and grunge using the Lost Shadow Embossing Glaze. If you aren't familiar with embossing glaze, it's really just embossing powder, but instead of being opaque it's transparent so you can actually see through it. This makes it fun to layer over printed or stamped images. Even though I'm not using it that way here, you can still use it to add color to your project. 

Taking the embossed paper, I rubbed over the surface with an embossing ink pad. You don't need to push hard as you're just trying to get ink onto the raised areas, but if you do push harder and you get more ink, it's totally fine! I then poured the Lost Shadow Embossing Glaze over the paper and tapped off the excess powder. After doing this, I felt like there was too much of the powder on the paper, so I used my finger to lightly wipe off some of the powder and then returned the excess powder to the jar. Next, I used my heat gun to melt the embossing powder, making sure to let the heat gun warm up a little bit before I started and then making sure to keep it moving over the paper and avoiding leaving it in one spot for too long. As the heat gun warms the powder, the magic starts to happen as the embossing powder begins to melt and become shiny. Once all of the powder is melted, you're ready for the next step....the addition of a little grunge!

For this step, I used a Hickory Smoke Distress Crayon, a stencil brush and just a bit of water. I began by coloring onto the embossed paper with the crayon and then used the brush to work the crayon into the embossed design and the cracks and crevices from the embossing glaze. You can use a tiny bit of water, if needed, to help move the color around a little easier. I only applied the color around the outer edge of the paper because I planned to cover it with my embellishments. Once I had the outer edge of the card covered with crayon, I tapped my tap my finger into some of the water that was still on my mat then lightly wipe my finger over the surface to gently remove some of the crayon, while revealing the color that has gotten into the cracks and crevices!

Next up, I took a piece of Distress Watercolor Paper and die cut it using one of the tag dies from the Scrapbook.com Nested Tag Die Set. I then added some stamping to it using the script stamp from the Tim Holtz Entomology Stamp Set. To do this, I placed the tag into my MISTI and because the stamp is larger than the tag, and I can't use the magnet, I apply a bit of removable adhesive to the back side of the tag to help hold it in place. Next, I spray the stamp with the Lost Shadow Distress Spray Stain. I then close the MISTI to stamp the image on the paper. If you don't have the spray, you can get the same look by inking the stamp with a Distress Ink pad and then spritzing it with a bit of water before you stamped the image. I wanted a little more color on the bottom and top edges of the tag, so I added more ink and restamped the image. After I stamped the image, I used my heat tool to dry the ink. For the tiny bits that were taking too long to dry, I used a paper towel to speed it up. As for the adhesive I put on the back side, you can easily rub it off if you want. Next, I'm inking the edges with a bit of Hickory Smoke Distress Oxide Ink for a little contrast. I can then set this to the side and move onto to the next layer.

The next step for this card was to create a couple of pieces of custom colored paper to use for die cutting. I used the Ink Smooshing technique with a piece of Distress Watercolor Paper. I made one piece with Lost Shadow Distress Ink and a second piece with Salvaged Patina Distress Ink. 

The dies I used are the Tim Holtz Tailored Die Set, Adorned Die Set and the Scrapbook.com Butterflies 1 Die Set and I cut the various pieces from my custom colored paper. One little tip when working with the Tailored Die Set that I've found to be helpful is to cut the shirt part from a piece of printer paper. I've found that when I use regular cardstock the collar doesn't fold down very easily and this thinner paper does and gives it a more of a crisp look.

To add a little more interest to the hat and jacket die cuts, I embossed them using the Tim Holtz Woven 3D Embossing Folder. Before doing this, I spritzed the backside of the paper so as not to activate the ink on the front of the paper and then ran it through my die cutting machine.

After I had embossed the hat and jacket, I highlighted the texture by lightly rubbing the Hickory Smoke Distress Oxide ink pad over the die cuts. I used a repositionable adhesive to help hold them in place while I did this. I then took a blending tool and applied Hickory Smoke Distress Oxide Ink to the edges of the hat, jacket, tie and butterfly die cuts. I also applied this same ink to the other hat layers and vest to darken them slightly and create a little more contrast.

After I finished inking the die cuts I assembled all the pieces and layers using Distress Collage Medium. Once the die cuts were assembled, I adhered them to the tag using double sided foam adhesive to give them a little bit of dimension. You could also use Collage Medium to adhere them if you're planning to mail your card and want to avoid the extra bulk from the foam tape.

Once I got everything adhered to the tag, I grabbed the background and the flourish die cuts and began arranging how I wanted them positioned behind the tag. I cut one of them in half to add a little extra curl to the right side of the tag. To help hold the die cuts in place, I applied Easy Tear Tape to the back side of the tag, removed the liner, placed the tag on top of the flourishes and pushed down to help them stick to the tape. To adhere the tag to the background I use double sided foam adhesive. This adds more dimension, which I personally love, but if you want to avoid that you could also use a different adhesive.

The final touch for the card was the addition of a sentiment. I used the Choose Happy stamp from the Scrapbook.com Wordfetti Oh So Happy Stamp Set. They have 2 stamp sets with this awesome typewriter font and there are a ton of great sentiments and sayings to choose from to fit your specific cards needs. I stamped the sentiment using Lost Shadow Oxide Ink onto a piece of white cardstock and then trimmed it down using my new favorite scissors, the Tim Holtz 9.5 Inch Non Stick Scissors. The long blades makes it easier to get a straight cut, although it's not quite as straight as using a paper trimmer. After I trimmed it down, I inked the edges with a little Hickory Smoke Oxide Ink and then adhered the sentiment with a strip of foam adhesive.

Thanks so much for stopping by today. I hope you enjoyed this bit of inspiration using the new Tim Holtz Distress Color Lost Shadow!

SUPPLIES

Below you can find the products I used to create this card along with compensated affiliate links to Scrapbook.com. These links are at absolutely no cost to you. When you shop through the links below, I receive a small commission from Scrapbook.com. These links are at absolutely no cost to you and the commission I receive helps me cover the costs of my blog and other expenses, which allows me to continue to provide you with FREE inspiration and tutorials. If you want to learn more about what an affiliate link is, you can see my full affiliate and product disclosure statement here. Thank you so much for your love and support!

Brushstroke and Butterfly Birthday Card

I'm starting off the year with a plethora of birthday card inspiration for you. This is in part because I have a ton of family and friend birthday's during the next couple of months and my goal is to create a card for each one of them! The card I'm sharing today was created for my Mom, who's birthday happens to be today. By now she'll have received her card, so I figured I'd be safe to finally share it. The elements and colors I used on this card were greatly inspired by things she loves...flowers and the color purple!

Happy Birthday Card by Juliana Michaels featuring Tim Holtz Brushstroke Thinlits and Scrapbook.com Nested Large Butterflies Dies

BRUSHSTROKE AND BUTTERFLY BIRTHDAY CARD


To get started, I die cut a piece of Distress Watercolor Paper using the middle size of the Scrapbook.com Nested Large Butterflies Die Set. I then ink smooshed the paper into a mix of Antique Linen and Old Paper Distress Ink and dried it with my heat tool. Next, I embossed the paper using the Tim Holtz 3D Lumber Texture Fade. Before embossing it though, I inked the folder with Vintage Photo Archival Ink, making sure to get the ink down into all the cracks, spritzed the paper once on the back side, placed it into the embossing folder and then ran it through my Sizzix Foldaway. By inking the folder, it pushed the ink down into the design. I then lightly applied Vintage Photo Distress Ink over the paper and Walnut Stain to the edges using a ink blending tool.


The sentiment is from the Scrapbook.com Happy Birthday Stamp Set. It is stamped onto white cardstock using Black Soot Archival Ink. I applied Walnut Stain Distress Ink to the edges with a foam blending tool, after I had trimmed it into a strip. Before I adhered the sentiment with double sided foam tape, I placed some strands of Tim Holtz Mummy Cloth underneath it to add a little texture.


I used the Tim Holtz Brushstroke Thinlits Die Set for the flowers and cut them from different colors of Sizzix Cardstock. Before I die cut the flowers, I ran the paper through a Xyron Create-A-Sticker to apply adhesive to the backside of the paper which makes assembling the flowers much easier and less messy than trying to use a liquid adhesive. After I had assembled the flowers, I inked the edges with Walnut Stain Distress Ink. I then used double sided foam adhesive to adhere them to the butterfly and to create a little dimension.


To finish the card, I trimmed a piece of patterned paper from the Tim Holtz Backdrops Paper Pack, inked the edges with Walnut Stain Distress Ink, added some machine stitching and adhered it to a piece of purple cardstock. The completed card size is a standard A2 card of 4.25 x 5.5 inches.


Thanks for stopping by today! I'll be creating and sharing more birthday cards soon. Should I put them all into one post or keep them separated? Just curious if you all have any thoughts on that.

SUPPLIES

Below you can find the products I used to create this card along with compensated affiliate links to Scrapbook.com. These links are at absolutely no cost to you. When you shop through the links below, I receive a small commission from Scrapbook.com. These links are at absolutely no cost to you and the commission I receive helps me cover the costs of my blog and other expenses, which allows me to continue to provide you with FREE inspiration and tutorials. If you want to learn more about what an affiliate link is, you can see my full affiliate and product disclosure statement here. Thank you so much for your love and support!

Tailored Hello Card | Tim Holtz 2023 Sizzix Everyday

Hello crafty friend! I'm back today with my second make from the Tim Holtz 2023 Sizzix Everyday YouTube Live. For this make, I created a card using several of the new dies including Tailored, Brushstroke and Alphanumeric Emporium. Below, I'm sharing all the little details that helped bring this card to life.

TAILORED HELLO CARD


Before I get started, I want to share a little back story on some of the inspiration for this card. In November 2022, Tim did several YouTube Lives that he called his Holiday Hoopla 2022 and in each one he shared some fantastic holiday crafting ideas. In Holiday Hoopla Part 2 he shared a simple, yet gorgeous idea that really spoke to me and when I started thinking about what I might create with his new Sizzix release, I knew that I wanted to incorporate his Two-tone Wood Grain Die Cutting idea in somewhere. As I said, it's a rather simple idea, but he does share some great tips for it in his video so feel free to take a few minutes to check it out. You can go straight to this technique here.

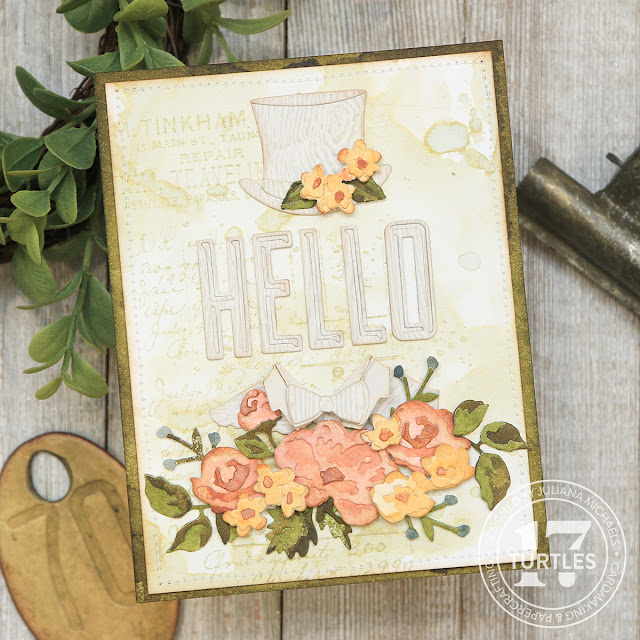
Tailored Hello Card by Juliana Michaels featuring Tim Holtz Sizzix 2023 Tailored, Brushstroke and Alphanumeric Emporium

For this technique you'll need some of his Gray Two-tone Woodgrain Paper. Hopefully you snagged some while it was available. It was part of his seasonal Christmas release and it seems to be sold out now. I personally hoarded 5 packs of it because I knew I'd want to use it throughout the coming making season.

Using the Gray Two Tone Woodgrain Paper, I die cut the top hat, one of the folding shirts/coats and the bow tie from the Tailored Thinlits die set. I made sure to place the dies with the most surface area that would be visible once assembled in a vertical position on the paper. This really helps add to the woodgrain look. Before die cutting the pieces, I ran the paper through my Xyron Create-A-Sticker to apply adhesive to the backside of the paper and to make assembly faster, but you can certainly use your favorite adhesive to do this.

I used this same technique to cut out Hello using the Alphanumeric Emporium Thinlits. I cut the letters out twice and adhered the letter along with the negative inside pieces and just the letter to build them up and create a little dimension. I also inked the edges of the assembled die cuts with Vintage Photo Distress Ink before adhering them to the card.


The sweet little flowers are from the Brushstroke Thinlits Die Set. I also used the Xyron Create-A-Sticker to apply adhesive to the paper before I die cut and assembled the flowers. These dies are super small and the Xyron Create-A-Sticker saved me loads of time when I started assembling the flowers.

Before any of this though, I took several pieces of Distress Watercolor Paper (you just need pieces that are large enough to die cut, so you could also use scraps) and sprayed each piece with a different color of Distress Spray Stain to create my own colored cardstock. I used Peeled Paint, Forest Moss, Tea Dye, Tattered Rose, Scattered Straw and Iced Spruce. I also created a panel that was 4.25 x 5.5 using the Peeled Paint Distress Spray Stain and I used this as my card base.

Once the die cutting was completed, I began assembling the flowers and creating the clusters that I adhered to the card.


Now let me discuss the background. I created this after I had done all of my die cutting, but if you are wanting to recreate this idea, you can certainly do this first so that it's ready to go once you're finished with all of the die cutting.

To create the background I took a piece of Distress Watercolor Paper trimmed to 4 x 5.25 inches and ink smooshed it into some Old Paper Distress Ink and water. I dried it with my heat tool and repeated the process until I was happy with the look. Next, I used the text stamp from the Distinguished Stamp Set and the ledger stamp from the Etcetera Stamp Set. I inked the stamps with Old Paper Distress Ink. I very lightly inked the edges with Vintage Photo Distress Ink and then added some machine stitching around the outside edge.


Thanks for stopping by and taking a look at how I created this Tailored Hello Card using some of the new dies from the Tim Holtz Sizzix 2023 Release.

SUPPLIES

Below you can find the products I used to create this card along with compensated affiliate links to Scrapbook.com. These links are at absolutely no cost to you. When you shop through the links below, I receive a small commission from Scrapbook.com. These links are at absolutely no cost to you and the commission I receive helps me cover the costs of my blog and other expenses, which allows me to continue to provide you with FREE inspiration and tutorials. If you want to learn more about what an affiliate link is, you can see my full affiliate and product disclosure statement here. Thank you so much for your love and support!

3 Chaps Coffee Company | Tim Holtz 2023 Sizzix Everyday Release

Coffee lovers unite! I'm a huge coffee lover myself, so when I saw the Papercut Cafe Die set from the Tim Holtz 2023 Sizzix Everyday Release, the creative ideas began to brew!

Those ideas turned into this 3 Chaps Coffee Company Framed Panel that I created for the Tim Holtz Sizzix 2023 YouTube Live. To create this panel I used a combination of the new dies, one of the new embossing folders, along with an older Alphanumeric set and a stencil. To learn all the details on how this came together, grab yourself a cup, sit back and continue the scroll.

3 CHAPS COFFEE COMPANY FRAMED PANEL


3 Chaps Coffee Company Framed Panel by Juliana Michaels featuring Tim Holtz Sizzix 2023 Gentlemen Thinlits, Alphanumeric Emporium, Papercut Cafe Thinlits and Dotted Embossing Folder

To get started, I used the Tim Holtz Framed Panel as my base. I applied a thin layer of Black Soot Acrylic Paint to the frame and sanded it lightly to reveal the wood beneath. I then took the base, measured it and cut a piece of Distress Watercolor Paper to the same size.


I placed the Tim Holtz Splatters Stencils on the paper and applied Vintage Photo Distress Ink through the stencil using a blending brush. I moved the stencil around to create splatters across the entire background. Next, I ink blended the edges of the paper using Vintage Photo Distress Ink, making sure to leave the area toward the center with minimal to no ink. I then used Distress Collage Medium to adhere the stenciled background to the base and then adhered the frame.


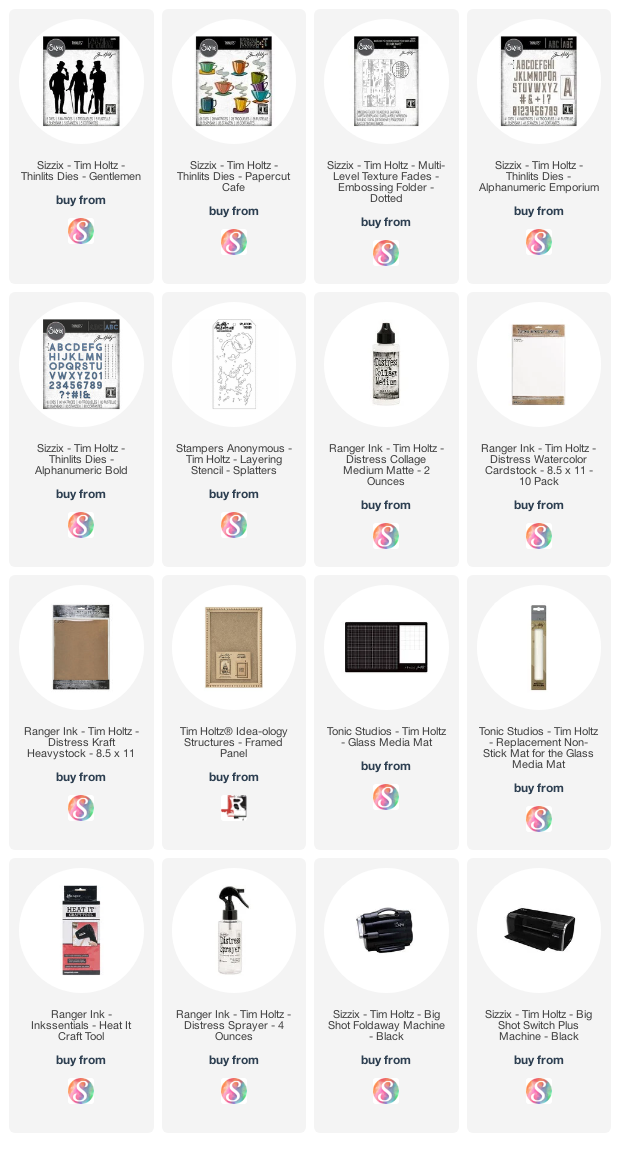
Next, up I die cut the 3 Chaps from Black Kraft Stock using the Gentlemen Thinlits Die Set. I then placed each one into the Dotted Embossing Folder and ran it through my die cutting machine to emboss the paper making sure to place each one onto a different area of the embossing folder so they would each have a slightly different embossed design. To add some interest, I very lightly sanded over the embossed design to reveal the kraft paper core.


For the coffee cups, I used the Papercut Cafe Thinlits Die Set. I cut out one of each of the five different cup designs using textured cardstock. Before I die cut the pieces, I ran the paper through my Xyron Create-A-Sticker which applies adhesive to the backside of the paper. I then die cut the various pieces. Once the paper is cut, all you have to do is peel and stick to assemble the die cuts. This makes assembling these more detailed die cuts a breeze! Tim has mentioned using a Xyron machine to do this and I'll admit to not seeing the need for it. However, as a little Christmas present to myself, I purchased one. Now that I've tried it and realized how much time it saves (as compared to applying liquid adhesive to those tiny pieces) AND the frustration it alleviates, I am SOLD! It's definitely a great tool for applying adhesive to small layered die cuts and something I'll be using going forward when working with small layered die cuts.


Now onto the title. As I was assembling the gentlemen and coffee cups the name 3 Chaps AKA Gentlemen came to me and I was sold! I used the Alphanumeric Bold to cut out 3 Chaps from Black Kraft Stock and from Distress Kraft Heavystock and you guessed it, I used my Xyron Create-A-Sticker! I layered them to give the letters a little more dimension. I then used the new Alphanumeric Emporium to cut out Coffee Co and yep....I used the Xyron Create-A-Sticker on this as well. For this part, I cut out the letters from Distress Kraft Heavystock keeping the negative pieces and then a second time from Black Kraft Stock keeping only the letter. Having the adhesive on them made the assembly so fast and easy!

3 Chaps Coffee Company Framed Panel by Juliana Michaels featuring Tim Holtz Sizzix 2023 Gentlemen Thinlits, Alphanumeric Emporium, Papercut Cafe Thinlits and Dotted Embossing Folder

Well there you have it! I hope you enjoyed learning out my 3 Chaps Coffee Company Framed Panel came together and that you got some inspiration on how to use some of the new dies from the Tim Holtz Sizzix 2023 Release.

SUPPLIES

Below you can find the products I used to create these project along with compensated affiliate links to Scrapbook.com. These links are at absolutely no cost to you. When you shop through the links below, I receive a small commission from Scrapbook.com. These links are at absolutely no cost to you and the commission I receive helps me cover the costs of my blog and other expenses, which allows me to continue to provide you with FREE inspiration and tutorials. If you want to learn more about what an affiliate link is, you can see my full affiliate and product disclosure statement here. Thank you so much for your love and support!

Happy Birthday Cards | Tim Holtz Sizzix 2023

Hello crafty friend and welcome! Today I'm celebrating in more ways than one. I'm celebrating the Tim Holtz 2023 Sizzix Release and I'm doing it by sharing some birthday cards! The new release is now available at Scrapbook.com and I want to thank them for sending some of the new products to me to create with. This new release has you covered from New Year's to Summer Vacation, and includes dies that are perfect for Valentine's Day, Easter, Spring, Mother's Day, Father's Day, 4th of July and so much more! 

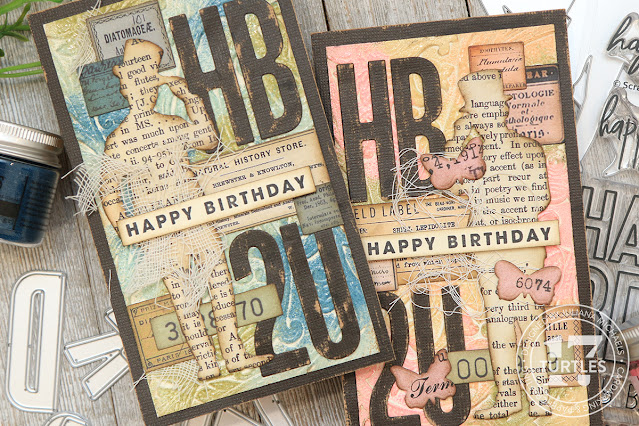
It also got me in the mood to start working on my birthday cards for the year and what better way to do that than to create two versions of the same card. Just by switching out the colors I was able to create a masculine and feminine version of the same card. If you prefer a different color choice you can always go neutral or even rainbow or choose the intended recipients favorite color! You may also notice that I didn't use traditional looking birthday dies to create my cards (even though there is a set that is perfect for celebrations) and went with ones that fit my design style. Even though they are nontraditional, they still lend themselves perfectly to creating birthday cards and it shows just how versatile these die sets can be!

Happy Birthday Cards by Juliana Michaels featuring the Tim Holtz Sizzix 2023 release including Entangled 3D Embossing Folder, Gentlemen Thinlit Dies and Alphanumeric Bulletin Thinlit Dies.

Blue Masculine Happy Birthday Card

Before I go into the details, I want to share that both of these cards are a modified/mini slimline and measure 3.5 x 6 inches. I ended up with this size because I started off with the idea of making a tag using the Tim Holtz Mixed Media Heavystock Number 8 Tag as my base. After creating the first tag though, I decided to trim off the top just below the hole reinforcer mount it onto a piece of black Kraftstock and turn it into a card.

Blue Masculine Happy Birthday Card by Juliana Michaels featuring the Tim Holtz Sizzix 2023 release including Entangled 3D Embossing Folder, Gentlemen Thinlit Dies and Alphanumeric Bulletin Thinlit Dies.

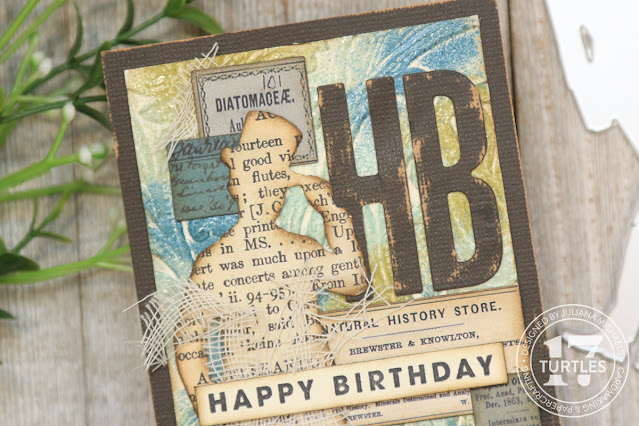
To get started, I began with the Tim Holtz Mixed Media Heavystock Number 8 Tag and embossed it using the 3D Entangled Embossing Folder. I did not spritz the paper with water and only ran it through my die cutting machine once.


Next, I rubbed an embossing ink pad over the surface of the tag and then sprinkled a mix of Distress Embossing Glazes over the inked tag. I used my fingers to pick up the powder and sprinkle it onto the tag. On this card I used the following colors: Uncharted Mariner, Peeled Paint, Speckled Egg and Weathered Wood. Once I had covered the surface, I tapped off the excess into the trash can and then used my embossing gun to melt the embossing glaze. If you want an even more distressed effect, you can rub a brown Distress Crayon over the surface and then use your finger to rub it into the cracks and crevices. I've used this Glazed Ceramic Effect in the past and had planned to do it on this tag, but I ended up changing my mind and went for the less distressed look.


After the background was completed, I began adding the layers of labels and die cuts. The small labels are from the Tim Holtz Ephemera Snippets. I selected some that were cream, blue and green to coordinate with the background.

Blue Masculine Happy Birthday Card by Juliana Michaels featuring the Tim Holtz Sizzix 2023 release including Entangled 3D Embossing Folder, Gentlemen Thinlit Dies and Alphanumeric Bulletin Thinlit Dies.

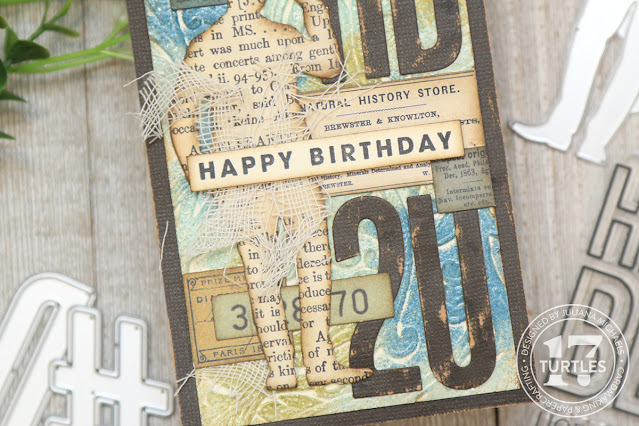
Next, I took the Gentlemen Thinlits and die cut one of them from a piece of text paper from the Tim Holtz Backdrops Volume One. I also cut it from a thin piece of chipboard and glued these layers together to give the die cut a little more stability. I then inked the edges with Walnut Stain Distress Ink. Next, I die cut the HB2U from Black Kraftstock using the Alphanumeric Bulletin Dies (minus the outside border piece) and sanded it slightly to reveal the kraft core.

I used Distress Collage Medium to adhere the labels and die cuts to the background. Because the surface is covered with the embossing glaze, I recommend placing something heavy on top of the piece and giving it some time to dry.

Blue Masculine Happy Birthday Card by Juliana Michaels featuring the Tim Holtz Sizzix 2023 release including Entangled 3D Embossing Folder, Gentlemen Thinlit Dies and Alphanumeric Bulletin Thinlit Dies.

For some added texture I tucked it some small pieces of Mummy Cloth which looks a bit like cheese cloth. It is a wonderful way to add some texture. Unfortunately it is only available during Halloween, so you may have a tough time locating it if you don't already have some in you stash.

The final touch was the sentiment, which is from the Scrapbook.com Happy Birthday Stamp Set. I stamped it onto a piece of Distress Mixed Media Heavystock using Black Soot Archival Ink. I then trimmed it down, inked the edges with Walnut Stain Distress Ink and adhered it to my card using double sided foam tape.

Blue Masculine Happy Birthday Card by Juliana Michaels featuring the Tim Holtz Sizzix 2023 release including Entangled 3D Embossing Folder, Gentlemen Thinlit Dies and Alphanumeric Bulletin Thinlit Dies.

Pink Feminine Happy Birthday Card

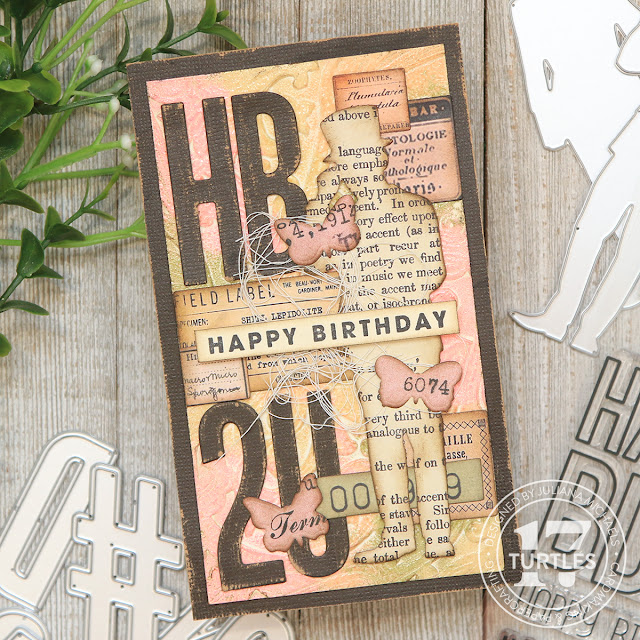
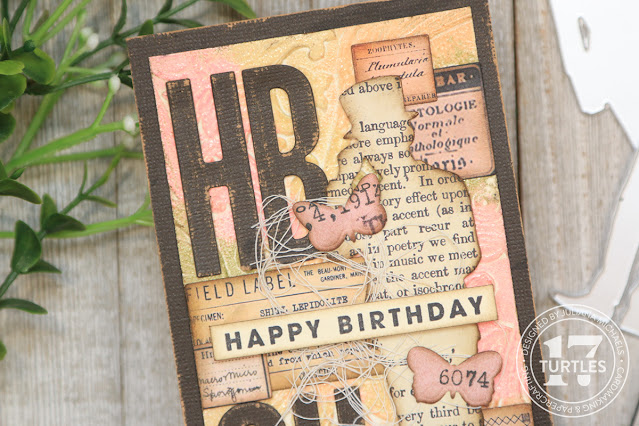
On this card, I used all the same techniques as the blue version. The only differences are that I used different embossing glaze colors, a different Gentlemen die and added some small butterfly die cuts.

Pink Feminine Happy Birthday Card by Juliana Michaels featuring the Tim Holtz Sizzix 2023 release including Entangled 3D Embossing Folder, Gentlemen Thinlit Dies and Alphanumeric Bulletin Thinlit Dies.

For the background I used Peeled Paint, Tattered Rose, Antique Linen and Kitsch Flamingo Embossing Glazes.


I selected labels that were cream, pink and green ink color. For the butterflies, I used a piece of pink paper from the Backdrops Volume One Paper Pad and cut it using the Scrapbook.com Butterflies 2 Die Set. Before adhering them to the card, I bent up the wings and then only applied adhesive to the body part so that they would have a little dimension.

Pink Feminine Happy Birthday Card by Juliana Michaels featuring the Tim Holtz Sizzix 2023 release including Entangled 3D Embossing Folder, Gentlemen Thinlit Dies and Alphanumeric Bulletin Thinlit Dies.

I once again used some of the Mummy Cloth for added texture, but this time I used some piece that had pulled loose and where like long threads that I swirled and twisted together.

Pink Feminine Happy Birthday Card by Juliana Michaels featuring the Tim Holtz Sizzix 2023 release including Entangled 3D Embossing Folder, Gentlemen Thinlit Dies and Alphanumeric Bulletin Thinlit Dies.

The final touch was once again the stamped happy birthday sentiment.

Pink Feminine Happy Birthday Card by Juliana Michaels featuring the Tim Holtz Sizzix 2023 release including Entangled 3D Embossing Folder, Gentlemen Thinlit Dies and Alphanumeric Bulletin Thinlit Dies.

Thanks so much for stopping by today! I hope you enjoyed this bit of birthday card inspiration using the Tim Holtz Sizzix 2023 release including Entangled 3D Embossing Folder, Gentlemen Thinlit Dies and Alphanumeric Bulletin Thinlit Dies.

Happy Birthday Cards by Juliana Michaels featuring the Tim Holtz Sizzix 2023 release including Entangled 3D Embossing Folder, Gentlemen Thinlit Dies and Alphanumeric Bulletin Thinlit Dies.

SUPPLIES

Below you can find the products I used to create these cards along with compensated affiliate links to Scrapbook.com. These links are at absolutely no cost to you. When you shop through the links below, I receive a small commission from Scrapbook.com. These links are at absolutely no cost to you and the commission I receive helps me cover the costs of my blog and other expenses, which allows me to continue to provide you with FREE inspiration and tutorials. If you want to learn more about what an affiliate link is, you can see my full affiliate and product disclosure statement here. Thank you so much for your love and support!

Craft Room Tour 2023

Hello there crafty friend! In this blog post I'm going to take you on a tour of my craft room and give you a look into how I store my craft supplies. Before I begin, I want to let you in on a little secret. I'm a relentless purger of things I haven't used within the past 6 months to a year. Between what I purchase myself and what I receive from the companies I work for, the amount of product adds up quickly, so the purging was something I started doing years ago to help me manage my stash. I place the items into a spare box and once it's full find the products a new home by either donating them or giving them away to fellow crafters. This process has helped me stay in my space without having to constantly add more storage options or furniture. I've also found that too many options tend to stifle my creativity so the purging allows me to surround myself with the products and supplies I love and that inspire me.

Juliana Michaels 17turtles Craft Room Tour 2023

Along with the purging, I'm also obsessed with organization. I find I do my best crafting and feel more inspired in a neat a tidy space. This is a personal preference, but one I've learned to embrace over the years. And yes, I clean up after every project! The products I create with are often what inspire me the most so being able to see them is very helpful for me. That is where open storage comes in handy and why you will see some of my products are more visible than others. At the same time though, I don't want to see all the things, so that's where the drawers and closets come in handy. I hope you enjoy this little tour and please let me know if you have any questions in the comments below. I've also included links to where you can purchase these storage options if they are still available. Now let's get on with the tour!

If you would like a video tour of my craft room, you can find that HERE or watch it below.


This is a long post with LOTS of photos, so feel free to grab a cup of your favorite beverage and sit back and enjoy the scroll. I'm sharing what I can with photos, but I highly encourage you to check out my video for more details.

My craft room is a spare room in my home. I'm going to be focusing on my craft room storage here, so you won't see a photo of where I actually work, but if you watch the video you will see it. I use an old kitchen table to work on and hope to refinish it this year to better match my room and get rid of the red oak stain on it!

Juliana Michaels 17turtles Craft Room Tour 2023

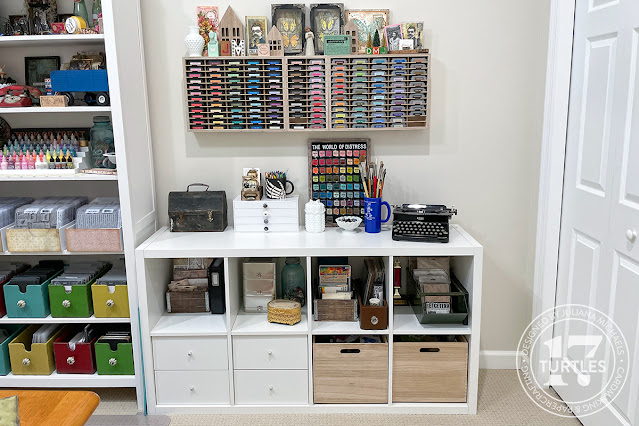
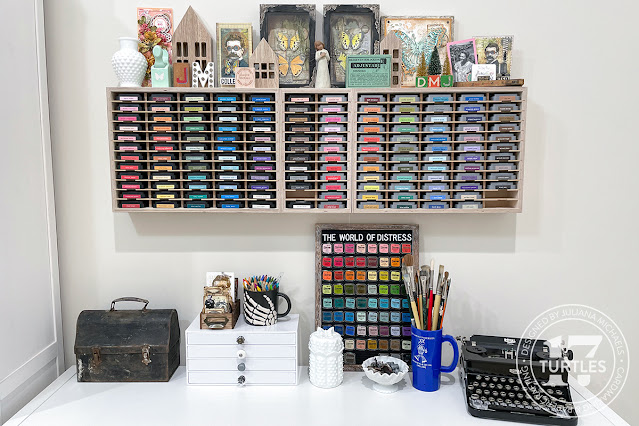
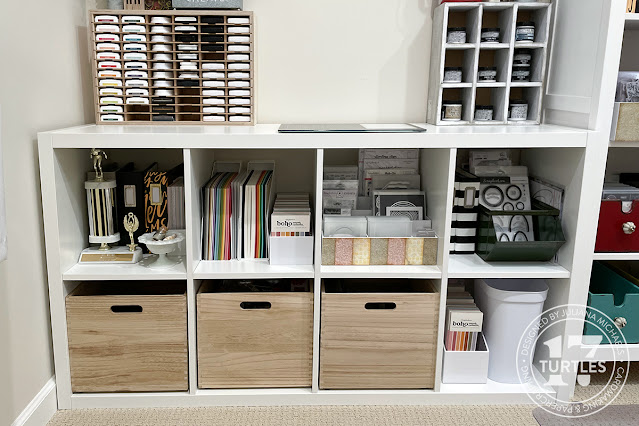
Behind my desk, I have a wall of storage using IKEA bookshelves and Kallax units. On this wall you can see my Distress Ink Storage. I have units from Stamp-N-Storage and have mounted them to the wall to free up counter space.

Below that is a Kallax unit turned on it's side and I actually use the top of it as a work surface at times. The black lunch box is where I store a lot of my Tim Holtz Idea-ology pieces. I also keep some in the white drawer unit. This is from Scrapbook.com but is sadly, no longer available. 

Distress Ink Storage Units Stamp-N-Storage

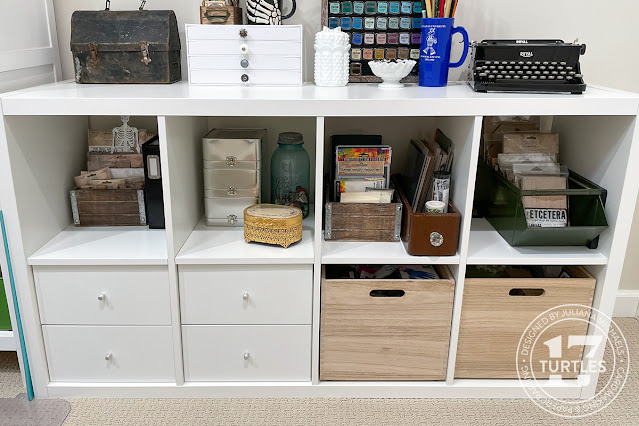
In the cubbies below I have stored my Tim Holtz products using a mix of storage options.

Tim Holtz Idea-ology Storage

The small wood crates were purchased several years ago at JoAnn in the garden/floral section and I use these to hold my Idea-ology paper and stickers. The black binder is a 6x8 album from Scrapbook.com and is where I store my ink swatches.


The brown drawer is an old sewing machine drawer and perfect for storing longer paper pads and sticker sheets. The green bin is a vintage hardware bin and I'm using it here to house my Tim Holtz Etcetera Thickboard. You might also notice the wood crates. I love these for storing items that I just don't want or need to see. The one on the left holds a mix of Idea-ology Vignettes and other surfaces and the one on the right holds my extra adhesives, foam squares, tape runners, refills, etc.

Tim Holtz Paper and Etcetera Storage

Also in the Kallax unit I have some drawers and in one of them I have my embossing powders organized.

Embossing Powder Storage

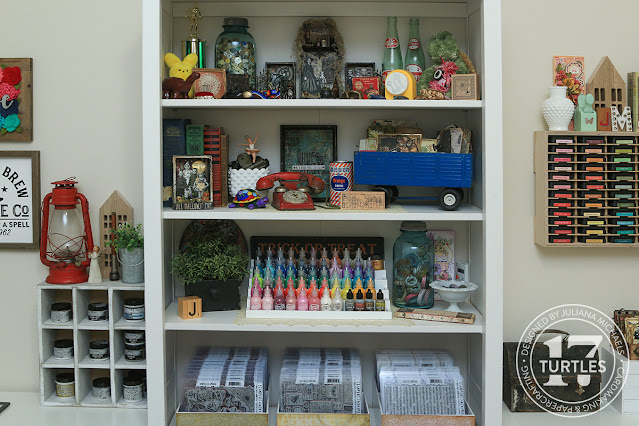
On the middle bookcase, I saved the top 2 shelves as a place to keep my knick knacks and to display some of my makes. It is also a place to add a little more color and interest!

Juliana Michaels 17turtles Craft Room Tour 2023

Below that I resume my product storage. Here I'm using a Totally Tiffany 6 Level Stadium to store and organize my Scrapbook.com Pops Of Color and Tim Holtz Foundry Wax. To the right of it, I have my washi tape in a vintage Ball Jar.

Scrapbook.com Pops of Color Storage Totally Tiffany Stadium

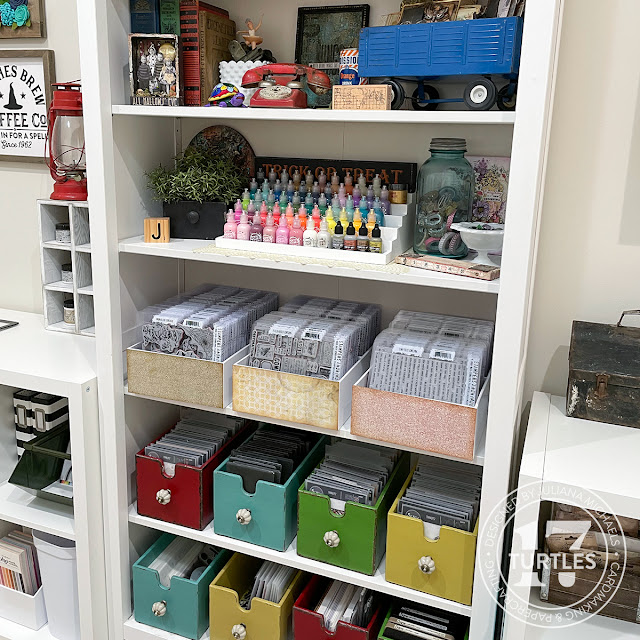
On the lower shelves is my Tim Holtz stamp and die collection.

Tim Holtz Stampers Anonymous Stamp Set Storage and Tim Holtz Sizzix Die and Embossing Folder Storage

I have the stamps stored in these Medium Envelope Organizer from Scrapbook.com and each organizer will hold 40 stamp sets. They were originally meant as a way to store and organize their medium storage envelopes, but once I realized my Tim Holtz stamps fit in them so perfectly, I began using them for that purpose. I just recently covered the front of each one with a piece of paper from one of Tim's Idea-ology Backdrops Paper Pads and love the color they add to my space.

Tim Holtz Stampers Anonymous Stamp Set Storage using Scrapbook.com Medium Envelope Organizer

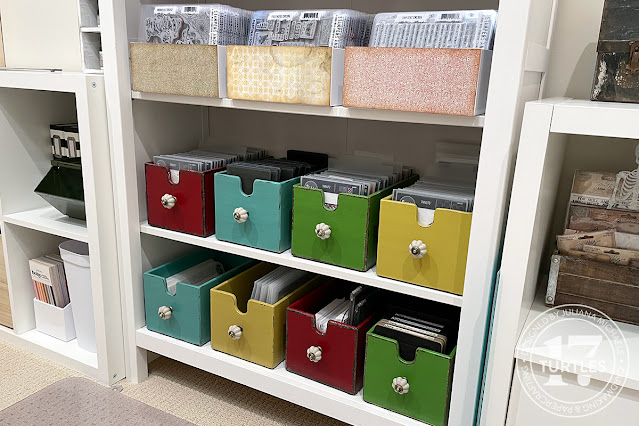
Next I have these wood drawers/crates where I store my Tim Holtz Sizzix dies and embossing folders. These are from Hobby Lobby and I've had them since at least 2016, but they're probably a couple years older than that. Unfortunately, they're no longer available, but if you're looking for something similar you might try getting a wood crate, spray painting it and adding a decorative knob or drawer pull. The wood makes these a bit heavy, especially with the added weight of the dies, but the wood also makes it a nice and sturdy option for that weight.

On the lower shelf you can find my Tim Holtz stencils (still looking for a better solution for these), Scrapbook.com Medium Storage Envelopes filled with paper scraps sorted by manufacturer/color, extra envelopes and card bases, extra stamping platforms and large stamp blocks and my Sizzix Bigz dies.

Tim Holtz Sizzix Dies and Embossing Folder Storage

Over on the left hand side, I have a similar set up as on the right with the use of another Kallax unit.

Juliana Michaels 17turtles Craft Room Tour 2023

Above the unit, I have some of my own creations hanging on the wall. The ink storage on the left is from Stamp-N-Storage and houses all my non-Distress Ink Pads. The cubby on the right side was a Jillibean Soup sample that never went to market, but it has become a great place to store my collection of Tim Holtz mediums.


Within the unit, I have a lot of my Scrapbook.com products stored in the top cubbies.

Juliana Michaels 17turtles Craft Room Tour 2023

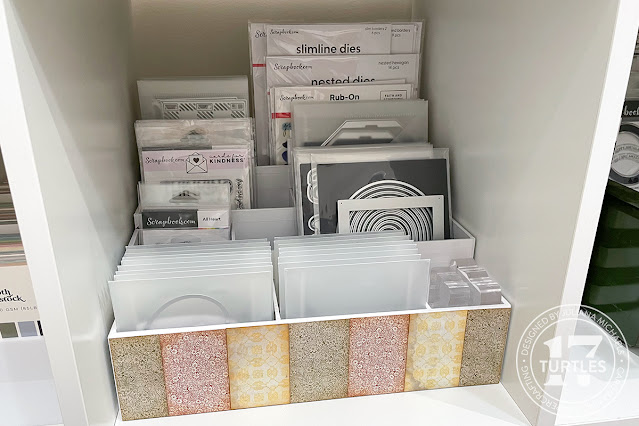
This is the Scrapbook.com Large Stadium Organizer. I'm using it to store a lot of my stamps and dies. This unit has 9 compartments in a variety of sizes that are perfect for storing so many crafting supplies. In the front I'm using the Scrapbook.com Small Storage Envelopes to organize some of my die sets. As with the other organizers, I adhered patterned paper to the front of the unit from a bit of color and interest.

Scrapbook.com Large Stadium Storage Organizer

In this cubby is another one of those vintage hardware bins and this one holds my larger stamp sets and stamps from other manufacturers, such as Pinkfresh Studio. The 6x8 albums are from Scrapbook.com and this is where I store my 6x8 stencils.

6x8 Albums for Stencil Storage

On the right hand side you can see the Scrapbook.com Ink Pad Organizer that I'm using to store my A2 Paper Pads. Next to this is my colored cardstock divided by manufacturer and stored in white plastic magazine holders.

In the wood crates, starting on the far left, I have my Tim Holt Halloween Idea-ology. The next one holds my Christmas Idea-ology and the one next to that holds my felt, ribbon and twine.

Scrapbook.com Ink Pad Storage used for A2 Paper Storage

And just in case you were wondering, this is all Ziva approved!

Ziva approving the craft room tour!

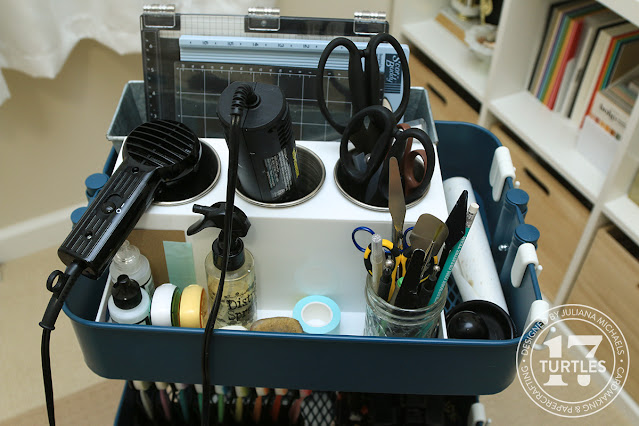
Next to my desk I have a Raskog cart. On the top, I have the Scrapbook.com Heat Tools and Accessory Organizer. This has quickly become one of my new favorite organizers and I love that I now have a safe place to store my heat guns after using them. I'm also using it to house my most frequently used tools, adhesives and other items. Behind it I have a metal planter I got from the craft store and I use that to hold my MISTI, scoring tool, and sticky mats.

Raskog Cart with Scrapbook.com Heat Tool and Accessory Organizer

On the second tier I have my blending brushes in a holder from Hero Arts, another metal planter holding more adhesives (foam squares, foam tape rolls, easy tear tape, etc) and my Sizzix Sidekick. On the very bottom shelf (not pictured) I store my Tim Holtz Tonic Comfort Trimmer and a roll of paper towels.

Raskog Cart with Scrapbook.com Heat Tool and Accessory Organizer

In front of my desk, I have a dresser drawer unit from IKEA. I show a bit more of this in my video. I use the top of it as my cutting station and you will find my Tim Holtz Tonic Guillotine Trimmer and Tim Holtz Sizzix Switch Die Cutting Machine here. The drawers are quite large and hold a ton of stuff.

The top drawers are a mix of junk drawers, small tools and die cutting plates and adaptors.
In the left middle drawer I have my Minc Machine and foil sheets. In the right middle drawer I have my Silhouette and Canon Selphy.
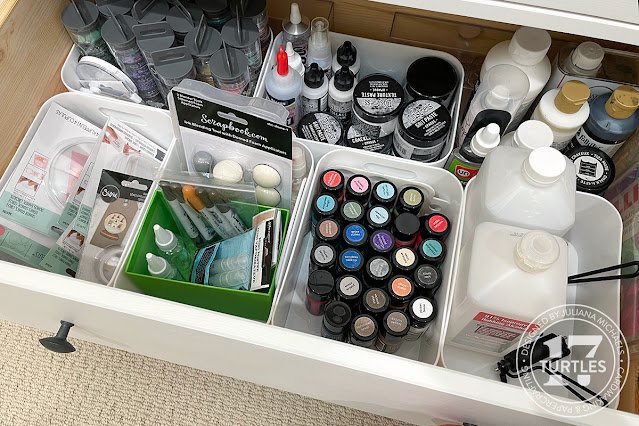
The bottom drawers are where I store some of the heavy products. In the left bottom drawer I have used Scrapbook.com White Bins to organize my sequins, liquid adhesives, extra mediums, paint and other miscellaneous supplies.

Scrapbook.com White Bins for storing acrylic paint, liquid adhesives, sequins, and other craft supplies

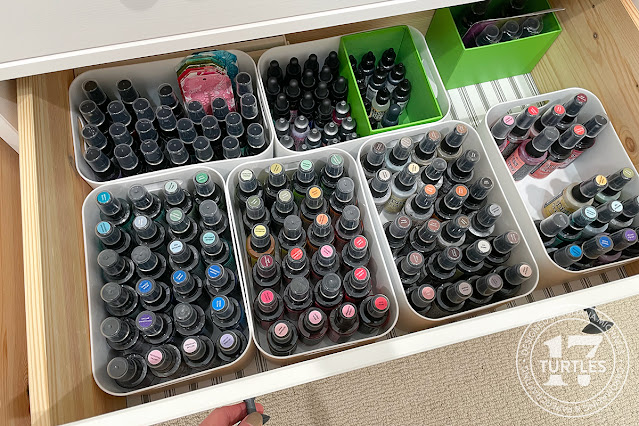
On the right hand side I have my collection of Tim Holtz Distress Inks Sprays, Mica Stains and Oxide Sprays and Reinkers. I'm once again using the White Bins from Scrapbook.com. I really love using these to help organize and the bins make it easy for me to pull them out and bring over to my desk when I want to use them.

Scrapbook.com White Bins for storing Tim Holtz Distress Spray Stains, Distress Oxide Sprays, Reinkers, Mica Stains

Last but not least, is the closet. Here I have an old book case where I store a mix of products that includes things I use frequently, such a paper, and others general craft items that I don't use as often.

I use these plastic drawers to hold my Tim Holtz Ranger Ink Papers, Neenah cardstock and chipboard. I've used an old school label maker to label each drawer. In between the drawer units I have the Scrapbook.com Small Envelope Organizer and I'm using it to hold the cards I make.

Plastic drawers for storing Tim Holtz Ranger Ink Distress Heavystock Watercolor Mixed Media Paper

Below that I have my specialty cardstock (glitter, foil, etc) on the left hand side and another plastic drawer unit for miscellaneous supplies such as plastic bags, extra storage envelopes and more chipboard. In between these is the Scrapbook.com Stadium Organizer that I'm using to house my seasonal stamps, dies and paper pads.

On the bottom shelf I have two more of the wood crates to house some generic craft supplies such as vinyl and my splat box.

Juliana Michaels 17turtles Craft Room Tour 2023

I hope you enjoyed this tour of my craft room and found some ideas that might help you as you organize your craft room. I also promise that it's not always this nice and neat, but it is close to it most of the time. As I mentioned above, this is really integral to my creative process. And just as I thrive in neatness you may thrive in chaos.  Neither one is wrong or right. We should each strive to find what makes us the most creative and efficient with the time we have to create and to enjoy the process!

ORGANIZATION AND STORAGE

Below you can find the organization and storage options I have mentioned above along with compensated affiliate links to Scrapbook.com. These links are at absolutely no cost to you. When you shop through the links below, I receive a small commission from Scrapbook.com. These links are at absolutely no cost to you and the commission I receive helps me cover the costs of my blog and other expenses, which allows me to continue to provide you with FREE inspiration and tutorials. If you want to learn more about what an affiliate link is, you can see my full affiliate and product disclosure statement here. Thank you so much for your love and support!

Subscribe