Coffee Card | Newton's Nook Designs

Hello friends! If you didn't already know, coffee is one of my favorite things. And today I'm sharing a Coffee Card I created using some of my favorite Newton's Nook Designs Stamps. In fact, I've combined 3 stamp sets to make this card. Any guesses before I share which ones below?

Coffee Card by Juliana Michaels featuring Newton's Nook Designs Stamps and Stencils

[All supplies are linked at the end of this post. Compensated affiliate links to Scrapbook.com are used at no cost to you.]

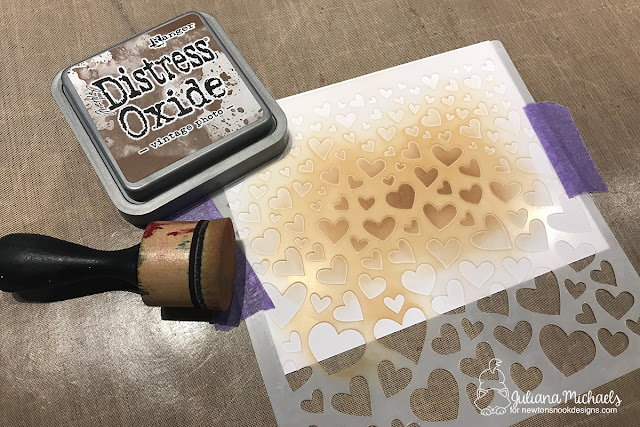
To get started, I created the stenciled background using the Tumbling Hearts Stencil and Distress Oxide in Vintage Photo. I applied the ink more intensely to the center of the paper and then blended it out to the edges to give it a slightly faded effect.

Stenciled background with Newton's Nook Designs Tumbling Hearts Stencil

I then went about collecting some of the coffee themed Newton stamps. First up, I stamped and colored Newton with the coffee press from Newton Loves Coffee. All of these images are stamped with Versafine onto Strathmore 400 Series Watercolor paper and then colored with Zig Clean Color Real Brush Markers.

Next, I added Newton from the Sending Hugs Stamp Set and added the coffee cup. I love how the dies from this set, cut out their little paws so they can hold things like the coffee cup! And finally, I added Newton from the Newton's Costume Party Stamp Set.

Coffee Card by Juliana Michaels featuring Newton's Nook Designs Stamps and Stencils


Supplies


Here are the supplies I used on the Coffee Card I created and shared with you. Affiliate links have been used to Simon Says Stamps. Thank you so much for your support!




Newton's Nook Designs Surprise Birthday Blog Hop

Hello friends! Today is a very special day and I'm so glad you are joining in the fun! The entire Newton's Nook Designs Design Team has gotten together to throw a Surprise Birthday Blog Bop for Jennifer, the owner and illustrator behind Newton's Nook! She is amazing person and we all feel truly blessed to be a part of this team and to get to work with Jennifer and her fabulous products! With that being said, we all just love her so much and wanted everyone to celebrate her birthday with her!

Keep reading to check out the card I created for Jen and then make sure your check out how you can get in on the celebration by entering to win a $25 GC to the Newton's Nook Store!

Happy Birthday Jen!!!

I have to admit, when the Special Delivery Stamp Set was released as a Christmas stamp set, I knew I had to use it to create a Birthday card. And what better person to create this special card for than Jen!
Llama Birthday Card by Juliana Micheals with Distress Ink Die Cut Rainbow Background featuring stamps by Newton's Nook Designs

To get started with creating this card, I cut out a frame from white cardstock using the Frames & Flags Die Set.  I then cut it into strips using the hill die from the Land Borders Die Set.

Distress Ink Die Cut Rainbow Background

I cut it into 5 sections...one for each color I wanted to use. I went with a rainbow color palette! To apply the ink, I used a foam blending tool and applied the ink to just the edge of the piece to give it a faded out effect.

Distress Ink Die Cut Rainbow Background

Once the background was complete, I stamped the sentiment and then adhered the adorable llama and some presents. The "Happy Birthday" sentiment is from Newton's Loves Cake. All of the color on the images was done with Chameleon Markers.

Llama Birthday Card by Juliana Micheals with Distress Ink Die Cut Rainbow Background featuring stamps by Newton's Nook Designs

I just love that I was able to extend the use of the awesome and totally adorable stamp set to a year-round must-have for your stamping stash!

Llama Birthday Card by Juliana Micheals with Distress Ink Die Cut Rainbow Background featuring stamps by Newton's Nook Designs

Now, let's keep this party going!!!


Would you like to win the a $25 gift certificate to the NND store?
You could be the ONE lucky winner! 

Here's how to win: Comment on the NND blog and Design Team blogs (see list below) with a birthday message for Jennifer! The winner will be chosen at random from the collective reveal posts. Make sure to check out each of their blogs and comment for your chance to win. You will not know which blog has been chosen so the more you comment on the better your chances are of winning! You have until Sunday, February 18th 9pm EST to comment -- winners will be announced on the blog post on Monday, February 19th. 

Check out all the awesome Design Team Blogs below to enter:

Newton's Nook Designs February Release Day 4 | Woof Pack

Hello friends! It's Day 4 of Newton's Nook Designs February Release and today we're sharing another fun set and this one is going to be a favorite of all the dog lover's out there. This set is called Woof Pack and is the dog version of the Company of Cats stamps set that we revealed yesterday!

On my post yesterday, I shared 2 different ways to go about coloring the Company of Cats Stamp Set. One version was simple and the other was more detailed.  I decided it would be fun to repeat the same process for the Woof Pack stamp set.


Woof Pack | Detailed Version


I once again used Zig Clean Color Real Brush Markers and stamped the image with Black Versafine onto Strathmore 400 Series Watercolor paper. I then heat embossed it with clear embossing powder.

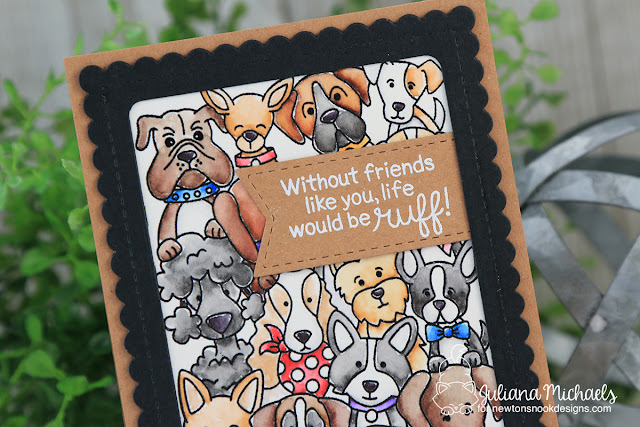
Friends Dog Card by Juliana Michaels featuring Newton's Nook Designs Woof Pack Stamp Set

I then used the two largest frames from the Frames and Flags Die Set to create a frame. I centered and then taped the two dies together and die cut the frame from black cardstock.  I then placed it on top of the colored image.

Friends Dog Card by Juliana Michaels featuring Newton's Nook Designs Woof Pack Stamp Set

Woof Pack | Simple Version


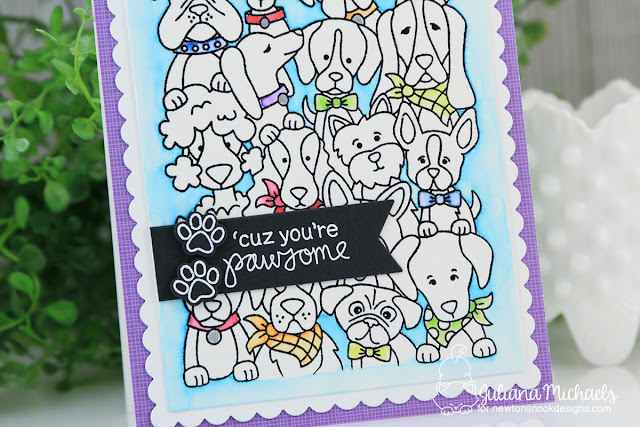
For the simple version, I only colored the collars and scarves on the dogs and then added some color around the outside edge to help the design pop.

Pawsome Dog Card by Juliana Michaels featuring Newton's Nook Designs Woof Pack Stamp Set

The sentiment and paw print used on this card are from the Terrific Terriers Stamp Set. I stamped it with Versamark Embossing Ink onto a small flag die cut from black cardstock using the Frames and Flags Die Set and then heat embossed it with white embossing powder.

Pawsome Dog Card by Juliana Michaels featuring Newton's Nook Designs Woof Pack Stamp Set

Blog Hop Details & Giveaway

Now, let's get to the fun stuff....the blog hop and giveaway!!!


Would you like to win the “Woof Pack” Stamp Set? This stamp set will be given away to ONE lucky winner! To enter, comment on the NND blog and Design Team blogs (see list below)! The winner will be chosen at random from the collective reveal posts. Make sure to check out each of their blogs and comment for your chance to win. You will not know which blog has been chosen so the more you comment on the better your chances are of winning! You have until Thursday February 15th at 9pm EST to comment -- winners will be announced on the blog post on Friday, February 16th. 

Check out all the awesome Design Team Blogs below to enter:


Supplies

Are you interested in the Newton's Nook Designs products I used to create my cards? These are the new stamps and dies I used to create the above cards and they will be available to purchase Friday, February 16th!


Inspired By Challenge | Hello Card

Hello friends! I'm very excited to be joining my friend, Laurel, in taking part in her Inspired By Challenge. Each week there is a new challenge image to inspire you. This week’s challenge is to make something inspired by this picture and the challenge is called "Inspired by... Cheesecake Anyone?".


[Affiliate links have been used to Scrapbook.com. If you click on them there is no extra cost to you. Thank you so much for your support!]

I do love me some cheesecake...especially Cheesecake Factory's Red Velvet Cheesecake! YUM!
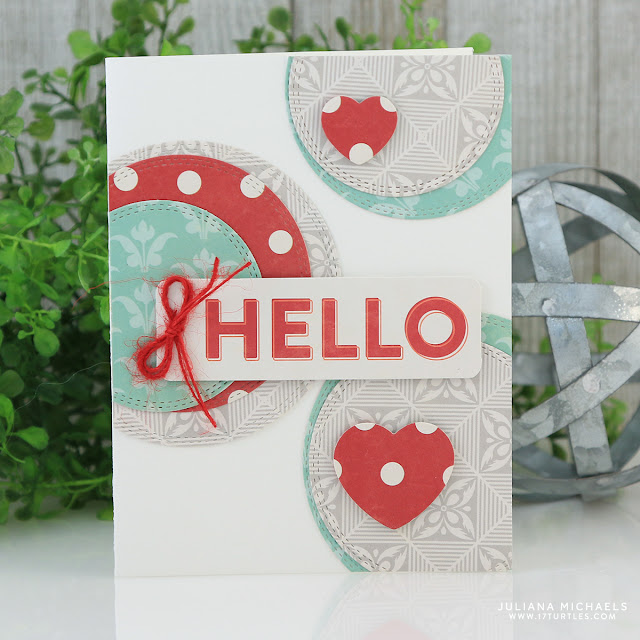
For my card, I was inspired by the colors and circle shapes of the plates. I pulled out the new Jillibean Soup collection called Bohemian Brew and some circle dies in various sizes. After cutting out circles in different sizes and colors, I began layering them until they somewhat matched the way the plates and cheesecake are laid out in the photo. For the pop of red from the berries, I die cut a couple of hearts and popped them up with double sided foam adhesive.

Hello Card by Juliana Michaels featuring Jillibean Soup Bohemian Brew

I then finished it off with a die cut sentiment from the Bohemian Brew Pea Pod Parts and a little red twine bow. BTW...this new collection will be available very soon at Scrapbook.com! If you want a full look at the collection you can check it out here...Jillibean Soup Bohemian Brew.

Hello Card by Juliana Michaels featuring Jillibean Soup Bohemian Brew

Make sure you head over to the Inspired By Challenge Blog to check out what the design team has created. Then it's your turn to be inspired and play along!

Newton's Nook Designs February Release Day 3 | Company of Cats

Welcome friends! It's Day 3 of Newton's Nook Designs February Release and today we're sharing a fun new set that is sure to be a favorite of all the cat lover's out there. This set called Company of Cats is similar to the super popular Frozen Fellowship Stamp Set, but instead of snowmen we have cats!

This stamp is sized to fill your card front and is super fun for coloring! So if you love to color, you are going to have a blast coloring all the kitties! Now, I have something to admit here. I was a bit intimidated with "all the coloring" when I first started playing around with this stamp set. It got me to thinking that I may not be the only one out there to feel that way, so I decided to create and share 2 different ways to go about coloring this stamp set. One simple and one more detailed. It did take a while to color the more detailed version..but I was relaxing and having fun while I was coloring. And that is what coloring is all about!

Company of Cats | Simple Version


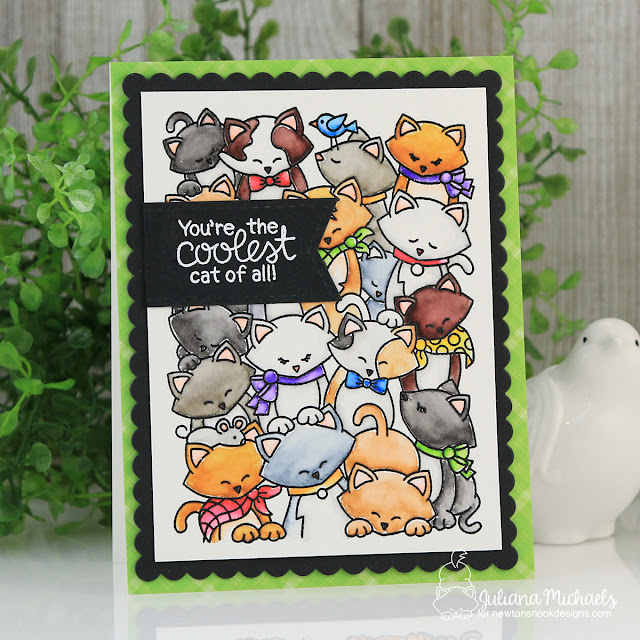
Simple Coloring Cat Card by Juliana Michaels featuring Newton's Nook Designs Company of Cats Stamp Set

[Affiliate links have been used. Thanks so much for your support!]

I used Zig Clean Color Real Brush Markers to do my coloring on both cards. I stamped the image with Black Versafine onto Strathmore 400 Series Watercolor paper. I then heat embossed it with clear embossing powder. By embossing the image it helps "hold" the color in place and reduces the possibility of the colors bleeding.

To create the simple version, I only colored the bows, scarves and collars on the kitties. I then colored all around the edges to help the design stand out more against the white background. Once the coloring was complete, I die cut the panel using the large frame die from the Frames and Flags Die Set. I then stamped the sentiment onto black cardstock and heat embossed it with white embossing powder. I did the same technique and added 2 little paw prints for a bit of an embellishment to the sentiment. The paw prints are from the Newton's Sweetheart stamp set.

Simple Coloring Cat Card by Juliana Michaels featuring Newton's Nook Designs Company of Cats Stamp Set

Company of Cats | Detailed Version


Now let's take a look at the detailed version. As you can see, I colored all the kitties different colors using the Zig Clean Color Real Brush Markers. I used a water brush to help blend the ink.

Detailed Coloring Cat Card by Juliana Michaels featuring Newton's Nook Designs Company of Cats Stamp Set

Once the coloring was done, I trimmed the panel to size and mounted it onto a piece of black cardstock die cut using the large frame from the Frames and Flags Die Set.

Detailed Coloring Cat Card by Juliana Michaels featuring Newton's Nook Designs Company of Cats Stamp Set

I hope you enjoyed learning about 2 different ways to color stamp sets like Company of Cats. Remember, you don't have to get complicated or detailed with your coloring to make a great card design!

Blog Hop Details & Giveaway

Now, let's get to the fun stuff....the blog hop and giveaway!!!


Would you like to win the “Company of Cats” Stamp Set? This stamp set will be given away to ONE lucky winner! To enter, comment on the NND blog and Design Team blogs (see list below)! The winner will be chosen at random from the collective reveal posts. Make sure to check out each of their blogs and comment for your chance to win. You will not know which blog has been chosen so the more you comment on the better your chances are of winning! You have until Thursday February 15th at 9pm EST to comment -- winners will be announced on the blog post on Friday, February 16th. 

Check out all the awesome Design Team Blogs below to enter:


Supplies

Are you interested in the Newton's Nook Designs products I used to create my cards? These are the new stamps and dies I used to create the above cards and they will be available to purchase Friday, February 16th!

Newton's Nook Designs Company of Cats Stamp Set


Newton's Nook Designs February Release Day 2 | Bitty Bunnies

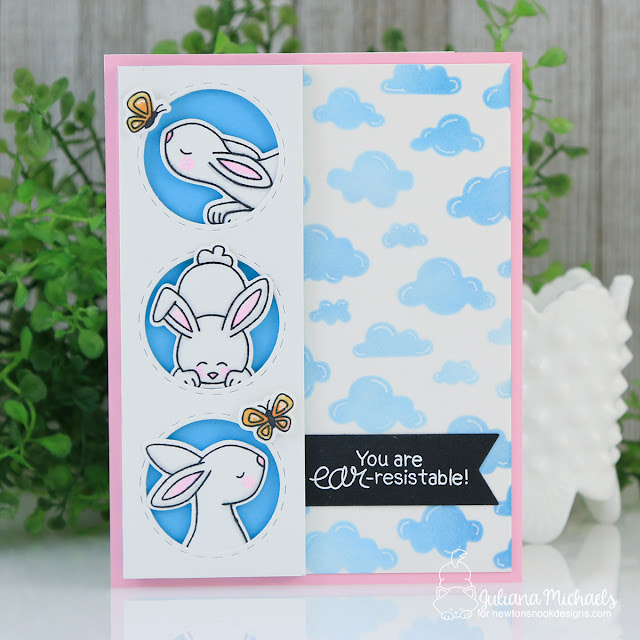
Hello friends and welcome! It's Day 2 of Newton's Nook Designs February Release and I'm so happy you are joining us! We have another great hop going on for this release and the design team is sharing loads of inspiration each day this week. Today, we're showcasing the new stamp set called Bitty Bunnies! It is totally ear-resistable!!!

You Are Ear-Resistable Bunny Card


For my card, I stamped and colored all 3 of the bunny images from the stamp set using Chameleon Pens. I then die cut them using the coordinating die set. I also stamped, colored and die cut the two little butterflies as well.

Bunny Ear Resistable Card by Juliana Michaels featuring Newton's Nook Designs Bitty Bunnies Stamp Set and Cloudy Sky Stencil

[Affiliate links have been used. Thanks so much for your support!]

Once I was done with the coloring, I went to work on the background. I placed the new Cloudy Sky stencil onto a piece of white cardstock and inked over it using Distress Oxide in Salty Ocean. I then added some white details to the clouds using a white gel pen.

Bunny Ear Resistable Card by Juliana Michaels featuring Newton's Nook Designs Bitty Bunnies Stamp Set and Cloudy Sky Stencil

For the next step, I used a circle frame die and cut it from a piece of white cardstock. I also cut a strip of blue cardstock to layer behind it.

Next, I placed the bunnies behind the openings on the die cut frame. To give this all some dimension, I used double sided foam adhesive to pop up the white frame from the blue strip. I also popped up the bunnies and the butterflies!

Bunny Ear Resistable Card by Juliana Michaels featuring Newton's Nook Designs Bitty Bunnies Stamp Set and Cloudy Sky Stencil

The final touch was to stamp the sentiment onto black cardstock and heat emboss it with white embossing powder. I then die cut it using one of the flag dies from the Frames and Flags Die Set

Bunny Ear Resistable Card by Juliana Michaels featuring Newton's Nook Designs Bitty Bunnies Stamp Set and Cloudy Sky Stencil

Blog Hop Details & Giveaway

Now, let's get to the fun stuff....the blog hop and giveaway!!!


Would you like to win the “Bitty Bunnies” Stamp Set? This stamp set will be given away to ONE lucky winner! To enter, comment on the NND blog and Design Team blogs (see list below)! The winner will be chosen at random from the collective reveal posts. Make sure to check out each of their blogs and comment for your chance to win. You will not know which blog has been chosen so the more you comment on the better your chances are of winning! You have until Thursday February 15th at 9pm EST to comment -- winners will be announced on the blog post on Friday, February 16th. 

Check out all the awesome Design Team Blogs below to enter:


Supplies

Are you interested in the Newton's Nook Designs products I used to create my cards? These are the new stamps and dies I used to create the above cards and they will be available to purchase Friday, February 16th!
Newton's Nook Designs Bitty Bunnies Stamp Set


Newton's Nook Designs Cloudy Sky Stencil

Newton's Nook Designs February Release Day 1 | Newton's Easter Basket

Hello friends and welcome to Day 1 of the Newton's Nook Designs February Release! Today we're featuring a new stamp set called Newton's Easter Basket. This set show the ever adorable Newton all ready for Easter with bunnies, chicks, Easter eggs and of course an Easter basket! Make sure to check out all the Blog Hop details below and enter for you chance to win!

Cloudy Sky Stencil 2 Ways


Along with the Newton's Easter Basket Stamp Set, we're also showcasing the new Cloudy Sky Stencil. I'm going to share with you how I used this new stencil to create 2 different backgrounds.
First up I used it to create a Simple Stenciled Background.

Happy Easter Stenciled Background by Juliana Michaels featuring Newton's Nook Designs Newton's Easter Basket Stamp Set and Cloud Sky Stencil

[Compensated affiliate links are used in this post at no cost to you.]

To get started, I die cut a circle from white cardstock. I then placed the stencil on top and inked it up with Distress Ink in Salty Ocean. I then die cut a strip of grass using the Newton's Nook Designs Land Borders Die and inked it up with Distress Ink.

Stenciled Background by Juliana Michaels featuring Newton's Nook Designs Cloud Sky Stencil

To trim off the excess, I placed the circle die on top of the stenciled background and used Therm O Web Purple Tape to hold it in place.

Stenciled Background by Juliana Michaels featuring Newton's Nook Designs Cloud Sky Stencil

I then ran the die cut grass and circle die through my die cutting machine.

Stenciled Background by Juliana Michaels featuring Newton's Nook Designs Cloud Sky Stencil

I love that I get the great stitched edge from the circle die by trimming off the excess this way.

Stenciled Background by Juliana Michaels featuring Newton's Nook Designs Cloud Sky Stencil

Once the stenciled background was completed, I added the stamped, colored and die cut images from Newton's Easter Basket.

To complete the card, I went with a white on white card base for the rest of the card. To add a touch of texture I embossed the main card panel with a polka dot embossing folder. It's never easy to capture this in a photo, but in real life the touch of texture is fabulous!

Happy Easter Stenciled Background by Juliana Michaels featuring Newton's Nook Designs Newton's Easter Basket Stamp Set and Cloud Sky Stencil

On this second card, I First up I used the Cloudy Sky Stencil to create an Embossed Background.

Happy Easter Embossed Background by Juliana Michaels featuring Newton's Nook Designs Newton's Easter Basket Stamp Set and Cloud Sky Stencil

I die cut a circle from white cardstock and positioned it onto the stencil. I then followed the directions for embossing with a stencil for the Spellbinders Platinum 6.

Embossed Background by Juliana Michaels featuring Newton's Nook Designs Cloud Sky Stencil

To add the grass to this piece, I used the Land Borders Grass die and created a mask. I placed the mask on top of the circle and used Purple Tape to hold it in place. I then inked it up with some Distress Oxide in Peeled Paint.

Embossed Background by Juliana Michaels featuring Newton's Nook Designs Cloud Sky Stencil

To create the cloudy blue sky, I used the other part of mask. Here you can see both piece after I created for the masks. I simply cut a 4.25 x 5.5 piece of cardstock into 2 pieces with the die.

Embossed Background by Juliana Michaels featuring Newton's Nook Designs Cloud Sky Stencil

I placed the other mask over the inked grass area and proceeded to ink up the top part of the die cut circle with Distress Oxide in Salty Ocean.

Embossed Background by Juliana Michaels featuring Newton's Nook Designs Cloud Sky Stencil

Once the background was complete, I added this adorable image from the Newton's Easter Basket Stamp Set. I also went with the same white on white background as well. I really love how this keeps the focus on the stenciled and stamped images and of course on Newton!

Happy Easter Embossed Background by Juliana Michaels featuring Newton's Nook Designs Newton's Easter Basket Stamp Set and Cloud Sky Stencil


Blog Hop Details & Giveaway


I hope you enjoyed seeing some fun ways to use the new Cloudy Sky Stencil and Newton's Easter Basket Stamp Set! Now, let's get to the fun stuff for the blog hop!


Would you like to win the “Newton’s Easter Basket” Stamp Set? This stamp set will be given away to ONE lucky winner! To enter, comment on the NND blog and Design Team blogs (see list below)! The winner will be chosen at random from the collective reveal posts. Make sure to check out each of their blogs and comment for your chance to win. You will not know which blog has been chosen so the more you comment on the better your chances are of winning! You have until Thursday February 15th at 9pm EST to comment -- winners will be announced on the blog post on Friday, February 16th. 

Check out all the awesome Design Team Blogs below to enter:


Supplies


Are you interested in the Newton's Nook Designs products I used to create my cards? These are the new stamps and dies I used to create the above cards and they will be available to purchase Friday, February 16th!


Subscribe