Multi-colored Stenciled Background

Hello friends! Today I'm sharing how to create multi-colored stenciled background using some of my favorite products from Scrapbook.com

Multi-colored Stencil Background by Juliana Michaels featuring Scrapbook.com Exclusives

When I first saw this stencil and the cute little rainbows and tiny hearts, I knew I wanted to give it lots of color. I just wasn't sure how to color all those small areas. Then I remembered that I had some Sponge Daubers from Scrapbook.com and I was able to make it work. Keep reading to learn how easy this technique can be and then start thinking about ALL the stencils you have that you can now use to create multi-colored backgrounds.


To get started, I used a Flat Card Front and applied just a touch of an adhesive roller to the back of the card panel and stuck it down onto my craft mat. This will keep the paper from moving around while I stencil. I then used Mint Tape to hold the stencil in place on top of the cardstock.

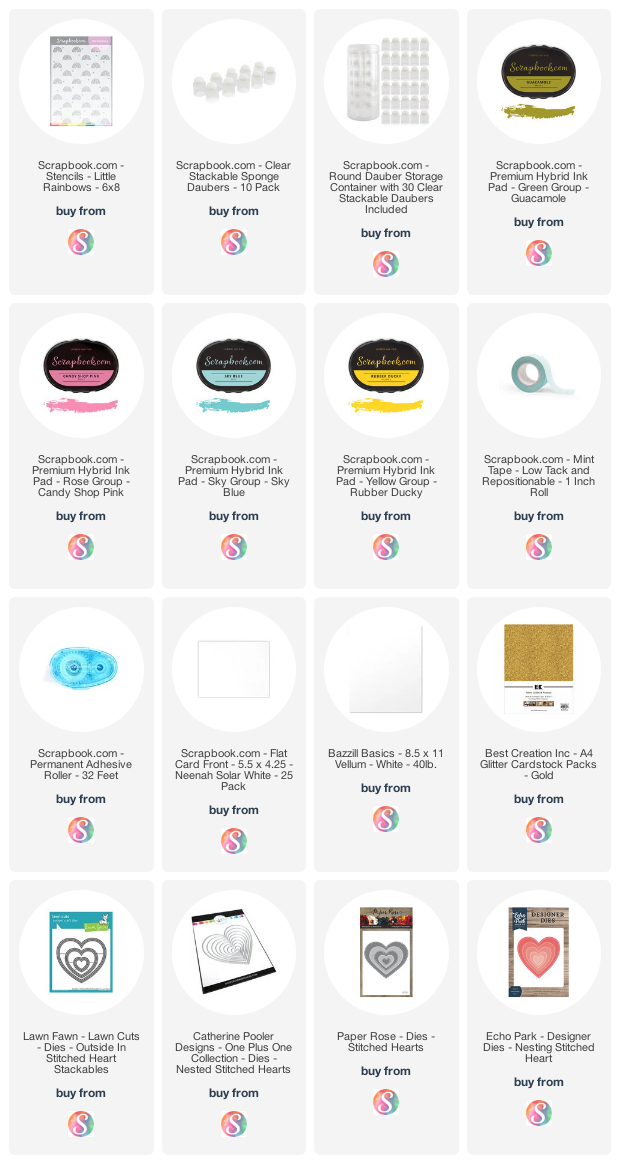
For this card, I'm using the Little Rainbows Stencil. To create the multi-colored stenciled background and to make each rainbow a different color, I used Scrapbook.com Sponge Daubers. They fit on the tip of your finger and are perfect for applying ink to small areas. I then randomly inked the rainbows and tiny hearts with Scrapbook.com Hybrid Inks in Oasis, Guacamole, Candy Shop Pink and Rubber Ducky.


To finish off the card, I stamped the sentiment using the Mini Caps Solid and Outline Stamp Sets, along with the Wordfetti Best Day Ever Stamp Set. This was stamped onto a piece of white cardstock and trimmed to size. I layered a piece of vellum die cut using a heart die and added some small hearts die cut from gold glitter paper to add a little pizzaz! These were then popped up with Double Sided Adhesive Foam Squares. Unfortunately, the heart dies I used have been discontinued, but I've linked several options below that could work.


I hope you enjoyed this bit of cardmaking inspiration and learning how to create a multi-colored stenciled background.

Now for something a little fun! If you aren't aware, World Card Making Day is this Saturday, October 3 and Scrapbook.com is starting the celebration early with some great sales. Make sure you check out their social media and the Scrapbook.com coupon page for all the details!


Supplies

You can find a supply list of the products I used to create this project below. This post contains compensated affiliate links to Scrapbook.com at no cost to you. If you want to learn more about what an affiliate link is, you can see my full affiliate and product disclosure statement here.
Tim Holtz Stamptember® 2020 Exclusive Collaboration

Hey friends! I'm so excited to be sharing two Christmas Cards I created using the new Tim Holtz Stamptember® 2020 stamp set. This set features your favorite Snarky Cats and they are ready to help you celebrate this holiday season like only they can!

Naughty Nice Snarky Cats Christmas Card by Juliana Michaels featuring Tim Holtz Stamptember® 2020

If you are new to Stamptember® it is a yearly event at Simon Says Stamp where each day during the month of September they release a new, exclusive stamp set or kit. The exclusive sets are done in collaboration with many of the amazing stamp companies that are a part of our industry. These stamp sets are available for a limited time AND only while supplies last. Many of them sell out super fast, so if you see one you like, you better grab it. With all that being said, the Stamptember® set by Tim Holtz is sure to sell out quickly. This stamp set is available now, so if you're worried about it selling out, head on over there and purchase it now and then pop back here for some inspiration on using your new stamp set!


And here's a look at the entire new Tim Holtz Stamptember® 2020 stamp set that is now available!


So, without further ado, may I introduce you to the Christmas Snarky Cats! Of course the stamp set is full of snarky cuteness so I couldn't resist creating two cards to share. For each card, I stamped the image using a stamp platform with Black Soot Archival Ink. I then restamped the image with embossing ink, sprinkled it with clear embossing powder and heat set it. I prefer this method when I want a black embossed image. Even when I use an anti-static pouch, I still get stray flecks of black embossing powder everywhere. With this technique you don't ever have to worry about that happening.


After the embossing was done, I water colored the images using Distress Ink and loosely applied the ink using a waterbrush. I then went about fussy cutting each image.

For the background on this Naughty or Nice card, I stamped the snowflakes image randomly onto the paper with embossing ink and then heat embossed it with white embossing powder making sure to leave room for the sentiment. I used the same black heat embossing technique for the sentiment that I used for the Snarky Cat images. I then lightly inked over the panel with Tumbled Glass Distress Ink.


This second card seriously makes me laugh! I love this cat all tangled up in the Christmas lights with his eyes popping out of his head and in a state of total overstimulation.

Shiny Things Snarky Cats Christmas Card by Juliana Michaels featuring Tim Holtz Stamptember® 2020

For the background I used the Tim Holtz Tangled Layering Stencil. I ink blended around the outside with Crushed Olive Distress Ink, making sure to leave the area that would be behind the cat with very little color. I then layered on Mowed Lawn and then just a bit of Pine Needles to gradually darken the color to the outer edges.


What you can't see very well in the photos is that I added Glossy Accents to each of the light bulbs. I tried my best to capture it when taking these images, but I just couldn't get it to show. I promise though that in person, it really adds a nice bit of interest!

For the base of this card, I created my own patterned paper by randomly stamping the sentiments from the stamp set using Hickory Smoke Archival Ink. I then inked the edges, as always, with a bit of Vintage Photo Distress Ink.


Thanks so much for stopping by today and I sure hope you enjoyed this bit of inspiration using the new Tim Holtz Stamptember® 2020 Exclusive Collaboration. 

I invite you to visit the Simon Says Stamp blog for more inspiration using this new stamp set.
 

Supplies

You can find a supply list of the products I used to create this project below. This post contains compensated affiliate links to Simon Says Stamp at no cost to you. If you want to learn more about what an affiliate link is, you can see my full affiliate and product disclosure statement here.


Make A Wish | Crackling Campfire Distress

I made this card as a birthday card for my husband. However, if I could make a wish today it would be that we could all love one another and with open hearts and open minds. If you could make a wish today what would it be?

Hey friends! I'm back with a new card to share with you.  For this card I've paired Crackling Campfire with the other newest Distress Color addition Speckled Egg to create this Make A Wish Birthday Card. 
Crackling Campfire has easily become one of my new favorite Distress Colors. It is SO perfect for Fall and Halloween makes! It was also perfect to use for creating this birthday card for my husband whose birthday was earlier this month.

Make A Wish Birthday Card by Juliana Michaels featuring Tim Holtz Crackling Campfire and Speckled Egg Distress

For the background, I began with a piece of watercolor paper that I spritzed and sprayed with Speckled Egg Distress Spray and a bit of water using my Distress Sprayer. Once it was dry, I placed the Script Stencil on the upper left corner and inked over it with embossing ink. I used a finger dauber to apply the ink. I then sprinkled it with Crackling Campfire Distress Glaze and heat embossed it. I then repeated this process on the lower right side of the card.


Once the embossing was completed, I inked the edges with my old stand by Vintage Photo.  I then added a bit of machine stitching and roughed up the edges.


The leaf was die cut from watercolor paper using the Skeleton Leaves Thinlits Die. When die cutting delicate dies like this, I highly recommend using the Chrome Precision Plate for a clean cut every time.
To ink such a delicate die cut, I flip the paper over and place Purple Tape over the backside to hold it in place.


I then flip it over and ink away. Here I used Crackling Campfire Distress Ink.


To add a little interest, I smooshed the ink pad onto my craft mat, spritzed it very lightly with my Distress Sprayer and then dabbed the die cut into the ink. I then dried it with my heat gun. I seriously love the interest this adds to the inked paper.


To adhere the die cut to the card, I used Distress Collage Medium along the stem part. This left the leaves free to curve slightly and added some nice dimension. For a touch of interest, I added some zigzag machine stitching along the stem.

The final touch was the addition of the Make A Wish Quote Chip. I inked the edges with Vintage Photo Distress Ink and then added a couple of Hardware Heads to finish it off.


Thanks for stopping by to check out my Make A Wish Birthday Card featuring Crackling Campfire Distress.

Supplies

You can find a supply list of the products I used to create this project below. This post contains compensated affiliate links to Scrapbook.com at no cost to you. If you want to learn more about what an affiliate link is, you can see my full affiliate and product disclosure statement here.

Boo Halloween Card

If you don't know by now, I'm a huge Halloween fan! Not the gory, bloody stuff though. Give me the elegant and vintage and I'm ready to craft away! Today I'm sharing a Boo Halloween Card featuring a bold sentiment using the Scrapbook.com Exclusive Classic Alphabet Dies.

Boo Halloween Card by Juliana Michaels featuring Scrapbook.com Classic Alphabet Dies

This card started with a panel I created using a mix of Alcohol Inks on a piece of Yupo Paper. I blended them using a bit of Alcohol Blending Solution and an Alcohol Ink Air Blower. The colors I used include: Moss, Sunshine Yellow, Mushroom, Pitch Black and Silver Alloy

Next, I pulled out some of my Halloween stamps and settled on using the cool skeleton image from the Tim Holtz Examination Stamp Set as the main image. I was afraid it would be lost on the background, so I decided to stamp it onto a piece of acetate cut to the size of the Alcohol Ink panel using Black Stazon Ink. After laying on top of the panel, I knew I had made a good decision as the design really stood out. It still felt like the background needed a little more texture or interest so I stamped a few other images from the stamp set directly onto the Yupo paper using Black Soot Archival Ink. I again laid the acetate panel back on top and knew it was good to go!


To attach the acetate to the alcohol ink background, I lined up the papers, poked a hole in each corner using a craft pick and inserted a small brad into each hole. 


I then went about creating the base for this panel. I took a piece of white cardstock and stamped the Tim Holtz Renaissance Stamp Set using Scrapbook.com Embossing Ink. I sprinkled it with silver embossing powder and heat set it. Because this design didn't cover the entire 4.25 x 5.5 inch paper, I flipped it around to stamp the other edge but only inked part of the design and stamped it. I sprinkled it again with the embossing powder and just wiped away any that overlapped the already embossed design before I heat embossed it again.


Now for the bold title! I cut the letter from Metallic Kraftstock and from thin chipboard using the Scrapbook.com Exclusive Classic Alphabet Dies. I glued the layers together and then adhered them to the card front using Smart Glue. I then finished it off with a couple of black cardstock bats die cut using the Tim Holtz Sizzix Bat Crazy Thinlits.

I hope you enjoyed learning how this Boo Halloween Card came together featuring a bold sentiment using the Scrapbook.com Exclusive Classic Alphabet Dies.

Supplies

You can find a supply list of the products I used to create this project below. This post contains compensated affiliate links to Scrapbook.com at no cost to you. If you want to learn more about what an affiliate link is, you can see my full affiliate and product disclosure statement here.

Joy Snowflake Christmas Card | How To Alter Die Cuts

Hey crafty friends! I don't know about you, but this is my favorite crafty time of the year. All the fabulous new holiday and Christmas themed products are becoming available and that always gets me in the mood for holiday crafting. Today I'm sharing a Joy Snowflake Christmas Card featuring the exclusive Snowflake Winter Wishes Die from Scrapbook.com. Keep reading to learn how it all came together, as well as how I altered this die cut to create my own custom design.

Joy Snowflake Christmas Card by Juliana Michaels featuring Scrapbook.com Snowflake Winter Wishes and Tall Skinny Alphabet Dies

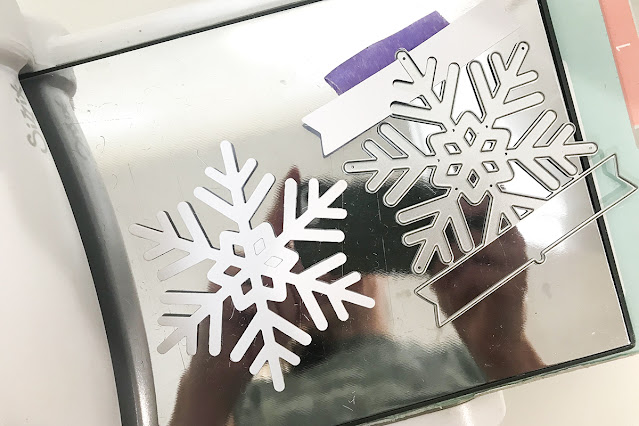
To get started, I cut a piece of white cardstock using the Snowflake Winter Wishes Die. This die has a banner at the bottom of the snowflake, which is definitely cute. However, I wanted the banner in the center of the snowflake.

How to alter die cuts

To remove the banner, I simply flipped the die upside down and placed it on top of the die cut I had just cut. I used a piece of tape to hold the die and paper in place as I ran it half way through my die cutting machine. Yes, you read that correctly. I only ran it half way through so that only the banner part is cut off. If you run it all the way through it will cut off the bottom of the snowflake. This die worked perfectly for this little trick because it is the same on both the left and right side.

How to alter die cuts
 
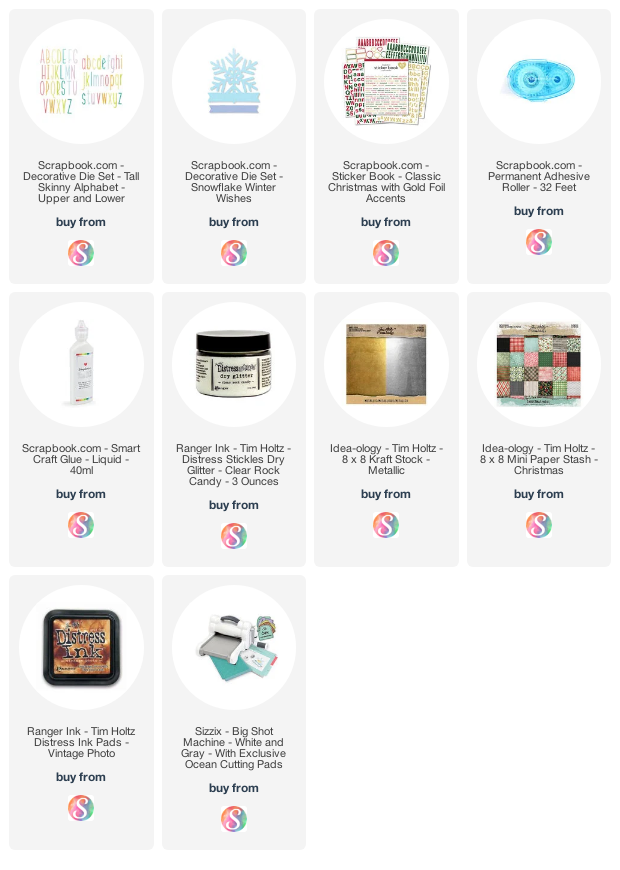
As you can see, I now have a snowflake with no banner. To give it a bit of shimmer, which you can't really see in the photo, I coated the paper with a layer of Smart Glue. I used my finger to smooth out the glue and cover the surface. While it was still wet, I poured Distress Rock Candy Glitter over it, gently patted it to make it stick and then tapped off the excess.

How to alter die cuts

Once the glue was dry, I added the banner and sentiment. The Snowflake Wishes Die comes with a separate banner die that I used to cut a piece of plaid paper and create a banner for the center of the snowflake. To jazz up the banner even more, I added a the word Joy die cut from Gold Metallic Kraft Stock using the Tall Skinny Alphabet Dies. I then finished it off with a sticker sentiment from the Classic Christmas Sticker Book. To give the sticker and banner a more vintage feel, I inked the edges of both before adhering them with Vintage Photo Distress Ink.

Joy Snowflake Christmas Card by Juliana Michaels featuring Scrapbook.com Snowflake Winter Wishes and Tall Skinny Alphabet Dies

To complete the card, I layered the snowflake onto a couple pieces of patterned paper. I added a bit of machine stitching to the edge of the top layer and inked the edges of both with a little Vintage Photo Distress Ink before adhering everything together.

Joy Snowflake Christmas Card by Juliana Michaels featuring Scrapbook.com Snowflake Winter Wishes and Tall Skinny Alphabet Dies

I hope you enjoyed learning how this Joy Snowflake Christmas Card came together.


Now that you've learned this fun technique on how to alter a die, I thought you might like to know that Scrapbook.com is having a huge Die Cutting Sale!

Shop and SAVE on your Die Cutting needs from machines to dies and more. These super low prices only last through Monday, September 21st at midnight MST, so stock up today.


*Re-Design, Rina K, Gina K, Lawn Fawn, My Sweet Petunia (MISTI), and Scrapbook.com 'Handmade Essentials' Stamp Set (SKU sbc-ds19-7) are excluded from all discounts and promotions.

Supplies

You can find a supply list of the products I used to create this project below. This post contains compensated affiliate links to Scrapbook.com at no cost to you. If you want to learn more about what an affiliate link is, you can see my full affiliate and product disclosure statement here.

Something Dreadfully Wicked | Tim Holtz 2020 Stampers Anonymous Halloween

Something dreadfully wicked indeed! Today I'm sharing a Halloween card I created for the Tim Holtz 2020 Stampers Anonymous Halloween release. This card features a mix of several new stamp sets including Dearly Departed, Examination and Tiny Text Halloween, along with a touch of stencil work.

Something Dreadfully Wicked Halloween Card


You might not believe this, but I made this card three times...each with subtle changes, before finally settling on the first one I made as the one to share with Tim! I kept thinking I wanted it to have more layers and dimension, but each time I came back to the one layer of stamping as being more eye catching! So, without further ado, let me share with you the card that made the cut.

Stamp and Smudge Technique


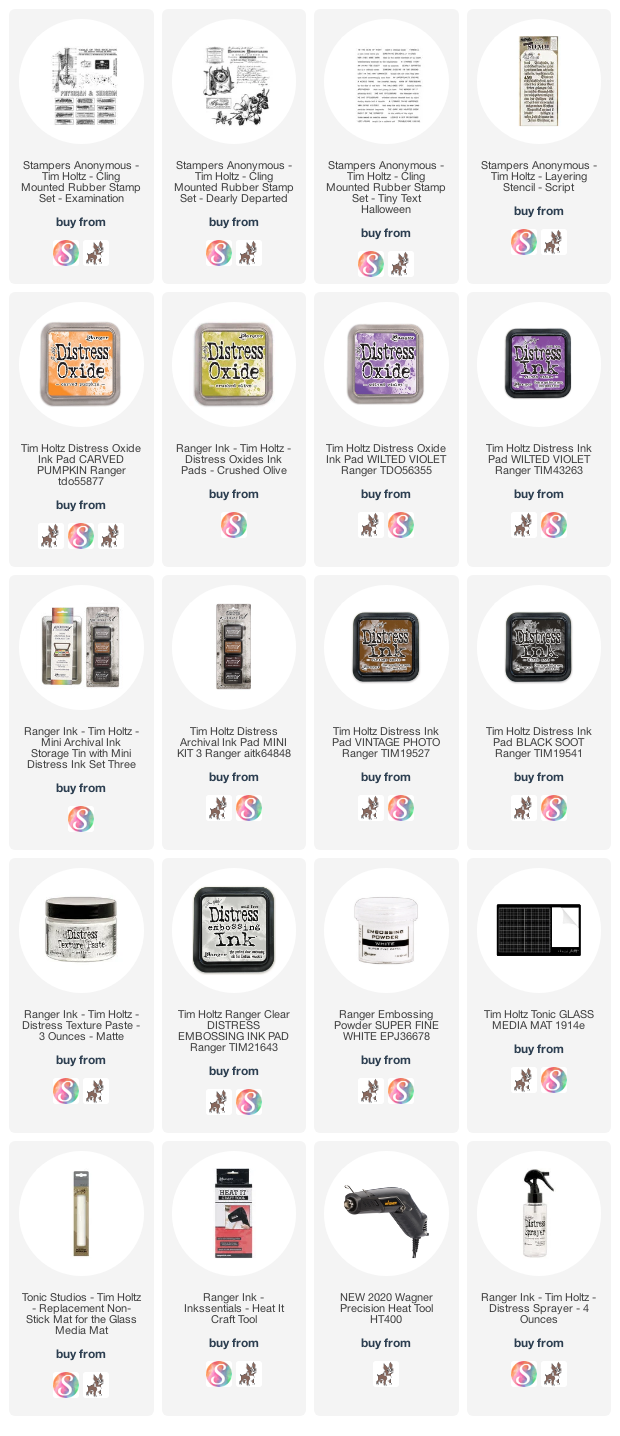
I began with one of my favorite techniques for the background...Stamp and Smudge. I began by stamping images onto a piece of Bristol Smooth using a variety of Distress Oxide inks. Here I used Carved Pumpkin, Crushed Olive, and Wilted Violet. 

Each time I stamped an image, I dabbed off the excess ink with a paper towel and then with another clean towel lightly smudged the image. I like to build layers with this technique, making sure the images overlap, but also thinking about color placement as I stamp each one. See how the orange images are opposite each other? Sometimes, I even lay out all the images to figure out which ones to stamp where and even what colors to use. 

Once all the stamping and smudging was complete, I stamped a few images using Hickory Smoke Archival Ink. As the focal point, I then stamped the wickedly cool anatomical eye dissection using Black Soot Archival Ink.


Next, I inked the edges with Vintage Photo and Wilted Violet Distress Ink, spritzed the entire panel with my Distress Sprayer and then dabbed the water droplets dry. 

For a touch of texture, I mixed some Black Soot Distress Ink into some Distress Texture Paste and applied that over the new Script stencil on opposite corners. Something to keep in mind when adding color to texture paste is that it will lighten the ink color because the paste is white. I choose Black Soot because I wanted a light grey color so it wouldn't overwhelm the focal point image.


To finish off the card, is stamped the sentiment from the Tiny Text Halloween set onto black cardstock and heat embossed it with white embossing powder. I then layered the entire panel onto a piece of black cardstock.


I hope you enjoyed learning how this Something Dreadfully Wicked Halloween card came together using some of the new stamps and stencils from the Tim Holtz 2020 Stampers Anonymous Halloween release.

Supplies

You can find a supply list of the products I used to create this project below. This post contains compensated affiliate links to Scrapbook.com and Simon Says Stamp at no cost to you. If you want to learn more about what an affiliate link is, you can see my full affiliate and product disclosure statement here.

Crackling Campfire Distress Just One Life

It's not quite fall here yet, but between the slightly cooler temperatures we've been having, the return of Pumpkin Spice Lattes AND the release of the new Tim Holtz Distress Color Crackling Campfire, I'm definitely getting in the mood for fall. Thank you once again to Tim and Mario for kindly sending me the new products to play with.

Crackling Campfire Tim Holtz Distress Just One Life Card by Juliana Michaels

Crackling Campfire Distress Just One Life Card 


When I sat down and started creating with Crackling Campfire, I wasn't totally sure where the creative play was going to take me. I made a couple of backgrounds and extra elements that I didn't end up using on this card. Trust me though, they did not go to waste and I ended up using them to create a second card that I'll share some other time. For today, I'm going to share the first card I finished and it's definitely all about the Crackling Campfire! 

Crackling Campfire Tim Holtz Distress Just One Life Card by Juliana Michaels

To start, I began by spritzing a piece of watercolor paper with Crackling Campfire Distress Spray. I then smooshed the Crackling Campfire Distress Ink Pad onto my craft mat, spritzed it with water and them dabbed my paper into the ink. Between each dab, I dried the paper with my heat tool. I also did a little Distress Sprayer spritzing (with water) as well.

Crackling Campfire Tim Holtz Distress Just One Life Card by Juliana Michaels

The next step was the addition of some heat embossing. I placed the Script Layering Stencil on top of the inked background and dabbed embossing ink over section of the stencil. I then sprinkled it with Crackling Campfire Embossing Glaze and heat embossed it. To bring out the design, I rubbed a bit of Walnut Stain Distress Crayon around the embossed areas and rubbed it in with my finger. I then used a paper towel to remove any excess and bring back the shine on the embossed areas. The final step for the background was to ink the edges with some Walnut Stain Distress Ink.

After I finished the background, I started making the leaves. I knew I wanted something with a fall theme and what says fall more than colorful leaves?! The leaves are cut from Bristol Smooth Paper using the Thinlits Skeleton Leaves Dies. I like to ink my paper after I die cut it, however inking these really delicate shapes is quite challenging. Here is a little trick I use to help make this super easy. After you die cut your shapes, place a piece of Therm O Web Purple Tape or masking tape on the back side. If the die cut falls out of the cut paper, just pop it back in place and add the tape. I then ink blended the die cuts with the selected colors using a foam blending tool. For the the leaves on this card I used the following Distress Ink color: Antique Linen, Fossilized Amber, Barn Door, Candied Apple, Forest Moss, Crushed Olive, Peeled Paint. 


These images don't show the exact color I used on this card, but this is one of the extras I mentioned that made it onto another card.


To add a bit more distressing, I did some ink smooshing on my craft mat and then dried them with my heat tool. On a few of the leaves, I spritzed them entirely with water and dabbed off the excess ink with a paper towel to lighten the colors, as they were a bit too intense for my liking.


Once the leaves were colored, I felt like the design still needed a little something. That's when I had the idea to add the Bigz Timekeeper Die. I cut it from a piece of Bristol Smooth Paper and a thin piece of chipboard. I adhered these together to give it a little more dimension and then inked the paper with Antique Linen and a touch of Walnut Stain Distress Ink. I then trimmed off the edge so it would fit on to the card.

For the final touches, I added some hand stitching to "attach" the clock to the background. I used jute twine that I dyed with Walnut Stain Distress Ink. To make this less messy, I put the jute into a plastic zip bag and sprayed it with the ink. This kept the ink off of my fingers and I used the bag to move the jute around until it was completely covered in ink. I then removed it from the bag and dried it with my heat tool. 

Last but not least, I added a Quote Chip with the saying "Just One Life". To dress it up, I inked the edges with Walnut Stain Distress Ink and added some alcohol inked Hardware Heads.

Crackling Campfire Tim Holtz Distress Just One Life Card by Juliana Michaels

Supplies

You can find a supply list of the products I used to create this project below. This post contains compensated affiliate links to Scrapbook.com and Simon Says Stamp at no cost to you. If you want to learn more about what an affiliate link is, you can see my full affiliate and product disclosure statement here.

Subscribe