Alcohol Pearls & Acetate Card Backgrounds

Hello friends! Today I'm super excited to share some cards with you using the new Tim Holtz Alcohol Pearls and Alloy. This is my first time playing with this type of alcohol inks and I had so much fun creating backgrounds with them on acetate! Typically alcohol inks are used with Yupo paper, however I thought it would be fun to switch it up a bit and try something a little different. 

Tim Holtz Ranger Ink Alcohol Pearls & Acetate Card Backgrounds by Juliana Michaels

All supplies are linked at the end of this post. Compensated affiliate links to Scrapbook.com may be used at absolutely no cost to you.  As always, I appreciate your support of my blog posts and videos!

Make A Wish Card by Juliana Michaels featuring Tim Holtz Ranger Alcohol Pearls, Rose Gold Alloy & Acetate Card Backgrounds

Make A Wish Card | Alcohol Pearls & Acetate Card Backgrounds

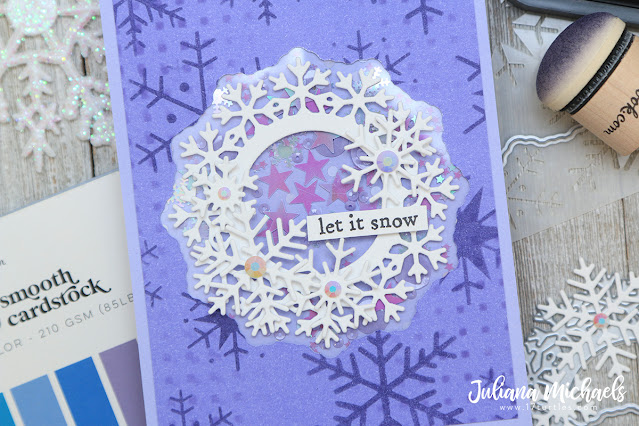
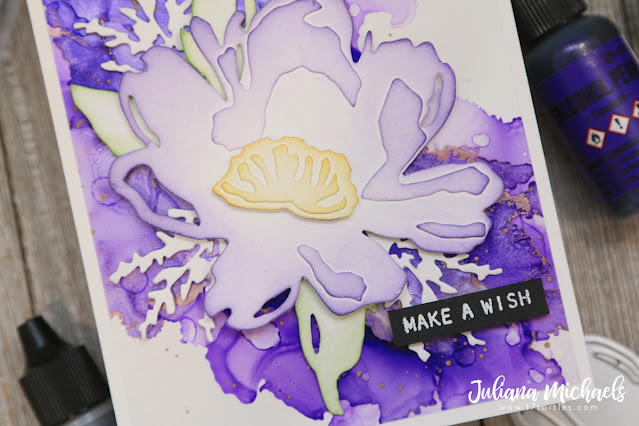
This first card uses the gorgeous new Opulent Alcohol Pearls on Acetate. I combined it with Purple Twilight Alcohol Ink and the new Alcohol Rose Alloy. As Tim recommends, Alcohol Blending Solution is the best medium to use for blending and moving the Alcohol Pearls. To learn more about this, I really recommend that you check out Tim's New Alcohol Pearls + Alloy Release YouTube Live where he goes into great detail explaining things. Basically, 91% Isopropyl Alcohol is not compatible with the Alcohol Pearls because the base of the pearls is the Alcohol Blending solution. It causes the pearl to clump and get kind of chunky looking. I will vouch for this as I actually tried using isopropyl alcohol and I yes, it got all clumpy and chunky and yucky looking. Now granted, you may like this look, but it's not the look I was going for. I really love the smooth, fluid look you can achieve with them.

I used the Tim Holtz Alcohol Ink Blower to move and manipulate the ink with air. This is a much safer alternative to using a straw. Always makes sure you are working in a well ventilated area when working with Alcohol Inks. Once the ink was dry, I splattered it with a bit of 91% Isopropyl Alcohol to add a bit of interest. I allowed this to dry and then added a little more splatter with a bit of Alcohol Ink Gold Mixative.


After completing the background, I trimmed it down to 4x5.25 inches so that I could layer it onto a piece of white cardstock trimmed to 4.25x5.5 inches.

Next, I used the Tim Holtz Brushstroke No. 3 Thinlits to die cut a piece of Distress Watercolor paper. I adhered the layers of the flower together, leaving the center separate. I then ink blended the edges using Wilted Violet Distress Ink for the flower, Mustard Seed for the flower center and Mowed Lawn for the leaves. I left the other greenery piece plain.


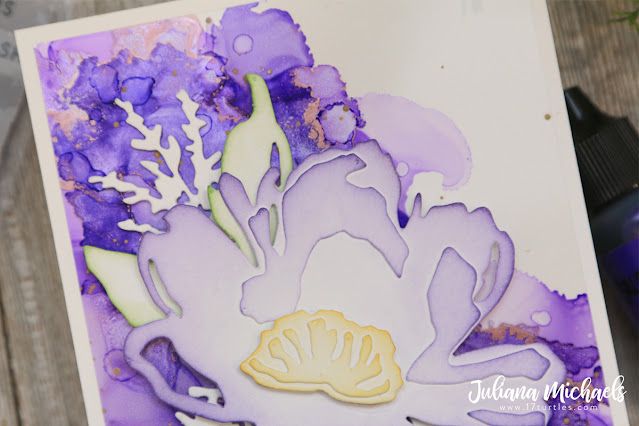
With the inking finished, I adhered the flower center using double sided foam adhesive and then used the same type of adhesive to adhere the flower to the alcohol pearl background. I then applied the panel to the card base using double sided adhesive tape. I applied the adhesive to the back side of the acetate, but behind the flower, so that you wouldn't see the adhesive through the acetate.


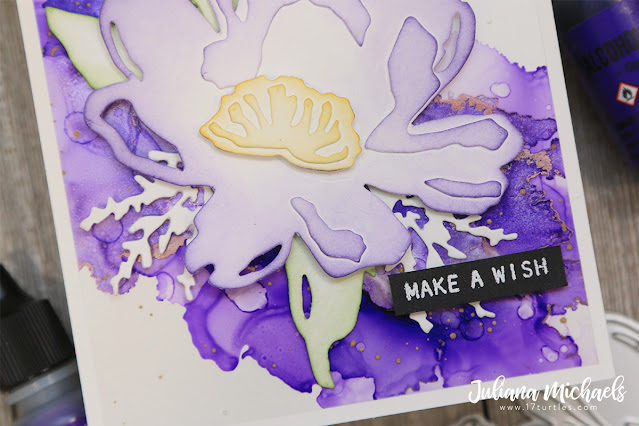
To complete the card, I added a sentiment using the Tim Holtz Tiny Text Stamp Set. I stamped it onto black cardstock using embossing ink and then heat embossed it with white embossing powder.

Hello Friend Card by Juliana Michaels featuring Tim Holtz Ranger Alcohol Pearls, Rose Gold Alloy & Acetate Card Backgrounds

Hello Friend Card | Alcohol Pearls & Acetate Card Backgrounds

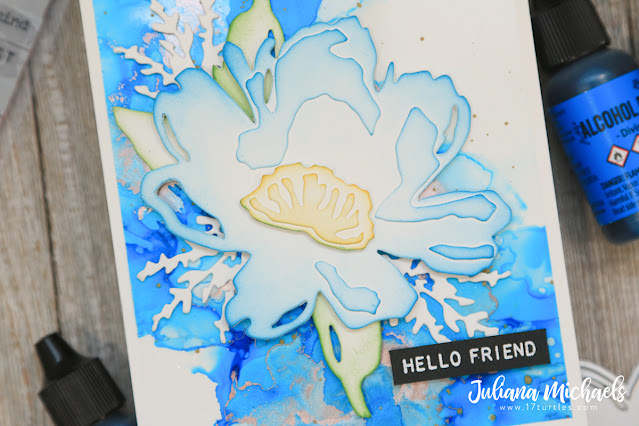
This second card uses the exact same technique to create the background, die cut and sentiment. The only thing that's different is the colors of ink I used for the background and the die cut.


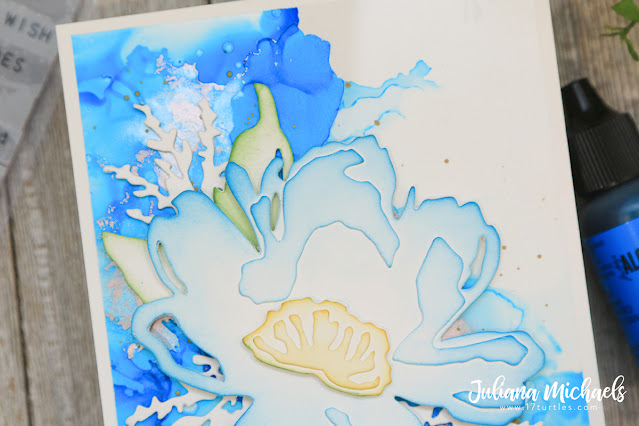
For the background I used Divine Alcohol Pearl, Glacier Alcohol Ink and Rose Gold Alloy. 


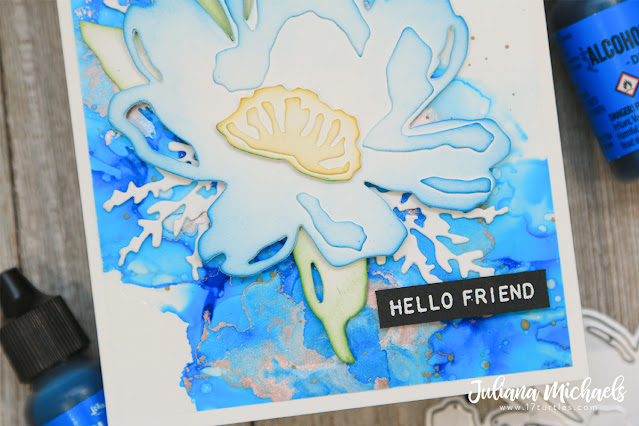
On the die cut I used Mermaid Lagoon Distress Ink for the flower, Mustard Seed for the flower center and Mowed Lawn for the leaves.


Thanks so much for stopping by today! I hope these cards inspire you to create some Alcohol Pearls and Acetate card backgrounds!

Supplies

Below you can find the products I used to create these cards along with compensated affiliate links to Scrapbook.com. These links are at absolutely no cost to you. If you want to learn more about what an affiliate link is, you can see my full affiliate and product disclosure statement here. I really appreciate your support of my blog and videos!

For the Love of Snowflakes Part 2 | More Winter Card Ideas

Hey friends! I'm back with Part 2 of my For the Love of Snowflakes series. As I mentioned in Part 1, I realized I had another addiction along with my Poinsettia dies and that was Snowflakes. So, I challenged myself to use some of the newer products to create and share some Winter Card ideas with you. Today I'm sharing 4 more cards I created using a mix of products from various companies. I also created a video that shares the process of how I created these cards, which you can check out below or on my YouTube Channel. If you aren't already, I'd love for you to subscribe so that YouTube will allow me to share even more with you!

As with my other post, I'll be sharing some of the basic information about how I created each card and as always, you can find a complete supply list at the bottom of this post. You can also check out my For The Love of Snowflakes Part 2 Video on YouTube or view it below.

Winter Card | Hero Arts Snowflake Cluster Die

On this first card I'm using the beautiful Hero Arts Snowflake Swirls Die. I die cut it from silver metallic cardstock and then twice from white cardstock. I glued all of the layers together to give the die cut a little more dimension.

Winter Card by Juliana Michaels featuring Hero Arts Snowflake Swirls Die

I created the background using Tim Holtz Alcohol Inks in Sailboat, Glacier and Monsoon. I then finished off the card by stamping the sentiment from the Scrapbook.com December Wordfetti Stamp Set and then heat embossed it with white embossing powder.


Happy Birthday Winter Cards | Tim Holtz Sizzix 3D Snowflake Impresslit

This next card features a gel printed background I created using Distress Oxides and Stencils. I share how I do this in the blog post: How To Create Backgrounds with Gelt Plates, Distress Oxides and Stencils.
You can also check out a video I created and shared on IG that shows me creating backgrounds with this technique.

For these particular backgrounds I used the following Distress Oxide colors: Kitsch Flamingo, Prize Ribbon and Salvaged Patina. The stencils I used are Tim Holtz Flurries, Dot Fade and Trellis.

Happy Birthday Winter Card by Juliana Michaels featuring Tim Holtz Sizzix 3D Snowflake Impresslit

To create the snowflakes, I used the Tim Holtz Sizzix 3D Snowflake Impresslit. I love these dies because they die cut the shape AND emboss all at the same time! To bring out the embossed detail I rubbed Sizzix Gold Luster Wax over 3 of the snowflakes and then used Silver on the other 3.

Happy Birthday Winter Card by Juliana Michaels featuring Tim Holtz Sizzix 3D Snowflake Impresslit

I matted the background on this card with a piece of pink paper from Scrapbook.com Peppermint Slimline Paper Pad and a piece of gold metallic cardstock. To create the sentiment,  I used the Hero Arts Message Strips Stamp Set and then heat embossed it with gold embossing powder to match the snowflakes.


On this card, I used a piece of blue paper from the Scrapbook.com Rainbow Slimline Paper Pad and piece of silver metallic cardstock. I then heat embossed the sentiment using white embossing powder.

Happy Birthday Winter Card by Juliana Michaels featuring Tim Holtz Sizzix 3D Snowflake Impresslit

These 2 cards are mini slimline in size and the finished size is 3.5 x 7.25 inches.


Let It Snow Winter Card | Waffle Flower Crafts Circle Snowflake Shaker and Small Snowflake Dies

This final card is a flat shaker card. To create it I began with some purple papers from the Scrapbook.com Cools A2 Paper Pad. I added some stencil work using Scrapbook.com Snowflakes Stencil with Villainous Potion Distress Ink and then with the Little Boxes Stencil using Villainous Potion Distress Oxide Ink.

Let It Snow Shaker Card by Juliana Michaels featuring Waffle Flower Crafts Circle Snowflake Shaker Die

Make sure to check out my video to see how I created the shaker part. The inside of the shaker is filled with sequins from the Sizzix Festive and Lavender Dust Sequins and Beads.

The frame and snowflake die cuts were created using the Waffle Flower Crafts Circle Snowflake Shaker and Small Snowflake Dies. For a bit more sparkle, I added some Pink Fresh Studio Glacier Jewels.


I hope you enjoyed this quick run through for the winter cards I made. For more details, make sure to check out my For the Love of Snowflakes Part 2 Video!

  ;

Supplies

Below you can find the products I used to create these cards along with compensated affiliate links to Scrapbook.com. These links are at absolutely no extra cost to you. If you want to learn more about what an affiliate link is, you can see my full affiliate and product disclosure statement here. I really appreciate your support!

For the Love of Snowflakes Part 1 | Winter Card Ideas

After going through my stash recently and realizing I was a Poinsettia Die addict, I also came to the realization that I have a similar problem with snowflakes! I have a mix of dies, stencils and stamps that feature them. So once again, I challenged myself to use some of the newer products to create and share some Winter Card ideas with you. I also took in one step further and made 2 videos sharing the process of how I created these card and you can check it out below or over on my YouTube channel. I broke the video and the blog posts up into 2 parts to hopefully make it a more enjoyable viewing process. In this post, I'll be sharing some of the basic information about how I created each card and as always, you can find a complete supply list at the bottom of this post.

Winter Card Ideas | Honey Bee Stamps Fancy Flakes Cover Plate

This first set of cards are all created with one set of dies...the Honey Bee Stamps Fancy Flakes Cover Plate. This is a set of 2 dies (sold separately) that work alone or together to create a variety of beautiful backgrounds. These are the cards that I share in Part 1 of my For The Love of Snowflakes Video.

For the Love of Snowflakes Winter Card Ideas by Juliana Michaels featuring Honey Bee Stamps Fancy Flakes Cover Plate and Pierced Cover Plate Dies

You can check out the video here:


You Are Snow Cool Winter Card

On this first card, I used both the Honey Bee Fancy Flakes Cover Plate and the Honey Bee Pierced Fancy Flakes Cover Plate together. I used the regular cover plate to first die cut the paper and then placed the stitched cover plate onto that die cut and ran it back through my die cut machine to add the pierced or stitched detail.

You Are Snow Cool Winter Card by Juliana Michaels featuring Honey Bee Stamps Fancy Flakes Cover Plate and Pierced Cover Plate Die

I finished off each of the cards with a custom sentiment using alphabet dies and my vintage typewriter. The letters on this card were created using Tim Holtz Alphanumeric Stretch Upper Thinlits Dies. I adhered a piece of white cardstock to a strip of Scrapbook.com 2" Foam Adhesive Tape and then die cut each of the letters. This turned them into dimensional letter stickers. To add a little extra interest and sparkle to the letters, I applied Scrapbook.com Pops of Color in Snowflake.


Snow Much Fun Winter Card

For my second card, I use the Honey Bee Fancy Flakes Cover Plate to create a shaker card. The paper I used is from the Scrapbook.com Cools A2 Paper Pad. These paper pads make selecting what colors to use SO easy since they all coordinate together so well!

Snow Much Fun Winter Card by Juliana Michaels featuring Honey Bee Stamps Fancy Flakes Cover Plate Die

Using the dark blue paper from the Cools Paper Pad, I die cut the Honey Bee Fancy Flakes Cover Plate and adhered a piece of acetate to the back side. To create the shaker box, I used Scrapbook.com 1/8" double sided foam tape. I then filled the shaker box with sequins from the Sizzix Arctic Sky Sequins and Beads.

The letters on this card were created using Scrapbook.com Classic Type Upper Alphabet Dies and I used the same process that I used on the card above.


Warm Winter Wishes Winter Card

For this final card I use the Honey Bee Pierced Fancy Flakes Cover Plate to create a simple background. I just love the texture that the piercing adds to the paper. This die doesn't cut your paper, but instead covers an entire A2 or standard card size. When you run it through your die cutting machine it pierces tiny holes into the paper creating this beautiful stitched design.

Warm Winter Wishes Winter Card by Juliana Michaels featuring Honey Bee Stamps Fancy Flakes Pierced Cover Plate Die

This card was super simple to put together thanks to that beautiful cover plate die. I used the same process to create the sentiment that I used on the other cards, however this time I used the Scrapbook.com Bold Basic Upper Alphabet Dies.


Thanks so much for stopping by today! I hope these cards inspired you to pull out your crafty supplies, see what's hiding in your stash and start making! Just a reminder that I also have a video I created that shares more of the process I used to create each of these cards.  And if you aren't already, make sure you've subscribed to my blog feed so you know when I share my next post. Part 2 of For the Love of Snowflakes will be coming soon and you don't want to miss it!

Supplies

Below you can find the products I used to create these cards along with compensated affiliate links to Scrapbook.com. These links are at absolutely no extra cost to you. If you want to learn more about what an affiliate link is, you can see my full affiliate and product disclosure statement here. I really appreciate your support!

Subscribe