Hello crafty friends! Today I've got some card ideas to share with you that feature Scrapbook.com Pops Of Color and Distress Foundry Wax.
In other news, I know I haven't been sharing too much on my blog or social lately, but along with working on "top secret" projects, I've had my hands full with the addition of a new family member...Ziva! She's a 15 month old Golden Retriever and she has been such light in our lives after losing both Lincoln and Shirley this past year. Any guesses on where we got the idea for her name?!

Now don't get me wrong. I have been crafting, but quite a bit of it has been for upcoming releases from Tim Holtz (woohoo!) and for a class I'll be teaching as part of the Card Makers Success Summit this July. If you haven't already, I recommend checking it out and signing up for the VIP Waitlist so you can get ALL the details as soon as they become available. Oh, and the great thing about this event...it's FREE!
JOIN THE VIP WAITLIST HERE

• • • • • • • • • • • • • • • • • • • • •
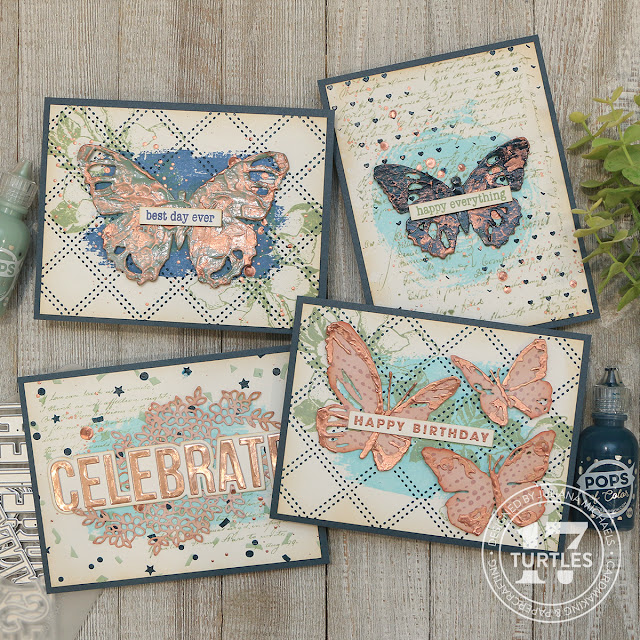
Best Day Ever Card | Pops Of Color + Distress Foundry Wax
Without further ado, let's get into the projects I've created and want to share with you today. I've created 4 cards and they all feature some new Scrapbook.com products including new stencils, Pops of Color and stamps. I also have a some fun techniques to share with you as well that include using Pops of Color with Distress Foundry Wax!

On this card, I stamped the image from the Tim Holtz Brushstrokes Stamp Set in Faded Jeans Archival Ink. I took the larger of the narrow brushstroke images and stamped it once in the center of the card front. I then rotated the stamp, inked the top half of it and stamped it above the center image, inked the bottom of the stamp and stamped it below the center image. In doing this, I was able to create a larger brushstroke shape. I then stamped the floral image from the Tim Holtz Dearly Departed Stamp in Bundle Sage Distress Oxide.

- 3 Ways To Use Scrapbook.com Pops Of Color With Stencils
- 4 Must Try Mixed Media Stencil Techniques
- More Pops Of Color Card Ideas
For the embellishment on this card, I die cut a piece of chipboard using the Tim Holtz Tattered Butterfly Bigz Die. I then used a palette knife to apply Scrapbook.com Pops Of Color in Sage to the chipboard. I did not try to get a smooth surface because I wanted it to have some texture for when I added the next step.
Once the Pops of Color was dry, I used my finger to apply Distress Foundry Wax in Mined to the raised areas on the butterfly. For more tips and tricks on working with Foundry Wax, you can check out this blog post - Tim Holtz Distress Foundry Wax Tips and Trick. After I applied the wax, I heat set it using a heat embossing gun. Because the Foundry Wax transforms from a dull to super shiny finish so quickly when heated, you don't need to worry about melting the Pops Of Color.

Once the background was dry, I applied a thin layer of Distress Micro Glaze over the surface and wiped over it with a clean paper towel. Next, I splattered some of the Distress Foundry Wax in Mined onto the background and again heat set it. The reason for the Distress Micro Glaze is that the Foundry Wax caused the Archival Ink to wick away from the larger splatters. I tested this several times and the only way I found to avoid it was to either only do small splatters or apply the Distress Micro Glaze.
With the background and butterfly completed, I finished off the card by inking the edges of the background with Vintage Photo Distress Ink. I then added a sentiment from the Scrapbook.com Happy Birthday Stamp Set which I stamped in Faded Jeans Distress Oxide Ink and adhered with a piece of Scrapbook.com Double Sided Foam Adhesive Strip. I then matted the paper onto a piece of the dark blue paper from the Scrapbook.com Boho A2 Paper Pad.

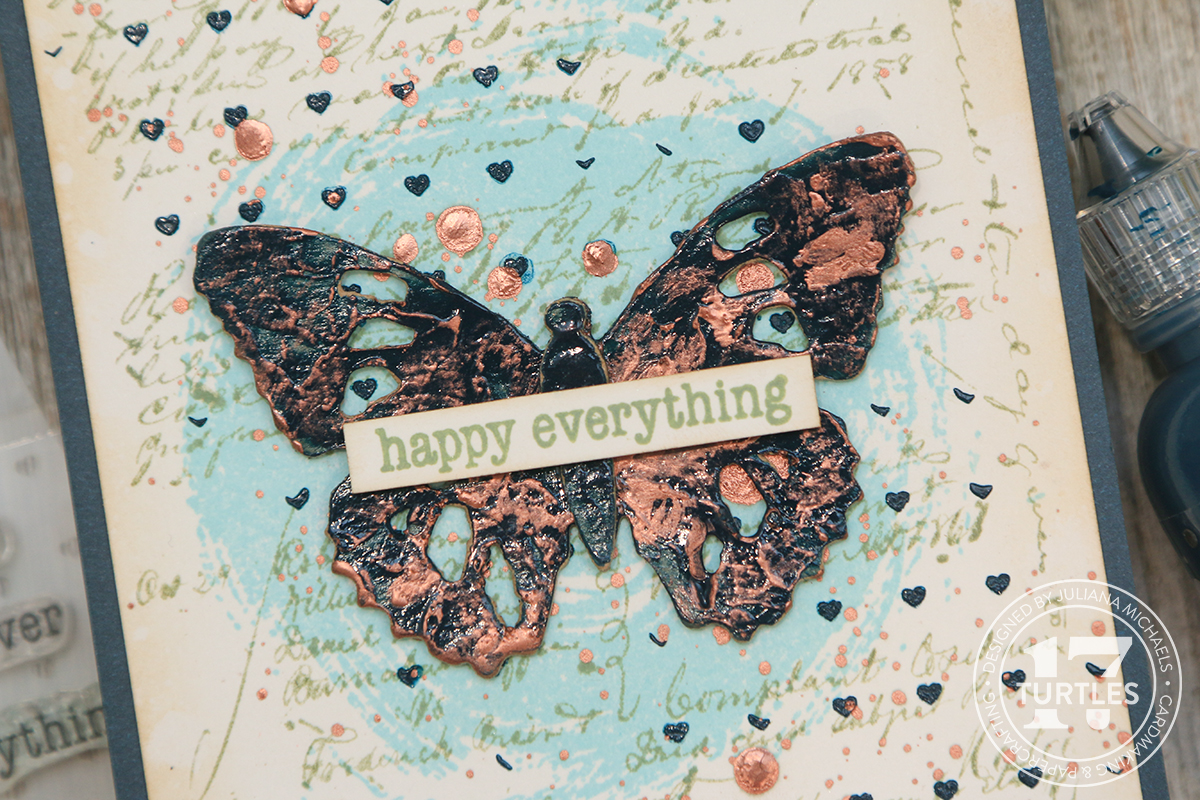
Happy Everything Card | Pops Of Color + Distress Foundry Wax
For this second card, I stamped the large circle brushstroke image from the Tim Holtz Brushstrokes Stamp Set in Salvaged Patina Archival Ink. I then stamped one of the script images from the Tim Holtz Ledger Script Stamp in Bundle Sage Distress Oxide.

For the stencil work I used the Scrapbook.com Mini Hearts Stencil with the same technique as on the first card using Scrapbook.com Pops Of Color in Marine mixed with Therm O Web DecoFoil Transfer Gel Duo. Once that was dry, I applied a layer of Distress Micro Glaze and then added the Foundry Wax splatters.

The butterfly on this card is the smaller of the butterflies from the Tim Holtz Tattered Butterfly Bigz Die. I cut it from chipboard and then applied Scrapbook.com Pops of Color in Marine just like I did on the first card. Once it was dry, I applied the Foundry Wax.

I finished off the card with a sentiment from the Scrapbook.com Happy Birthday Stamp Set which I inked up with Bundled Sage Distress Oxide Ink. Another little tip here...if you are worried about the sentiment bleeding if it gets wet you can always apply a little Distress Micro Glaze to protect it.
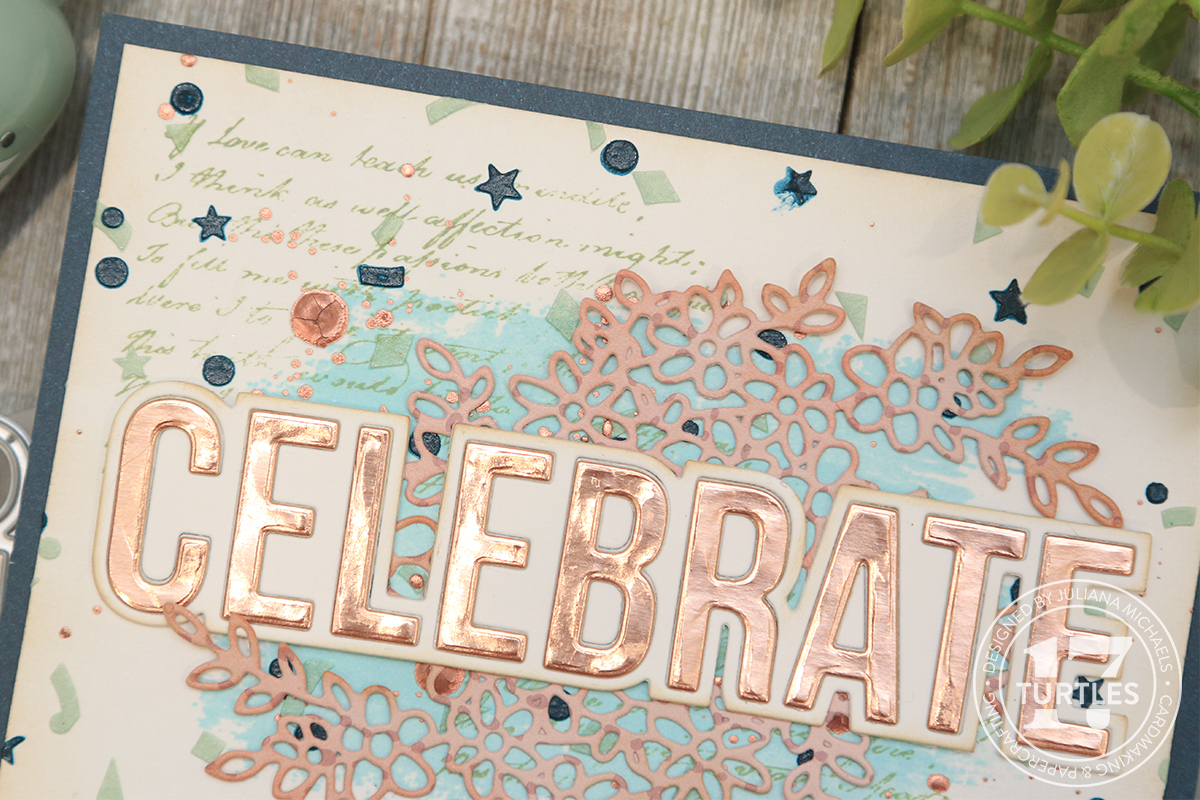
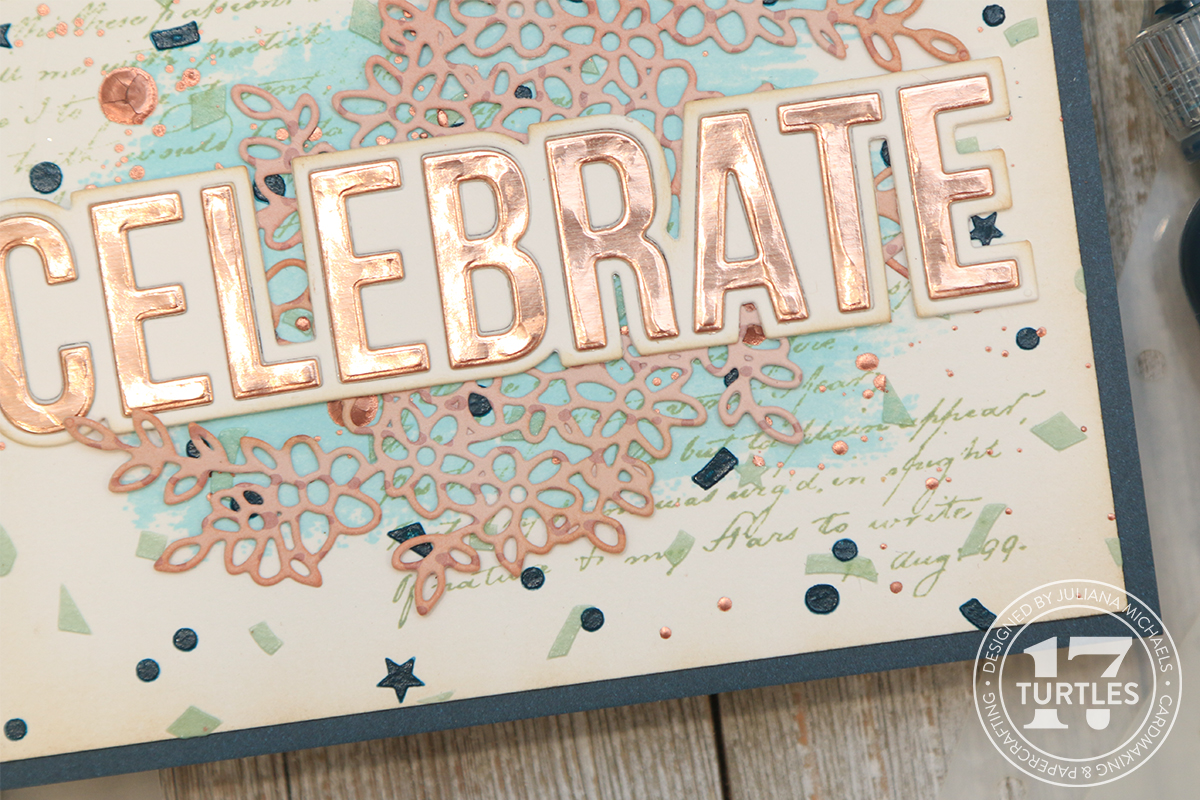
Celebrate Card | Pops Of Color
Surprise! This card doesn't have a butterfly on it! Can you believe it?! For this card I used the same stamping technique as above to create the background. I used same brushstroke image I used on the first card and stamped it three times but this time I used Salvaged Patina Archival Ink. I then stamped the script image from the Tim Holtz Dearly Departed Stamp in Bundle Sage Distress Oxide.

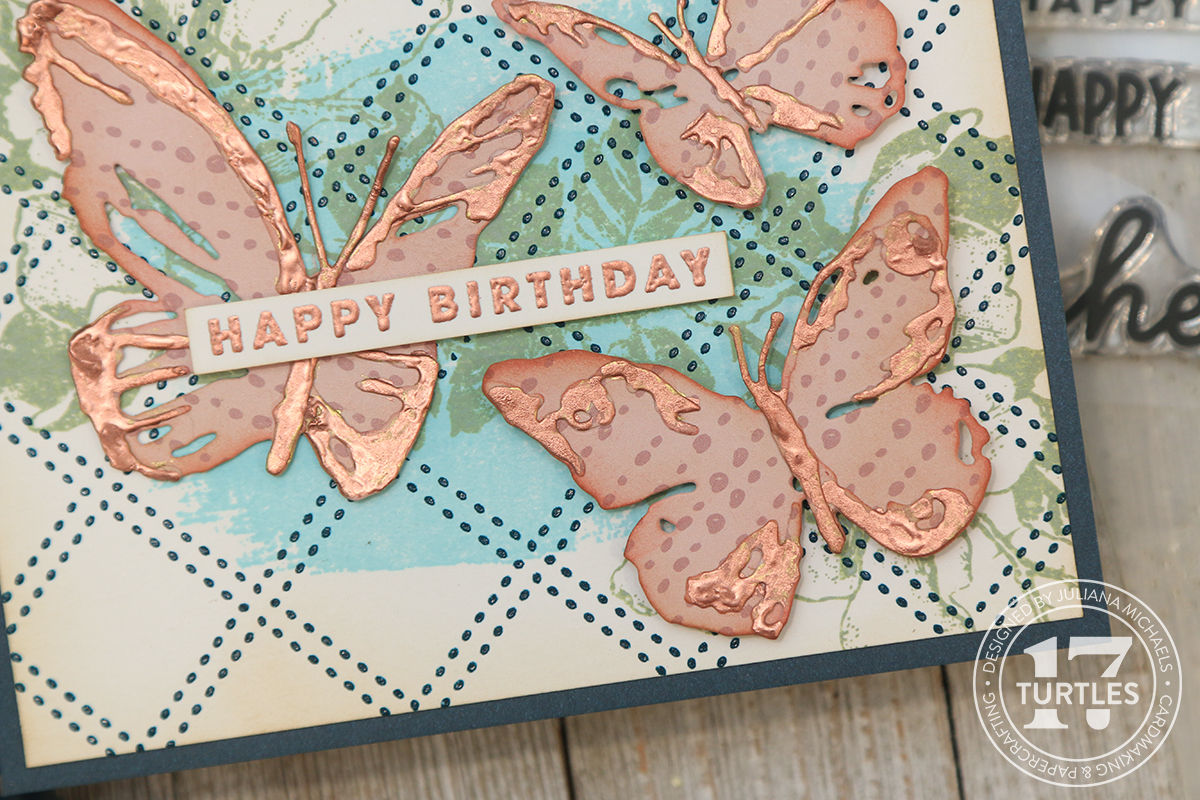
Happy Birthday Card | Pops Of Color
For this fourth and final card, I actually used the original background I made for the very first card I shared with you in this post. When I went to put the butterfly on it, the stamped brushstroke image and the butterfly were so close in color to each other that the butterfly didn't really stand out. So I redid the background and saved this one for later. I had also die cut and assembled these Tim Holtz Brushstroke Butterflies for another card that I didn't end up liking, so I tore them off and they ended up on this background! You just never know where the creative process will take you!

The butterflies were die cut from a piece of paper that is from the Scrapbook.com Boho 6x8 Patterned Paper Pad. I then added Foundry Wax in Mined to the detail pieces using a small paint brush.
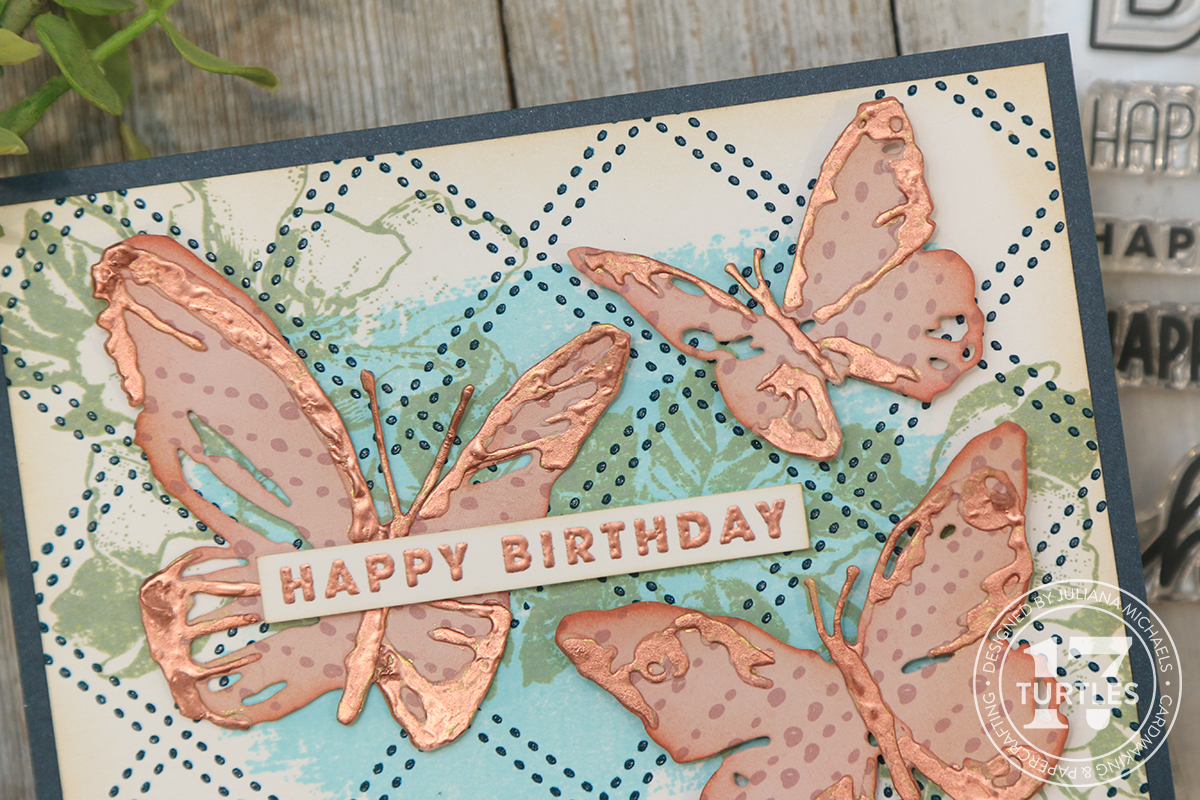
Then sentiment is from the Scrapbook.com Happy Birthday Stamp Set. I stamped it in embossing ink and then heat embossed it using Ranger Copper Embossing Powder.

I then adhered the two smaller butterflies and the sentiment strip using Scrapbook.com Double Sided Foam Adhesive Strips and Squares.

SUPPLIES
Below you can find the products I used to create this project along with compensated affiliate links to Scrapbook.com. These links are at absolutely no cost to you. When you shop through the links below, I receive a small commission from Scrapbook.com. These links are at absolutely no cost to you and the commission I receive helps me cover the costs of my blog and other expenses, which allows me to continue to provide you with FREE inspiration and tutorials. If you want to learn more about what an affiliate link is, you can see my full affiliate and product disclosure statement here. Thank you so much for your love and support!