Merry Christmas Mini Slimline Card Set

I'm back with another mini slimline card set to share with you today and this one is Christmas themed! I don't know about you, but I'm all for getting an early start on my Christmas card making. This is actually the first one I've made this year and it's got me motivated to do some more really soon!
This set is very similar to my most recent Butterfly Thanks Mini Slimline Card Set in how it was constructed. I'll share all the differences below, and if you missed the other card set, make sure to check it out for more details and inspiration.

• • • • • • • • • • • • • • • • • • • •

Before I get into this card set, I have some super exciting news to share with you! Announcing the first ever Scrapbook.com SBC Fest 2022! 

What is SBC Fest you ask? It's a 2 day FREE virtual event filled with card making and scrapbooking classes from some of the top makers in the industry...including yours truly! Join me on September 16th and 17th for a fun-filled weekend of online classes, crafting and so much more! You can learn more about SBC Fest HERE!


Here's a look at the amazing makers who will be sharing and inspiring you during this event! Are you excited?! I know I am and I can't wait to see you there!

SBC Fest 2022 hosted by Scrapbook.com

• • • • • • • • • • • • • • • • • • • •

Now let's get on with the making!

Merry Christmas Mini Slimline Card Set


This mini slimline card set features some amazing new dies from Scrapbook.com including their new Tall Skinny Pocket and Snowflake Dies which I used to create a coordinating card, envelope and tag!

Merry Christmas Mini Slimline Card Set by Juliana Michaels featuring Scrapbook.com Tall Skinny Pocket Dies, Snowflake Dies and Christmas Block Word Dies

Merry Christmas Mini Slimline Envelope and Tag

To create the envelope, I used the largest Tall Skinny Pocket Die to cut out a piece of paper from the Scrapbook.com Christmas Patterned 6x8 Paper Pad. I then but another piece of the paper the same size as the pocket front to use as a back.

Merry Christmas Mini Slimline Envelope and Tag by Juliana Michaels featuring Scrapbook.com Tall Skinny Pocket Dies, Snowflake Dies and Christmas Block Word Dies

I applied Scrapbook.com 1/4" Clear Double Sided Tape to the tabs of the envelope and then attached it to the back piece. With the envelope assembled, I inked the edges with Vintage Photo Distress Ink using a foam blending tool.


The first thing I did to embellish the envelope was to add some snowflakes die cut from Distress Watercolor Paper using the Scrapbook.com Snowflakes Die Set. I used the ink smooshing technique to give them a vintage feel. To do this, I smooshed some Old Paper Distress Ink onto my craft mat, spritzed them with water and then smooshed the paper into the ink. I then dried it with my heat tool and adhered them to envelope using Distress Collage Medium. I recommend using watercolor paper or paper that is made to stand up to water when using the ink smooshing technique.

Next, I die cut the numbers "25" from a piece of glitter paper in the Scrapbook.com Mixed Metals Glitter Paper Pad using the Tim Holtz Alphanumeric Stretch Lower and Numbers Dies and adhered them. I finished it off by adding the "special delivery" label which is from the Tim Holtz Vintage Holidays Stamp Set, stamped in Barn Door Archival Ink. I then fussy cut it with scissors and inked the edges with Vintage Photo Distress Ink.


Merry Christmas Tag

To create the tag, I took the Scrapbook.com Nested Tag Die set and used the third size up from the smallest tag to cut a piece of the same glitter paper I used for the numbers on the envelope. I also used this same glitter paper to die cut the Merry die from the Christmas Block Words Die Set and saved the inside/negative pieces. I then cut it again from a piece of paper from the Scrapbook.com Christmas Patterned 6x8 Paper Pad. I layered these pieces along the center of the tag die and adhered them using Distress Collage Medium. I then trimmed the tag down to make it a skinny tag. To finish it off I added some red and white twine that I inked with some Vintage Photo Distress Ink to make it a bit more vintage.


Merry Christmas Mini Slimline Card

For the card, I cut a piece of the Scrapbook.com Christmas Patterned 6x8 Paper Pad to 2.75 x 7 inches. I had some scrap pieces leftover from the envelope and added a strip of that along the left hand side. I then added some machine stitching and inked the edges with Vintage Photo Distress Ink.

Merry Christmas Mini Slimline Card and Envelope by Juliana Michaels featuring Scrapbook.com Tall Skinny Pocket Dies, Snowflake Dies and Christmas Block Word Dies

To embellish the card, I added some more snowflake die cuts that I created using the same ink smooshing technique as the ones on the envelope. I also added another stamped image.


For the December Tab, I used a tab die from the Scrapbook.com Small Tabs Die Set and ink smooshed it just like I did the snowflakes. The "December" is from the Scrapbook.com Wordfetti December Stamp Set and is stamped in brown ink.


Thanks so much for stopping by today! I hope you enjoyed this Merry Christmas Mini Slimline Card Set and some early Christmas card inspiration.

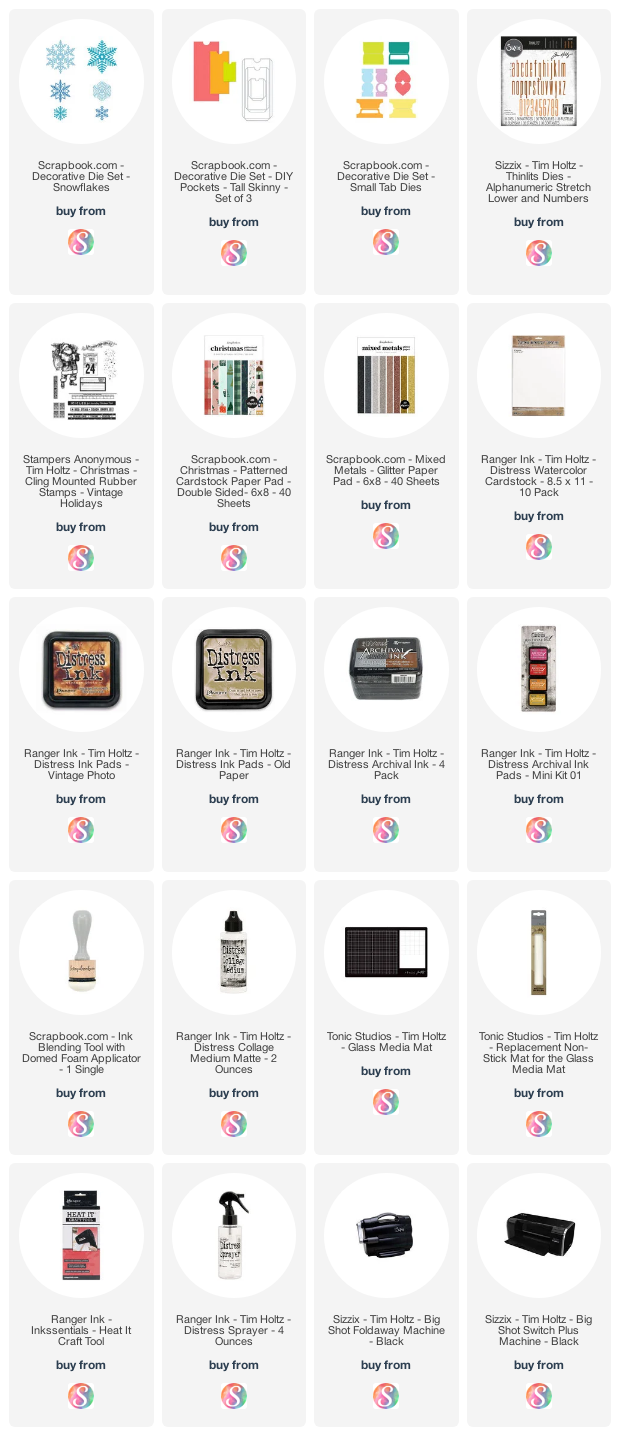
Supplies - Merry Christmas Mini Slimline Card Set

Below you can find the products I used to create this project along with compensated affiliate links to Scrapbook.com. These links are at absolutely no cost to you. When you shop through the links below, I receive a small commission from Scrapbook.com. These links are at absolutely no cost to you and the commission I receive helps me cover the costs of my blog and other expenses, which allows me to continue to provide you with FREE inspiration and tutorials. If you want to learn more about what an affiliate link is, you can see my full affiliate and product disclosure statement here. Thank you so much for your love and support!

Butterfly Thanks Mini Slimline Card Set

Hello my crafty friends! The summer is flying by and even though I haven't posted in awhile, I have been super busy BTS making and creating. Today, I'm excited to share one of the projects I've been working on with you. It's a mini slimline card set featuring some amazing new dies from Scrapbook.com including their new Tall Skinny Pocket and Butterflies Dies which I used to create a coordinating card, envelope and tag!

Butterfly Thanks Mini Slimline Card, Envelope and Tag by Juliana Michaels featuring Scrapbook.com Tall Skinny Pocket Dies and Butterflies 1 Dies

Butterfly Thanks Mini Slimline Envelope and Tag

To create the envelope, I used the largest Tall Skinny Pocket Die to cut out a piece of Distress Watercolor  Paper. I then cut another piece of the watercolor paper the same size as the pocket front to use as a back.
Once I had the paper cut, I used the ink smooshing technique. To do this I smooshed some Old Paper Distress Ink and just a tiny bit of Vintage Photo Distress Ink onto my craft mat, spritzed them with water and then smooshed the paper into the ink. I then dried it with my heat tool and repeated it until I was happy with the ink coverage. Next, I added a bit of stamping to the front of the envelope using the Tim Holtz Botanic Collage Stamp Set and Black Soot Archival Ink.

Butterfly Thanks Mini Slimline Envelope and Tag by Juliana Michaels featuring Scrapbook.com Tall Skinny Pocket Dies and Butterflies 1 Dies

I applied Scrapbook.com 1/4" Clear Double Sided Tape to the tabs of the envelope and then attached it to the back piece. With the envelope assembled, I inked the edges with Vintage Photo Distress Ink using a foam blending tool.

To further embellish the envelope, I added a strip of peach colored paper from the Scrapbook.com Floral Slimline Paper pad and a die cut created using the Scrapbook.com Butterflies 1 Die Set.


For the butterfly, I die cut both layers from Distress Watercolor paper. The detailed layer was smooshed into Vintage Photo Distress Ink on my craft mat and the solid layer was inked around the edges with the same ink. Using Distress Collage Medium, I adhered the layers and then attached them to the strip I had wrapped around the envelope.


Butterfly Thanks Tag

To create the tag, I took the Scrapbook.com Nested Tag Die set and used the third size up from the smallest tag to cut a piece of the peach paper. Using the same paper color, I die cut it using the Thanks die from the Card Maker Block Words Die Set and saved the inside/negative pieces. I then cut it again from Distress Watercolor paper that I had inked using the ink smooshing technique that I used on the envelope. I layered these pieces along the center of the tag die and adhered them using Distress Collage Medium. I then trimmed the tag down to make it a skinny tag and added some machine stitching around the outside edges. To finish it off I inked the edges with Vintage Photo Distress Ink and added a bit of ribbon.


Butterfly Thanks Mini Slimline Card

For the card, I cut a piece of the peach paper from the Floral Slimline Paper Pad to 2.75 x 7 inches. I then stamped some of the images from the Botanic Collage stamp set using Black Soot Archival Ink.

Butterfly Thanks Mini Slimline Card and Envelope by Juliana Michaels featuring Scrapbook.com Tall Skinny Pocket Dies and Butterflies 1 Dies

Next, I lightly splattered the paper with some Old Paper and Vintage Photo Distress Ink that I had added a little bit of water too. Because this paper is not meant to handle water, I wouldn't recommend the ink smooshing technique I used on the envelope. I then inked the edges with Vintage Photo Distress Ink.


The butterflies on the card were inked and colored the same way I did the one on the envelope. Once they were assembled I adhered them to the card front. The "filed" tab was created using the Scrapbook.com Small Tabs Die Set and a stamp from the Tim Holtz Field Notes Stamp Set and the sentiment is from the Scrapbook.com.


To finish off the the card, I added some machine stitching around the outside edges and down the center of the butterflies.


As always, I really appreciate you stopping by today and checking out what I've created and shared with you!


• • • • • • • • • • • • • • •

Before you go, I also wanted to remind you about the Cardmaker Success Summit that starts this week! All the fun for this FREE event begins on Thursday and I'll be presenting my project on Friday, July 29 at 2pm EST. 

Here's a peek at my card! During my presentation, I'll be sharing some easy to do mixed media techniques that you can incorporate on your upcoming Christmas cards. Along with my presentation, I've also created a worksheet with step by step instructions AND a detailed supply list for you as well. My goal is to help you create a beautiful mixed media holiday card that you can easily replicate!

Cardmaker Success Summit July 2022 Juliana Michaels

If you haven’t grabbed your FREE ticket to the summit yet, you can do that HERE. I sure hope to see you there!

Supplies - Butterfly Thanks Mini Slimline Card Set

Below you can find the products I used to create this project along with compensated affiliate links to Scrapbook.com. These links are at absolutely no cost to you. When you shop through the links below, I receive a small commission from Scrapbook.com. These links are at absolutely no cost to you and the commission I receive helps me cover the costs of my blog and other expenses, which allows me to continue to provide you with FREE inspiration and tutorials. If you want to learn more about what an affiliate link is, you can see my full affiliate and product disclosure statement here. Thank you so much for your love and support!

Subscribe