
If you are looking for even more inspiration make sure to watch the Tim Holtz YouTube Live and check out what the other Makers are creating and sharing on social media. You can find links to the Makers here.
In the write up below I'm sharing the highlights for creating these tags. If you would like more details, including tips and tricks on working with Embossing Glazes, make sure to watch the video below or you can check it out over on my YouTube Channel.
To create my samples, I used Distress Tags, but if tags aren't your thing you can certainly do these techniques on card size pieces of paper. The other supplies I'll be using are embossing folders, stencils, stamps, embossing ink, Distress Crayons, Distress Spray Stains, Distress Oxide Sprays, Distress Ink and Distress Pastes including...Opaque Texture Paste, Translucent Crackle Paste and Translucent Texture Paste. I know this seems like a lot of supplies, but I'm not using all of them for every technique. and definitely feel free to use any embossing folders, stencils and stamps you already have in your stash as well as whatever colors of inks, sprays or even embossing glazes you have as well. If you are interested in the supplies I'm using, I'll have all of them linked below in the supply list and when you shop through those links it helps support me and I really appreciate that so much!
EMBOSSING GLAZES VS EMBOSSING POWDERS
If you're not familiar with embossing glazes, you might be wondering how are these different from regular embossing powder. Well, embossing glazes and embossing powders are similar in that they are both powders that need something to stick to and then you must heat set them using a heat tool. How they are different is that embossing glazes are actually translucent so you can see through it. This is in comparison to regular embossing powder which you can't see through it. So with embossing glazes, if you put them over something you can see what is underneath and some of the techniques I'm going to share will explore that quality and show you how you can use it to add depth and interest to your cards.To embellish each tag, I added a mix of Paper Dolls, Idea-ology Ephemera with the edges inked using Walnut Stain Distress Ink. I also layered in some Black Kraftstock that I die cut and lightly sanded with a Distress Sanding Disk to reveal the kraft colored core of the paper.
EMBOSSING FOLDERS & EMBOSSING GLAZE
To start off I'm going to show you some techniques for working with embossing folders and Embossing Glaze. I began by taking three Distress Tags and I embossed each one with a different embossing folder.TAG No. 1
On this first tag, I embossed the tag using the Mosaic Embossing Folder. Next, I lightly rubbed an embossing ink over the raised surface of the tag. I then applied Aged Mahogany Embossing Glaze and heat set it with my heat tool.

To add some interest to this tag I applied Frayed Burlap Distress Oxide Spray, spritzed it with some water and dried the paper with my heat tool. I then added more color to the cracks with some Walnut Stain Spray Stain, spritzed it with more water, dabbed off the excess ink and then dried it with my heat tool. Next, I used Distress Crayons in Crooked Broomstick (a limited edition Halloween color with a pearlescent shimmer) and Walnut Stain Distress Crayon. I really love how this turned out and the shimmer from the pearl is really cool!


To add interest to this tag, I spritzed it with some water and then added Pumice Stone Distress Oxide Spray, dried the paper with my heat tool and dabbed off the excess ink with a paper towel. Next I added a bit of Salvaged Patina Distress Oxide Spray and repeated the same process. I then finish it off by inking the edges with Walnut Stain Distress Ink, spritzed it with some water and dabbed the water droplets with a paper towel to lift the ink in those areas and then I dried it with my heat tool.

To add some grunge and interest to this tag I spritzed the paper with water and then added Walnut Stain Distress Spray. I dabbed off the excess ink and dried the paper with my heat tool. I then added various colors of Distress Crayons in Crooked Broomstick, Salvaged Patina, Rusty Hinge, and Walnut Stain.


Once the paper was dry, I applied Walnut Stain Distress Crayon to bring out the cracks from the Crackle Paste. Next, I inked the edges of the tag with some Walnut Stain Distress Ink. I then spritzed it with some water, dabbed the water droplets to lift the ink and then set it to the side to dry. You could also use your heat tool to dry the paper is so desired.

To add some grunge and interest to this tag, I spritzed the tag with water and then added some Distress Spray Stains in Old Paper and Tea Dye and then dry the paper with my heat tool. I then finished it off by inking the edges with Walnut Stain Distress Ink, spritzing it with water. I then dried it with my heat tool and used a paper towel to dab up some of the larger water droplets.

To add some grunge and interest to this tag, I sprayed it with Speckled Egg Distress Spray Stain and dried the paper with my heat tool. Next, I inked the edges of the tag and also added some ink toward the center of the tag with Walnut Stain Distress Ink. The glaze acts as a resist to the ink and I really love the way it looked when I added the ink over some of the glazed areas. I then spritzed the tag with water, dried it and dabbed off some of the excess ink with a paper towel. I then re ink the edges to darken them up again.


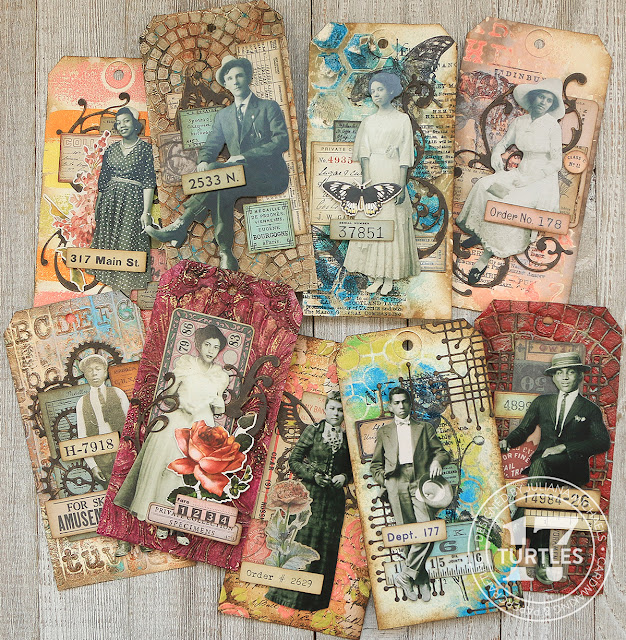
So there you have it! Nine tags created using nine amazing Embossing Glaze Techniques and a mix of different mediums and supplies! To decorate each tag, I added a mix of die cuts cut from Black Kraftstock that I lightly sanded with a sanding disk, a paper doll and ephemera from my stash. I inked the edges of the ephemera with Walnut Stain Distress Ink. I then adhered the clusters with a mix of Scrapbook.com Clear Double Sided Adhesive Roll and Double Sided Adhesive Foam Roll. The dies I used are listed below each tag.
To add some interest to this tag I applied Frayed Burlap Distress Oxide Spray, spritzed it with some water and dried the paper with my heat tool. I then added more color to the cracks with some Walnut Stain Spray Stain, spritzed it with more water, dabbed off the excess ink and then dried it with my heat tool. Next, I used Distress Crayons in Crooked Broomstick (a limited edition Halloween color with a pearlescent shimmer) and Walnut Stain Distress Crayon. I really love how this turned out and the shimmer from the pearl is really cool!
The die I used on this tag is the Paper Rose Texture 3 Die.
TAG No. 2
On this tag, I embossed it with the Tim Holtz Damask Embossing Folder. I then used a finger dauber sponge to apply the embossing ink. This allowed me to push the ink down into all the cracks and crevices created by the embossing folder. If you have the Distress Embossing Dabber you could also use that. I then applied Seedless Preserves Embossing Glaze.To add some grunge and interest I applied Walnut Stain Distress Crayon using a stencil brush and just a tiny bit of water to work the crayon into the embossed design. I kept adding more of the Distress Crayon until I had the entire piece covered with the crayon. I then took a paper towel, spritzed lightly with water and gently rubbed here and there over the embossed areas to lift off some of the crayon. I then lightly applied Sizzix Luster Wax in Gold over the raised surfaces of the tag.
The die I used on this tag is the Tim Holtz Adorned Thinlits Dies.
TAG No. 3
For this third tag I embossed it using the Tim Holtz Typewriter Embossing Folder. I gently rubbed over the raised part of the embossed design with an embossing ink pad. I then added three different colors of embossing glaze in Walnut Stain, Peacock Feathers and Rusty Hinge. Because I'm used several colors on this one, I'm spread the colors out across the paper, tap off the excess and then heat set it.To add interest to this tag, I spritzed it with some water and then added Pumice Stone Distress Oxide Spray, dried the paper with my heat tool and dabbed off the excess ink with a paper towel. Next I added a bit of Salvaged Patina Distress Oxide Spray and repeated the same process. I then finish it off by inking the edges with Walnut Stain Distress Ink, spritzed it with some water and dabbed the water droplets with a paper towel to lift the ink in those areas and then I dried it with my heat tool.
The die used on this tag is the Tim Holtz Gearhead Thinlits Dies.
STENCILS & EMBOSSING GLAZE
Now I'm going to share some techniques for working with stencils and Embossing Glaze.TAG No. 4
On this tag I applied Distress Opaque Texture Paste through the Tim Holtz Mosaic Layering Stencil. This paste dries white and is less see through than the translucent pastes. Once I get the paste applied I'm going to set this tag to the side and let it dry completely. After the paste had dried, I placed the stencil back over the stenciled design and used a finger dauber to apply embossing ink to the areas with paste. Once the entire surface was covered with ink, I removed the stencil and applied Pumice Stone Embossing Glaze, tapped off the excess and then used my heat tool to heat set the glaze.To add some grunge and interest to this tag I spritzed the paper with water and then added Walnut Stain Distress Spray. I dabbed off the excess ink and dried the paper with my heat tool. I then added various colors of Distress Crayons in Crooked Broomstick, Salvaged Patina, Rusty Hinge, and Walnut Stain.
The die I used on this tag is Tim Holtz Leaf Fragments Thinlits Die Set.
TAG No. 5
For this next tag, I show you how the translucent nature of these glazes comes into play by first stamping one of the floral images from the Tim Holtz Botanic Collage Stamp Set onto the tag using Black Soot Archival Ink. Next, I applied Translucent Texture Paste through the Tim Holtz Typo Layering Stencil. This paste dries transparent so you can see the stamping underneath it. In retrospect, I wish I had picked a stencil with a slightly larger design so I could apply more paste which would allow for an even cooler effect.After removing the stencil and while the paste is still wet, I applied Abandoned Coral and Pumice Stone Embossing Glaze. I used my fingers to pinch small amounts of the glaze onto the wet paste, making sure to spread the colors out across the pasted areas. I then tapped off the excess glaze and set this to the side to give the paste time to dry. Once the paste was dry, I used my heat tool to heat set the glaze.
To add little grunge and interest to this tag I spritzed it with some water and then added Distress Spray Stain in Tattered Rose. I used my heat tool to dry the paper and dabbed off any excess ink that was sitting on top of the glaze. Once the glaze has been heat set, the ink will not dry on it. I then repeated this process with Pumice Stone Distress Oxide Spray. The final step on this tag was to ink the edges with Walnut Stain Distress Ink, spritz it with some water and dab the ink dry.
The die I used on this tag is Tim Holtz Adorned Thinlits Die Set.
TAG No. 6
For this next tag, I'm going again stamp some images from the Tim Holtz Botanic Collage Stamp Set and Black Soot Archival Ink. This time I stamped the butterflies. I then applied Translucent Crackle Paste through the Tim Holtz Brush Hex Layering Stencil. I removed the stencil and then added Mermaid Lagoon, Peacock Feathers and Bundled Sage Embossing Glaze over the wet Translucent Crackle Paste making sure to spread the various colors across the pasted area. I then tapped off the excess glaze and and set the tag to the side to allow the paste time to dry. After the paste dried, I used my heat tool to heat set the embossing glaze.Next, I spritzed the tag with water and added some Speckled Egg Distress Spray Stain. I used my heat tool to dry the paper and then dabbed off any excess ink with a paper towel because, as we learned earlier, the ink will not dry on the embossing glaze once the glaze is heat set..
Once the paper was dry, I applied Walnut Stain Distress Crayon to bring out the cracks from the Crackle Paste. Next, I inked the edges of the tag with some Walnut Stain Distress Ink. I then spritzed it with some water, dabbed the water droplets to lift the ink and then set it to the side to dry. You could also use your heat tool to dry the paper is so desired.
The die I used on this tag is Tim Holtz Adorned Thinlits Die Set.
TAG No. 7
For this tag, I wanted to apply the embossing glaze to very specific areas of the design, but first, I started off by stamping the tag with the ledger image from the Tim Holtz Ledger and Script Stamp Set with Black Soot Archival Ink. I then applied Opaque Texture Past through the Tim Holtz Roses Layering Stencil. I was a bit surprised, that I could see the stamped design through the opaque paste after it had dried.Once the paste was dry, I lined up the stencil over the dry texture paste and used a finger sponge dauber to apply embossing ink through the stencil, making sure I get ink over the entire design. I removed the stencil and began to apply the embossing glaze. I like to refer to this as painting with the embossing glaze. I pinched different colors over different sections of the stenciled design. I applied Abandoned Coral to the flower areas and Crushed Olive to the leaf and stem areas. I then tapped off the excess powder and used my heat tool to set the embossing glaze.
To add some grunge and interest to this tag, I spritzed the tag with water and then added some Distress Spray Stains in Old Paper and Tea Dye and then dry the paper with my heat tool. I then finished it off by inking the edges with Walnut Stain Distress Ink, spritzing it with water. I then dried it with my heat tool and used a paper towel to dab up some of the larger water droplets.
The die I used on this tag is Tim Holtz Mini Detailed Butterflies Thinlits Die Set.
TAG No. 8
This is the last tag I used with a stencil and I only used a stencil, no pastes or other mediums. The first thing did was stamp a floral image from the Tim Holtz Botanic Collage Stamp Set onto the tag using Black Soot Archival Ink. I then placed the Tim Holtz Linked Circles Layering Stencil over the tag and applied embossing ink through the stencil at a diagonal across the tag using a finger sponge dauber. You could also use an Embossing Dabber.
I removed the stencil and applied Mowed Lawn, Mermaid Lagoon and Crushed Olive Embossing Glaze to various sections of the inked stencil. I then tapped off the excess embossing glaze and used my heat tool to set the glaze.
To add some grunge and interest to this tag, I sprayed it with Speckled Egg Distress Spray Stain and dried the paper with my heat tool. Next, I inked the edges of the tag and also added some ink toward the center of the tag with Walnut Stain Distress Ink. The glaze acts as a resist to the ink and I really love the way it looked when I added the ink over some of the glazed areas. I then spritzed the tag with water, dried it and dabbed off some of the excess ink with a paper towel. I then re ink the edges to darken them up again.
The die I used on this tag is Paper Rose Circuit Texture Die Set.
STAMPS & EMBOSSING GLAZE
Now I'm going to share one last tag that only uses stamps and embossing glaze.
TAG No. 9
Now onto the final tag! For this one I went super simple and used only stamps. For this technique, I recommend using stamps that are more solid in their design such as the Tim Holtz Brushstrokes Stamp Set. I stamp the top of the tag with one of the brushstroke images from the Tim Holtz Brushstrokes Stamp Set with Embossing Ink. I then applied Abandoned Coral Embossing Glaze over the stamped image, tapped off the excess and heat set it with my heat tool. I repeated this process down the length of the tag using different brushstroke stamps from the set to provide a little variety. Each time I applied a different embossing glaze color to include Abandoned Coral, Spiced Marmalade, Squeezed Lemonade and Crushed Olive. After I had stamped and embossed each of the four colors, I repeated Spiced Marmalade and Abandoned Coral to finish off the design.
The final touch on this tag was to ink the edges with Walnut Stain Distress Ink. I then spritzed it with some water, dabbed it dry with a paper towel to lift off some of the ink and dried the tag with my heat tool.
The die I used on this tag is Tim Holtz Adorned Thinlits Die Set.

So there you have it! Nine tags created using nine amazing Embossing Glaze Techniques and a mix of different mediums and supplies! To decorate each tag, I added a mix of die cuts cut from Black Kraftstock that I lightly sanded with a sanding disk, a paper doll and ephemera from my stash. I inked the edges of the ephemera with Walnut Stain Distress Ink. I then adhered the clusters with a mix of Scrapbook.com Clear Double Sided Adhesive Roll and Double Sided Adhesive Foam Roll. The dies I used are listed below each tag.
SUPPLIES FOR EMBOSSING GLAZE TECHNIQUES TAGS
Below you can find links to the Self-Healing Workspace Mat and Stackable Paper Trays. These are compensated affiliate links to Scrapbook.com and there is absolutely no cost to you when you click on them. When you click on them and then shop through them, I receive a small commission from Scrapbook.com. This helps support me and I truly appreciate that so very much! If you want to learn more about what an affiliate link is, you can see my full affiliate and product disclosure statement here. Thank you so much for your love and support!


No comments
Every time you smile at someone, it is an action of love, a gift to that person, a beautiful thing. ~Mother Teresa
HUGS!
JULIANA