Wedding Card Inspiration + Giveaway

Hello friends and welcome! Wedding season is upon us and with that in mind (and several weddings on my calendar), I was inspired to create a card using the adorable Happy Owls Stamp Set and Happy Owls Die Set by Pretty Pink Posh. If you are looking for some wedding card inspiration, you have come to the right place! Along with the card I'm sharing, I'm also having a little giveaway. At the end of this post, you can check out all the details on how you can win the Pretty Pink Posh Happy Owls Stamp and Die Set.

Wedding Card Inspiration - Shaker Card


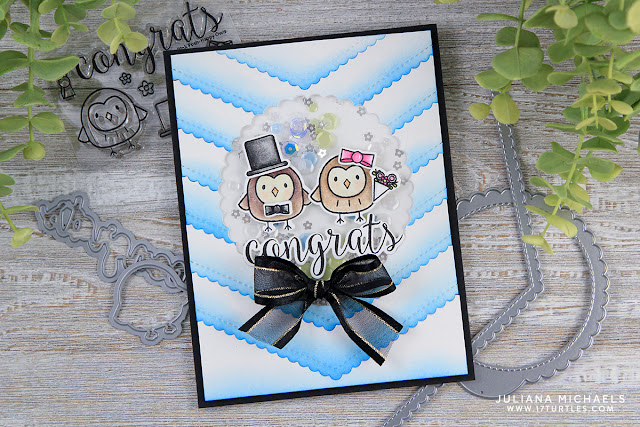
Wedding Shaker Card by Juliana Michaels featuring Happy Owls Stamp and Die Set by Pretty Pink Posh

The background was created by repeatedly die cutting a piece of watercolor paper using the Scallop Border Dies 2 Set. I then added Distress Ink in Salty Ocean to the bottom edge of each piece with a foam blending tool. After the inking was complete, I positioned each of the die cut pieces back together and adhered them on the back side with some double sided tape. Next, I positioned the large Scallop Circle Tags Die Set in the center of the panel and ran it through my Big Shot to create an opening.

Wedding Shaker Card by Juliana Michaels featuring Happy Owls Stamp and Die Set by Pretty Pink Posh

For this card, I chose to create a faux shaker and use some Pretty Pink Posh Sequins. This is a quick and easy way to create a shaker without all the layers or added bulk. To create the shaker, I adhered a circle of acetate to the back side of the opening on the front panel. I then sprinkled some Mini Sparkling Clear Flower Sequins and Spring Meadow Sequin Mix onto the center of a piece of white cardstock. I added some adhesive around the outside edge of where the opening would be and then adhered the front panel to create the shaker.

Wedding Shaker Card by Juliana Michaels featuring Happy Owls Stamp and Die Set by Pretty Pink Posh

To decorate the card, I colored the cute images from the Happy Owls Stamp Set with Prismacolor colored pencils. I then used the coordinating Happy Owl Dies Set to die cut the owls, their accessories and the sentiment. I adhered these to the card front using some double sided foam tape on some of the pieces to give them a little dimension. The final touch was black organza bow!

Wedding Shaker Card by Juliana Michaels featuring Happy Owls Stamp and Die Set by Pretty Pink Posh

As I mentioned above, along with sharing some wedding card inspiration with you today, I'm also hosting a giveaway! I ended up with an extra Happy Owls Stamp and Die Set so I'm giving it away to one lucky person! For your chance to win, leave a comment here on my blog. If you would like to have your name in the hat twice, head over to my Instagram, locate the image below and enter for another chance to win. You'll have until Friday, May 26 at 12PM EST to enter.

Happy Owls Stamp and Die Set by Pretty Pink Posh

Thanks so much for stopping by today!

Supplies Used


Are you interested in the supplies I used to create this card? To make them easy for you to find, I have listed them below. Affiliate links are used at no additional cost to you and I've linked to them because I use them and love them! Click on the image below each picture to go to your favorite store: Scrapbook.com, Simon Says Stamp and Therm O Web.



Gina K Designs Foil Mates Blog Hop

Hello friends and welcome to the Gina K Designs Foil Mates Blog Hop! Gina K Designs recently partnered with Therm O Web to release an amazing line of products perfect for card making, paper crafting and more. This lines includes Fancy Foils, Foil Mates and more and makes adding a touch of shine to your projects super easy. Even better is that all of the products coordinate with some of the most popular Gina K Designs cardstock and ink. We recently had a Foil Mates blog hop featuring this new line of products and because of all the wonderful feedback we decided to host another blog hop to share even more inspiration with you! As you continue along the hop, you will enjoy some wonderful inspiration from the Gina K Design Team. You will also have the chance to win a $50 Gina K Designs gift certificate just by leaving a comment on each blog.

Tips for Creating Cards with Gina K Designs Foil Mates and Fancy Foils


When working with Foil Mates and Fancy Foils, you will need a laminator to adhere the foil to the preprinted cards. Always turn on your laminator and allow it to warm up for at least 30 minutes before you start to use it.

To eliminate wrinkling, pay attention to the direction the grain or lines are running on the back side (silver side) of the foil. Place the foil into the laminator so that the lines are running horizontal to the opening of the laminator.

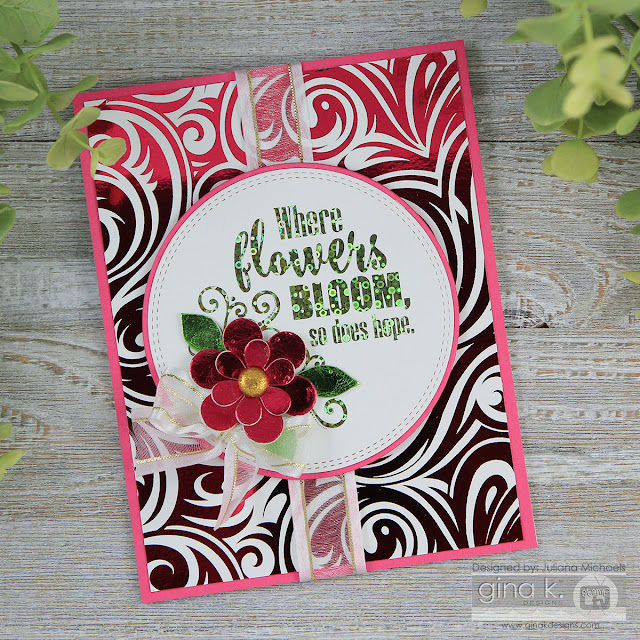
Flowers Bloom Hope Card


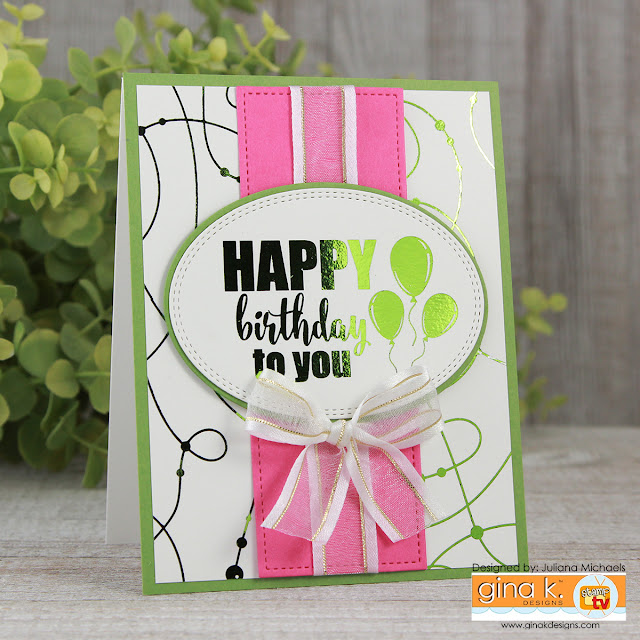
This card uses the Foil Mates Swirls and Flourishes Backgrounds and True Friend Sentiments. I foiled the designs using Fancy Foils in Passionate Pink, Grass Green and Gold Sequins.

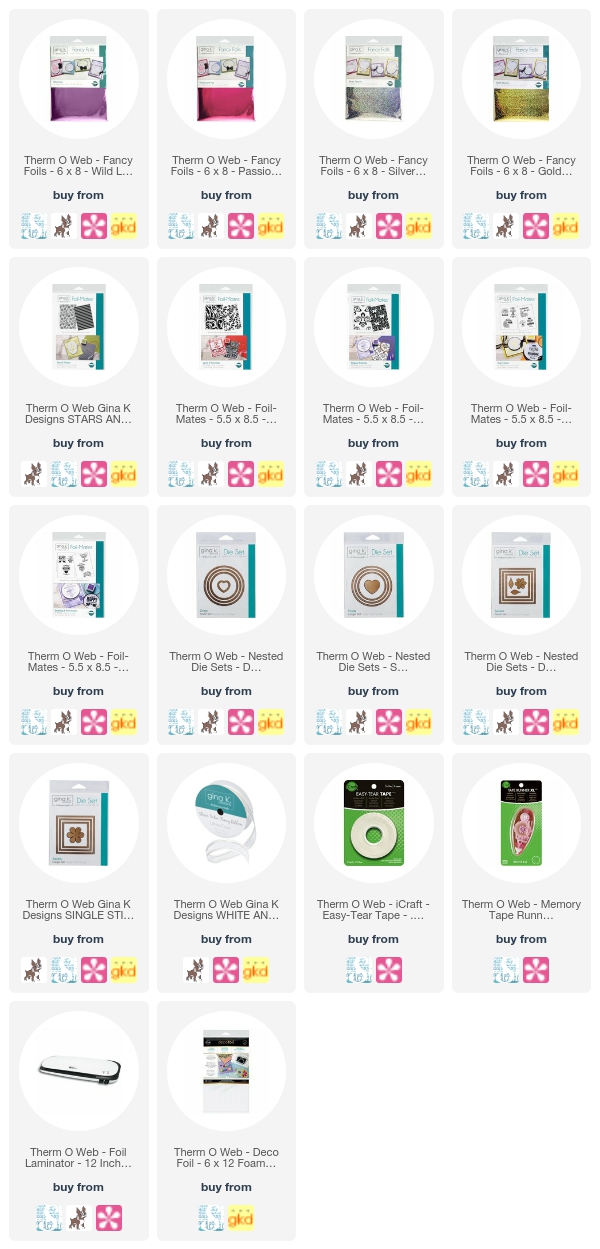
(All the supplies I used are linked to multiple sources in the thumbnails. Compensated affiliate links are used at no cost to you.)

Flowers Bloom Hope Card by Juliana Michaels featuring Gina K Designs Foil Mates by Therm O Web

I created the flower accent on this card using Therm O Web Deco Foil White Foam Adhesive. The great thing about this product is that it does not require the use of a laminator to adhere the foil. The final touch was the addition of some Fancy Ribbon in White and Gold.

Flowers Bloom Hope Card by Juliana Michaels featuring Gina K Designs Foil Mates by Therm O Web

The flowers and leaves were die cut from the Foam using these shapes from the Nested Square Single Stitch Wafer Thin Dies and the Nested Square Double Stitch Wafer Thin Dies. After die cutting the shapes, peel off the top protective layer and lay the foam sticky side down onto the back side of the foam. Gently burnish the foil onto the foam and then peel off the transfer sheet to reveal the foiled shape. I used a glittered brad as the center for the flower and then adhered the image over the floral design on the sentiment from the Foil Mates True Friend set.

Flowers Bloom Hope Card by Juliana Michaels featuring Gina K Designs Foil Mates by Therm O Web

Wedding Card

For my second card I used the Foil Mates Backgrounds Elegant Damasks Backgrounds, Stars & Stripes Backgrounds and Wedding & Anniversary Sentiments.

Wedding Card by Juliana Michaels featuring Gina K Designs Foil Mates by Therm O Web

I foiled the designs using Silver Sequins and Wild Lilac Fancy Foils. For a touch rustic, I added a a piece of burlap ribbon and jute twine.

Wedding Card by Juliana Michaels featuring Gina K Designs Foil Mates by Therm O Web

I love how all of these products can be mixed and matched to create a wide variety of beautiful cards. I also love how the foils coordinate perfectly with some of the most popular colors from Gina K Designs cardstock and ink.

Wedding Card by Juliana Michaels featuring Gina K Designs Foil Mates by Therm O Web

Now it's time to get hopping and to see more amazing inspiration from the Gina K Design Team! And don't forget to leave a comment on each blog for your chance to win a $50 gift certificate!


Just a reminder, all of the new products are now available in the Foil Mates Collection section of the Gina K Designs Store!

Supplies used:

Do you want to find the products I used? To make them easy for you to find, I have listed them below.  Affiliate links are used at no additional cost to you and I've linked to them because I use them and love them! Click on the image below each picture to go to a favorite store: Scrapbook.com, Simon Says Stamp, Therm O Web or Gina K Designs.


3 Ways to Create Cloudy Sky Backgrounds using Dies

Hello friends! Today I'm going to be sharing 3 ways to Create Cloudy Sky Backgrounds using dies. The dies I'm using are the Newton's Nook Designs Sky Border Die Set. This set includes a cloud and a scallop die.

Die Cut Layered Cardstock

The first technique is called Die Cut Layered Cardstock. This is a quick and easy method to create a cloudy sky background. All you have to do is use the cloud die with 2 shades of blue cardstock and then layer them to create your background.

Die Cut Layered Cloudy Sky Background by Juliana Michaels featuring Newton's Nook Designs Sky Border Dies and Newton Scoots By Stamp Set

I love that the Sky Border Dies are just long enough to be able to offset the cut image when creating A2 size cards.

Die Cut Layered Cloudy Sky Background by Juliana Michaels featuring Newton's Nook Designs Sky Border Dies and Newton Scoots By Stamp Set


Die Cut Masking

For the second cloudy sky background method you begin by die cutting the clouds from a scrap of white cardstock and use it as a mask. I used the Die Cut Masking technique recently on a Father's Day Card featuring Winston's Tee Time from the recent May Release. You can check out a tutorial on this technique in this post.

Die Cut Masking Cloudy Sky Background by Juliana Michaels featuring Newton's Nook Designs Sky Border Dies and Newton Dreams of Italy Stamp Set

I also used the Die Cut Masking technique to create the water and waves background.

Die Cut Masking Cloudy Sky Background by Juliana Michaels featuring Newton's Nook Designs Sky Border Dies and Newton Dreams of Italy Stamp Set

Inlaid Die Cut

The third and final method for creating a cloudy sky background is the Inlaid Die Cut Method. There are two ways you can use this technique. For the first option, you can simply die cut the same piece of cardstock into pieces. I used this method in these Welcome Baby Cards I created featuring the Lovable Laundry Stamp Set.

For the second option, you can add some Distress Ink to each layer as I did in this Happy Birthday Card featuring Winston Takes Flight Stamp Set. For a full tutorial on the Inlaid Die Cut technique check out this post.

Inlaid Die Cut Cloudy Sky Background by Juliana Michaels featuring Newton's Nook Designs Sky Border Dies and Winston's Tee Time Stamp Set

Watercolor paper is my favorite paper to use when I'm working with Distress Inks. It blends so easily and adds a touch of softness to the design.

Inlaid Die Cut Cloudy Sky Background by Juliana Michaels featuring Newton's Nook Designs Sky Border Dies and Winston's Tee Time Stamp Set

I hope you've enjoyed learning 3 Ways to Create Cloudy Sky Background using dies. Will you be trying one of these techniques on your next card?

• • • • • • • • • • • • • • • • • • • • • •

Supplies Used (I use Affiliate Links when available for products I love! If you click on these links, I will receive a small commission to help me keep up with the cost of running my blog. This will all be at no extra expense to you and I will be most grateful for you support!)

Pretty Pink Posh May Blog Hop

Hello friends and welcome! I'm so very excited to be sharing with you today as one of the special guests for the Pretty Pink Posh May Product Release Blog Hop! (I'm seriously still pinching myself!) For those of you hopping along, you may have arrived here from Jeanne Jachna's blog, but if not, you can find the full list of participants below and join in all the fun!


Congrats Wedding Card | Happy Owls Stamp & Die Set


For my first card, I used the Happy Owls Stamp Set and Happy Owls Die Set to create a sweet little wedding card. I stamped and die cut all of the images and then colored in the cute little owls and their accessories using Prismacolor colored pencils.

Congrats Wedding Card by Juliana Michaels featuring Pretty Pink Posh Happy Owls Stamp and Die Set

I used the new Scallop Circle Tags Die Set and put together my little scene as the focal point of the card. I then dressed it up with a bow and of course some fabulous Pretty Pink Posh 6mm Navy Sequins and Pretty Pink Posh 4mm Navy Sequins.

The final touch I added to the card was to die cut one of the layers using the new Scallop Borders 2 Die Set. These borders are so fun to create with and are perfect for adding the special touch to any card.

Congrats Wedding Card by Juliana Michaels featuring Pretty Pink Posh Happy Owls Stamp and Die Set

Thinking of You Card | Bee Friends Stamp & Die Set


For my second card I'm featuring the adorable Bee Friends Stamp Set and Bee Friends Die Set. I again used the Scallop Circle Tags Die Set, however this time I altered it a bit as you can see. I used a plain circle die to cut an opening in the center of the tag. I then flipped the scallop circle tag upside down in the die, lined up the scallops and cut off the tag top to give me a plain scalloped circle. I always love when I can stretch my supplies, don't you?

Thinking Of You Card by Juliana Michaels featuring Pretty Pink Posh Bee Friends Stamp and Die Set

I created the background by placing a hexagon stencil on a piece of yellow cardstock. I then applied Mustard Seed and Wild Honey Distress Ink with an ink blending tool. After completion of the background, I adhered the scallop circle die cut and stamped the sentiment. Next I adhered the adorable bees with double sided foam adhesive. 

I have to admit, that part of me wanted to add more to this card. However, the simplicity of the design really spoke to me, so I choose to leave it as is. I do know though that I'll be making a similar card in the near future with a bit more embellishment to it and I can't wait to share it with you!

Thinking Of You Card by Juliana Michaels featuring Pretty Pink Posh Bee Friends Stamp and Die Set

Now that I've shared a little inspiration with you, let me share a bit more about the Pretty Pink Posh Blog Hop. Two winners will be selected each day of the hop to win a $25 Pretty Pink Posh gift certificates. That's a total of 4 winners! For your chance to win all you have to do is leave a comment on each blog hop along the way. Winners will be picked randomly from among all the blogs. Comments must be left by 11:59 PM PST on 5/17/2017 and the winners will be announced on the Pretty Pink Posh blog. 


Affiliate Links for Supplies Used (If you click on these links, I will receive a small commission to help me keep up with the cost of running my blog. This will all be at no extra expense to you and I will be most grateful for you support!)

Newton's Nook Designs May Release | Day 3

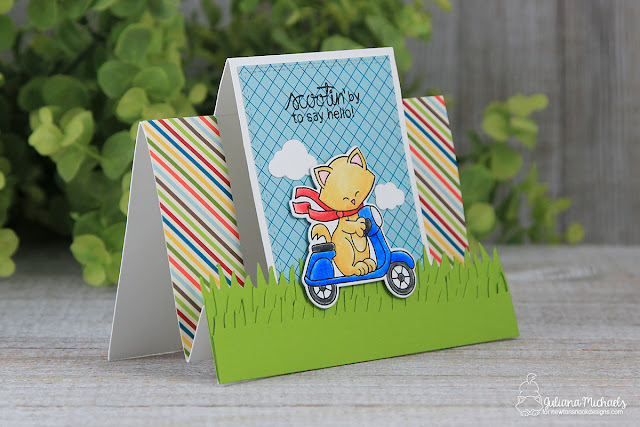
It's the third and final day of the Newton's Nook Designs May Release! And as always on the final day, we have a fun set to share featuring the ever adorable Newton. This new stamp set is called Newton Scoots By and you guessed it...he is on a little scooter! Eeks how fun!

For my card, I created a step card. I was inspired to create this after recieving one as an Easter card from one of my dear friends....yes, you know who you are! I used her card as a template to create my own and I'm including a link below for you to download the template so you can create one too.

Hello Step Card by Juliana Michaels featuring Newton's Nook Designs Newton Scoots by Stamp and Die set

I recommend doing a test run on a scrap piece of paper before cutting into your good cardstock. After you have cut out your step card base, it's time to decorate it with patterned paper and/or cardstock.

To create the grass scene, I used Newton's Nook Designs Land Borders grass die and die cut three strips of green cardstock. I then adhered the adorable Newton on his little scooter using double sided foam adhesive.  The clouds are from the coordinating die set. I simply cut them from white cardstock. You could also stamp the with the coordinating stamp image if you desired.

Hello Step Card by Juliana Michaels featuring Newton's Nook Designs Newton Scoots by Stamp and Die set

Step Card Template and Instructions -  click here to download the Step Card Template and Instructions. 

I really love how this step card takes a simple scene card to a whole other dimension...both literally and figuratively! I hope I've inspired you to create one for your next card.

Hello Step Card by Juliana Michaels featuring Newton's Nook Designs Newton Scoots by Stamp and Die set

Now that you've learned how to create a step card, how would you like to win the Newton Scoots by Stamp Set?

 Newton's Nook Designs Newton Scoots By Stamp set

To enter for your chance to win, all you have to do is comment on the Newton's Nook Designs blog and each of the Design Team blogs. One lucky winner will be chosen at random from the collective reveal posts. You have until Thursday May 11th at 9pm CST to comment and the winners will be announced on the Newton's Nook Designs blog on Friday, May 12th.

For even more inspiration and your chance to win, make sure to visit each of the awesome Design Team Blogs:


With today being the final day of the May Release Blog Hop, I wanted to remind you that all of the new stamp and die sets will be available in the Newton's Nook Design Store on Friday, May 12. And along with the three new stamp and coordinating die sets, they are also releasing a new die set to coordinate with Newton's Bookclub.

Newton's Nook Designs Newton's Book Club Coordinating Die Set


Thanks so much for stopping by today and I hope you have enjoyed the Newton's Nook Designs May Release Blog Hop!


Newton's Nook Designs May Release | Day 2

Hello and thanks for stopping!  It's Day 2 of the Newton's Nook Designs May Release. Today we're traveling to the country of Italy with Newton as we feature the new stamp and coordinating die set -  Newton's Dreams of Italy. In this set, Newton travels to Rome, Venice and Pisa and along the way he enjoys a little pasta and a glass of wine! Keep reading to learn how the card I created came together and how to enter for you chance to win this new stamp set!How would you like to win the Newton Dreams of Italy Stamp Set?

When I saw this stamp set, I couldn't resist Newton as a gondolier! How cute is he?! I colored him using Prismacolor colored pencils and then blended it using a stump blender and gamsol. I then used the coordinating dies to die cut the image. Next, I die cut a circle from watercolor paper and stamped the sentiment.

Ciao Hello Card by Juliana Michaels featuring Newton's Nook Designs Newton Dreams of Italy Stamp Set

To create the water, I used my Zig Clean Color Real Brush markers and a water brush. I lightly applied the ink to the paper and then used the water brush to blend the ink. I then adhered Newton with a piece of double sided foam tape for a little dimension. I was originally going to have just a red frame behind the focal image. When die cutting, I often center the die cuts in the middle of a piece of 4.25 x 5.5 inch paper. This way, I don't waste any paper because I can cover the die cut in the center with a larger piece of paper to create a layered design.  However, while playing around with this design, I placed the entire piece behind the circle die cut just to see how it looked and I ended up liking it better. The die cut piece adds a little bit of texture and interest as compared to a plain piece of cardstock.

Ciao Hello Card by Juliana Michaels featuring Newton's Nook Designs Newton Dreams of Italy Stamp Set

I hope you enjoyed learning the little tips I shared about die cutting. You never know when you can use those scraps!

Now onto the fun stuff! How would you like to win the Newton Dreams of Italy stamp set?

Newton Dreams of Italy Stamp Set by Newton's Nook Designs

To enter all you have to do is comment on the Newton's Nook Designs blog and each of the Design Team blogs. One lucky winner will be chosen at random from the collective reveal posts. You have until Thursday May 11th at 9pm CST to comment and the winners will be announced on the Newton's Nook Designs blog on Friday, May 12th.

For even more inspiration and your chance to win, make sure to visit each of the awesome Design Team Blogs:


Just a reminder, the May Release will be available in the Newton's Nook Designs Shop on May 12.

Newton's Nook Designs May Release

Newton's Nook Designs May Release | Day 1

Hello friends and welcome to Day 1 of the Newton's Nook Designs May Release! Today we're featuring Winston's Tee Time stamp and coordinating die set. In this set, the adorable Winston is on par to help you celebrate all the special men in your life who love the game of golf! And he's definitely on time for creating some fabulous Father's Day cards! Keep reading to learn how the card I created came together and how to enter for you chance to win this new stamp set!

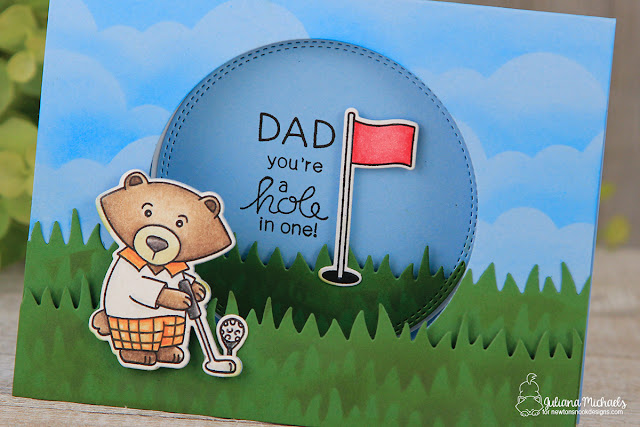
For my card, I created a fun little scene for Winston as he goes for a hole in one. The stamped images are colored with Prismacolor colored pencils and then blended with Gamsol and a blending stump.

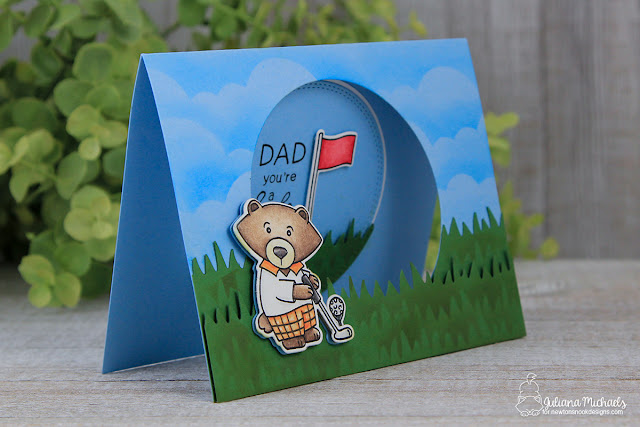
Dad You're A Hole In One Golf Father's Day Card by Juliana Michaels featuring Newton's Nook Designs Winston's Tee Time

Die Cut Masking - Sky and Grass Background:
Use Newton's Nook Designs Sky Border cloud die and cut a piece of scrap paper to create a mask. Position the mask onto your background cardstock color. Select a slightly darker ink color than the cardstock you are using and use an Ink Blending Tool.


Tap off the extra ink from the ink blending tool before applying it to your paper. This will help to avoid large ink splotches. Apply the ink by brushing upward from the mask onto the cardstock with a very light amount of pressure. Tapping off the excess ink and light pressure are the key to keeping the ink application even. Slide the mask down the paper and move it side to side to vary the position of the clouds and repeat the ink application process.


To create the grass, you're going to use the same technique as with the clouds. Begin by die cutting 2 strips of green cardstock using the Newton's Nook Designs Land Borders grass die.

Dad You're A Hole In One Golf Father's Day Card by Juliana Michaels featuring Newton's Nook Designs Winston's Tee Time

Cut another strip of grass from scrap paper to create a mask. Position the mask onto the green die cut strips and add ink using Mowed Lawn Distress Ink and and Ink Blending Tool. To avoid large splotches of ink, stamp off some of the ink before blending it onto the cardstock.

Dad You're A Hole In One Golf Father's Day Card by Juliana Michaels featuring Newton's Nook Designs Winston's Tee Time

This card is created from a piece of 5.5 x 11 inch blue cardstock folded in half. To create the circle opening in the card, I temporarily adhered the second layer of grass onto the card front, positioned the circle die over it and then die cut the circle piece. Make sure to have the card fully opened when die cutting the circle from it. (I just might have forgotten to do this the first time I was making this card, so I wanted to send out a little reminder if you want to try to make one of these yourself! LOL)

Dad You're A Hole In One Golf Father's Day Card by Juliana Michaels featuring Newton's Nook Designs Winston's Tee Time

Die cut another circle from blue cardstock. Add the die cut grass, the stamped flag and sentiment to it and then adhere this to the inside of the card.  Next, attach the other die cut grass pieces. To complete the scene add Winston and the golf ball to the card front with some double sided foam adhesive. 

Dad You're A Hole In One Golf Father's Day Card by Juliana Michaels featuring Newton's Nook Designs Winston's Tee Time

I hope you enjoyed learning about how this card came together! Now for some fun stuff! How would you like to win the “Winston’s Tee Time” Stamp Set?


To enter all you have to do is comment on the Newton's Nook Designs blog and each of the Design Team blogs. One lucky winner will be chosen at random from the collective reveal posts. You have until Thursday May 11th at 9pm CST to comment and the winners will be announced on the Newton's Nook Designs blog on Friday, May 12th.

For even more inspiration and your chance to win, make sure to visit each of the awesome Design Team Blogs:


Newton's Nook Designs May Release

PS...All of the new May Release products will be available on Friday, May 12 in the Newton's Nook Design Shop.

Gina K Designs Foil Mates Inspiration Blog Hop Day 2

Hello friends and welcome to Day 2 of the Gina K Designs Foil Mates Inspiration Blog Hop! I sure hope you enjoyed all the wonderful ideas shared by the design team during Day 1.

If you're just joining the party, here's what you need to know: During the hop the Cast & Crew of Gina K Designs will be featuring loads of projects to inspire you to join the foil craze! As you visit each design team members blog, make sure you leave a comment for your chance to win a $50 Gina K Designs gift certificate! One lucky commenter will be selected at the end of the hop from a combination of all three days of comments.

Happy Birthday Card by Juliana Michaels featuring Gina K Designs Fancy Foils and Foil Mates

Today, I'm sharing two more birthday cards using the scraps from my Fancy Foils technique that I shared for my Day 1 Inspirations projects. However, for these I used a couple of different sentiments from the Birthday Essentials Foil Mates and the backgrounds were created using the Polka Party Foil Mates.

Happy Birthday Card by Juliana Michaels featuring Gina K Designs Fancy Foils and Foil Mates

I used the new Turquoise Sea Fancy Foils to do the foiling on this set. To die cut and mat the sentiments I used the Single and Double Stitched Rectangle Wafer Thin Die Set.
Happy Birthday Card by Juliana Michaels featuring how to use Gina K Designs Fancy Foils scraps and Foil Mates

If you want to create these cards, simply refer to the directions from Day 1 and just switch out the colors, Foil Mates and dies to achieve two totally new designs!
Happy Birthday Card by Juliana Michaels featuring how to use Gina K Designs Fancy Foils scraps and Foil Mates

Now it's time to head on over to the next stop on the hop and check out more amazing inspiration from the Gina K Design Team! Don't forget to leave a comment for your chance to win a $50 gift certificate.

Gina K
Cathy Tidwell
Chris Dayton
Donna Idlet
Juliana Michaels
Karen Hightower
Laurie Schmidlin
Melanie Muenchinger
Rema DeLeeuw
Sean Fetterman
Sheri Gilson
Susie Moore
Theresa Momber
-->

Thanks so much for stopping by and I hope you're finding all kinds of inspiration as you hop along!

Gina K Designs Foil Mates Inspiration Blog Hop Day 1

Hello friends and welcome to Day 1 of the Gina K Designs Foil Mates Inspiration Blog Hop! Gina K Designs recently partnered with Therm O Web to bring you a full line of great products including Foil Mates, Fancy Foils, Cardstock, Die Sets and more the coordinates beautifully with her cardstock and inks. As of today, the entire line of Foil-Mates products are available in the Gina K Designs Store.

During the hop, the Cast & Crew of Gina K Designs will be sharing loads of gorgeous inspiration samples to inspire you to join the foil craze! Make sure you leave a comment on each design team members blog for your chance to win! One lucky commenter will be selected at the end of the hop from a combination of all three days of comments to win a $50 Gina K Designs gift certificate!

For my inspiration projects, I'm sharing a fun technique to create a set of Happy Birthday Cards using Gina K Designs Fancy Foil scraps and Foil-Mates.

Happy Birthday Card by Juliana Michaels featuring Gina K Designs Birthday Essentials and Dots and Strings Foil Mates and Fancy Foils


Happy Birthday Cards using Gina K Designs Fancy Foil Scraps and Foil Mates


Begin by turning on your laminator and allow it to preheat at least 30 minutes. Cut a piece of Jelly Bean Green Cardstock to 4.25 x 5.5 inches and then trim one of the Dots & Strings Foil Mates to 4 x 5.25 inches.

Trim a piece of Jelly Bean Green Fancy Foil and place it on top of the Foil Mate with the colored foil side facing up. Put both of these inside a piece of folded parchment paper and feed it through your laminator. Once it comes out, allow it to cool briefly and then pull back the transfer sheet to reveal the gorgeous foiled design.

Hold onto that "scrap" of Fancy Foil though, you're going to use it to create another card!

Happy Birthday Cards using Gina K Designs Fancy Foil Scraps and Foil Mates by Juliana Michaels

Next, trim out one of the birthday sentiments from the Birthday Essentials Foil Mates. Select the largest double stitched oval die from the Nested Oval Dies Double Stitched Set and die cut the sentiment. Repeat the foiling process from above, but feel free to discard the leftovers from this. Die cut another oval from cardstock using the largest single stitched oval die from the Nested Oval Dies Single Stitched Wafer Thin Die Set.

To create the strip down the center, die cut two rectangles using the smallest single stitched rectangle from the Nested Rectangles Single Stitched Wafer Thin Die Set. Overlap them and adhere them to the center foiled card front.

Wrap a piece of Gina K Designs new Fancy Ribbon in White and Gold around the card front and secure in place. Adhere the die cut and foiled ovals. The final touch is to add a little bow.

Happy Birthday Card by Juliana Michaels featuring Gina K Designs Birthday Essentials and Dots and Strings Foil Mates and Fancy Foils

So now you're ready to create the second card. Do you still have that scrap of Fancy Foil?

Cut a piece of Therm O Web Toner Sheet to 4 x 5.25 inches, place the scrap of Fancy Foil and top of it, position this between a piece of parchment paper and run this through your preheated laminator. Peel off the transfer sheet to reveal the foiled design.

To create the rest of the design, follow the steps above. This time use a different sentiment from the Birthday Essentials Foil Mates and some circle dies from the Double and Single Stitched Circle Wafer Thin Dies. The final touch on this card will be the addition of a piece of Gina K Designs new Fancy Ribbon in Black and Gold.

Happy Birthday Cards using Gina K Designs Fancy Foil Scraps and Foil Mates by Juliana Michaels

I sure hope you enjoyed learning more about how to use up all that beautiful Fancy Foil! It would be a shame to let any of that go to waste in my book!

Now it's time to head on over and check out more amazing inspiration from the Gina K Design Team! Don't forget to leave a comment for your chance to win a $50 gift certificate.

Gina K
Cathy Tidwell
Chris Dayton
Juliana Michaels
Karen Hightower
Melanie Muenchinger
Rema DeLeeuw
Sean Fetterman
Sheri Gilson
Susie Moore
Theresa Momber

Thanks so much for stopping by and happy hopping!
Subscribe