
Hello there and welcome! In this post I'm sharing how to use rub ons to create custom card backgrounds. Rub ons were super popular many years ago and yes I might be dating myself...think Basic Grey. Anyone out there remember them?! ) Well they were here and then they just seemed to disappear. Lately however, I've noticed that they are back and more beautiful than ever!

I recently used Scrapbook.com Wild Blooms Rub Ons to create this Thankful For You Card and I wanted to share with you how I used the rub ons to create the background for this card. But instead of recreating this card, I decided to use the same technique to create this Merry Christmas Card. If you're interested in more details about this card you can find the link to my blog post HERE.

If you prefer a video format, you can watch below or head over to my YouTube channel to see the process in more detail.
If you're interested in the supplies I've used to create this card, you can find links to them in the supply list below. When you shop through those links it supports me and I really appreciate that so very much! And as always, there is a blog post available with more photos if you're interested in looking at the card in more detail.
Now let's get on with the making!

To get started I used the gorgeous Winter Floral Rub Ons from Scrapbook.com, the Christmas Block Words Die Set and the Cozy Autumn Foliage Die Set which are both from Scrapbook.com, the Mini Slimline and Tickets Die Set by Eileen Hull for Sizzix, the Noel Patterned Paper Pad from Scrapbook.com.
I began with a piece of Distress Watercolor paper that I die cut with the Mini Slimline and Tickets Die Set by Eileen Hull for Sizzix. I ink smooshed it into Old Paper Distress Ink pad onto my craft mat. I then dried that with my heat tool.

Next I added the rub ons. I used Mint Tape, washi tape would also work, to mask off each of the open areas and add the rub ons to those sections. I cut out the rub ons I wanted to use and then used the applicator that comes with the rub ons to adhere them. I place the rub on top of the paper, rubbed over it with applicator to to release the rub on from the liner and transfer it to the paper. I then slowly peeled off the liner. If some of it doesn't come off, you can reposition the rub on and rub over it again until it sticks to the paper.
Once the rub ons were adhered to that section and the liner removed, I took a craft knife and trimmed off the excess. If you don't trust yourself to cut straight, you can grab a ruler and run the craft knife along the edge of it. When using the craft knife, you don't have to push very hard to cut through the rub ons, because they are really quite thin. I then removed the Mint Tape from that section, placed it around the next section and repeated this process until all of the openings were filled in. Another tip is to slowly peel off the Mint Tape, just to make sure that you cut through everything and that you don't peel up the rub on and possibly tear it.

During the process of working with these rub ons, I realized how easily you can layer them. So I created several of my own floral arrangements to fill in some of the openings. I also trimmed one of the larger rub ons in half and used it in the two square openings.
I then took some scissors and trimmed around the outer edge of the die cut to make it look like a postage stamp edge. I saved the excess and used it to stamp my sentiment.
Once the background was completed, I die cut papers from the Noel Patterned Paper Pack to cut the Merry Die from the Christmas Block Words Die Set and the holly and evergreen branches from the Cozy Autumn Foliage Die Set. I cut the Merry out of two different papers, a lighter red and a darker red using the darker color as the outline or shadow layer.
Next because I just love to distress things, I very gently and carefully sanded the die cuts using a Ranger Sanding Disk to give them a distressed effect. Make sure to do the sanding on a piece of scrap paper so you don't ruin your craft mat or work surface. While you are sanding make sure to hold the paper and then gently rub the sandpaper away from where you are holding the paper. Another way that is a little easier, is to put the die cut back into the paper you cut it from. This just helps hold it a little better and makes you less likely to tear the paper while your sanding it.
I also sanded the edges of a piece of paper from the Noel Paper Pad that I cut to create the card base. This technique is one of my favorites for adding a little distress but it only works with papers that have a different colored core from the color of the surface. These papers have a white core, so when you sand them you remove the surface color and reveal the white core.
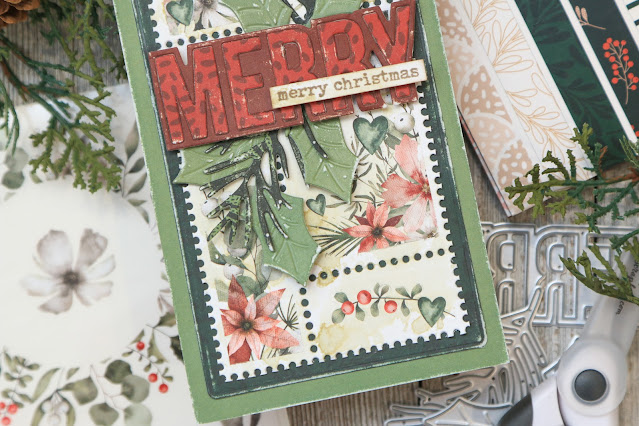
I then used Scrapbook.com Artis Glue to adhere the die cuts together and to the card front. As I've mentioned before, with this adhesive was the first time I had every used a precision tip to apply a liquid adhesive and I must admit, it has been a game changer when it comes to adhering small and delicate die cuts!
I used Scrapbook.com 1mm Double Sided Foam Adhesive to give the die cut sentiment a little dimension. This is a new favorite of mine! I love adding dimension and use foam tape quite often, but sometimes it's just a little too thick, especially if you have other layers underneath it. This 1mm thickness is just perfect for adding just a tiny bit of dimension without adding a lot more bulk and this is also super helpful for mailing your cards.
To finish off the card, I stamped Merry Christmas from the Scrapbook.com Wordfetti December Stamp set with some brown ink onto that strip I trimmed off of the die cut earlier. I then trimmed it size, inked the edges with a little Vintage Photo and adhered it over the Merry die cut.

There you have it! I hope you enjoyed learning how to use rub ons to create custom card backgrounds. Until next time...stay crafty my friend!


SUPPLIES
Below you can find the supplies I used to create this Merry Christmas card featuring Scrapbook.com Winter Florals Rub Ons. When you shop through the links below, I receive a small commission from Scrapbook.com. These links are at absolutely no cost to you and the commission I receive helps me cover the costs of my blog and other expenses, which allows me to continue to provide you with FREE inspiration and tutorials. If you want to learn more about what an affiliate link is, you can see my full affiliate and product disclosure statement here. Thank you so much for your love and support!
Below you can find the supplies I used to create this Merry Christmas card featuring Scrapbook.com Winter Florals Rub Ons. When you shop through the links below, I receive a small commission from Scrapbook.com. These links are at absolutely no cost to you and the commission I receive helps me cover the costs of my blog and other expenses, which allows me to continue to provide you with FREE inspiration and tutorials. If you want to learn more about what an affiliate link is, you can see my full affiliate and product disclosure statement here. Thank you so much for your love and support!


No comments
Every time you smile at someone, it is an action of love, a gift to that person, a beautiful thing. ~Mother Teresa
HUGS!
JULIANA