Showing posts with label Video. Show all posts

No-Heat Foil Technique with Die Cuts | Spellbinders + Scrapbook.com

Hello friends! You might not have noticed, but foiling is still going strong and today, I'm sharing a No-Heat Foil Technique with Die Cuts that you are going to love. Seriously, no-heat means you don't need a laminator to add foil to die cuts! All you need are some fabulous dies...such as those by Spellbinders, a die cutting machine and a couple of other supplies that I'll get to in just a bit.
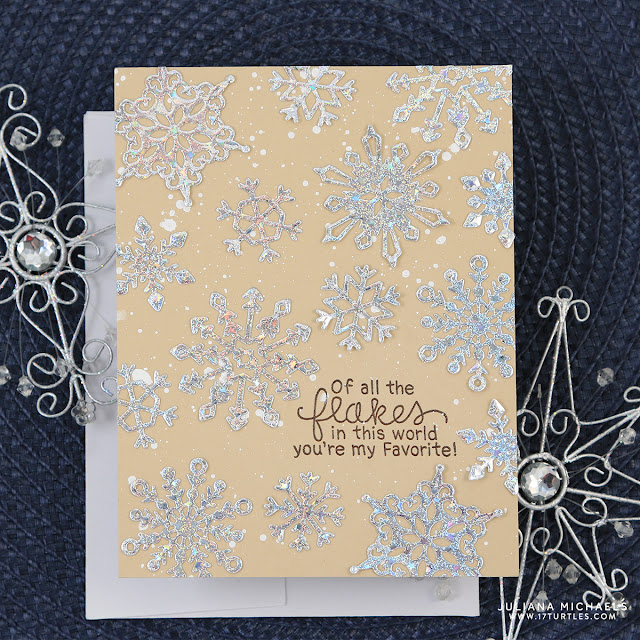
Snowflake Card by Juliana Michaels featuring No Heat Foil Technique with Die Cuts using Spellbinders Dies and Therm O Web Deco Foil

[All supplies are linked at the end of this post. Compensated affiliate links to Scrapbook.com are used at no cost to you. ]


I used this No-Heat Foil technique to create the Snowflakes on the card I'm sharing today. The dies I used are the Die D-Lites Snowflake Dies and Four Seasons Wreath Element Dies provided to me by Spellbinders and Scrapbook.com. I've fallen in love with their gorgeous dies and these beautiful snowflakes just screamed to be foiled!

Snowflake Card by Juliana Michaels featuring No Heat Foil Technique with Die Cuts using Spellbinders Dies and Therm O Web Deco Foil

Before I did the foiling, I created the background for the card using a piece of kraft cardstock. I then flicked it with white paint and a paint brush to give it a look of falling snow. I then stamped the sentiment in brown pigment ink and heat embossed it with clear embossing powder.

No-Heat Foil Die Cuts


Now let's get to the foiling fun! Along with some dies and a manual die cutting machine, you'll also need Therm O Web Adhesive Sheets (Easy Cut Adhesive) and some Deco Foil or Fancy Foils by Therm O Web.

Snowflake Card by Juliana Michaels featuring No Heat Foil Technique with Die Cuts using Spellbinders Dies and Therm O Web Deco Foil

To get started take your die and a piece of the Adhesive Sheet and trim a piece slightly larger than the die. Repeat this process with a piece of foil and then again with a piece of cardstock.

Peel off the liner on one side of the Adhesive Sheet and adhere the cardstock to this side.

Next, turn the paper over and peel off the liner on the other side of the Adhesive Sheet and adhere the foil. I recommend going in this order. I originally tried to adhere the foil first, but it's much more difficult to remove the liner since the foil is more pliable. You also run the risk of peeling off the transfer sheet that is part of the foil. This is what you peel off when you use the heat method to apply the foil to your project.

Finally, place your die on top of your foiled cardstock and run it through your die cutting machine.

Snowflake Card by Juliana Michaels featuring No Heat Foil Technique with Die Cuts using Spellbinders Dies and Therm O Web Deco Foil


And there you have it... beautifully foiled die cuts without having to use a laminator all thanks to the No-Heat Foil Technique with Die Cuts!

Supplies


Here are the supplies I used on the card I created and shared with you. Affiliate links have been used to Scrapbook.com. Thank you so much for your support!

Watercolored Die Cuts | Scrapbook Process Video

Hello everyone! Today, I'm sharing a new scrapbook page along with a new process video (you can view it below) on how to create watercolored die cuts using a simple technique that helps prevent scrapbook paper and cardstock from warping. I love the watercolor and mixed media trend that is showing up on scrapbook pages and cards lately, but I really don't care for how it warps and sometimes destroys the paper. This simple technique has made me more willing to pull out my paints and play with them and I bet it will do the same thing for you!

Cute Puppy Scrapbook Page using Watercolored Die Cuts by Juliana Michaels featuring MFT Stamps and Studio Calido

To create this layout, I used the Die-namics Pierced Star Stax by MFT Stamps and the new Baxter collection from Studio Calico. With it's super cute dog theme, the Baxter collection is just perfect for scrapping all the photos I've taken of Lincoln. I just hope you all don't get tired of all the puppy and dog themed layouts!

Cute Puppy Scrapbook Page using Watercolored Die Cuts by Juliana Michaels featuring MFT Stamps and Studio Calido

I really love the wood veneers and puffy stickers that coordinate with this collection!  I also added a couple more puffy stickers from Heidi Swapp and Me & My Big Ideas. I have been eyeing those puffy paw print stickers at Michael's for quite some time and they finally ended up in my basket!

Cute Puppy Scrapbook Page using Watercolored Die Cuts by Juliana Michaels featuring MFT Stamps and Studio Calido

Here's the process video that I created to share with you today. I hope you enjoy the tutorial on watercolored die cuts along with the other little tips that I share. I loved for you to leave me a comment and even subscribe to my YouTube Channel to let me know what you think about it.

Supplies:
Patterned Paper, Stickers, Wood Veneer: Studio Calico | Baxter
Puffy Stickers: Studio Calico, Me & My Big Ideas, Heidi Swapp
Dies: My Favorite Things / MFT Stamps - Die-namics Pierced Star Stax
Watercolors: Michaels
Ink: Ranger Distress Ink | Walnut Stain
Clear Gesso: Liquitex

BoBunny Sweet Life Scrapbook Process Video + Digital Cut File

Hello and Happy Hump Day my fellow crafty friends! Today I have a new layout to share with you using the BoBunny Sweet Life Collection and a Digital Cut File that you can download at no cost! I also created my very first scrapbook process video about my layout. It was quite the learning experience for me! I actually learned some things about myself and I how create just by making the video. For example, I knew I liked to move things around a lot, but I never realize just how much I move them around. I also want to apologize for my head! It is in the way and I know that, but I also learned that I lean over and look at my layouts a lot while I am creating them, so this "head in the way thing" is really me doing what I do when I'm creating a layout. So bear with me and hopefully, I can remember to keep my head out of the way for future videos! You can check out the video at the bottom of the post along with a full supply list for the products I used on my layout.

Always Believe Scrapbook Page by Juliana Michaels featuring a FREE 17turtles Digital Cut File and the BoBunny Sweet Life Collecttion

FREE DIGITAL CUT FILE | SCRIBBLED CIRCLE

This free cut file can be used for a full range of projects, including cards, home decor, scrapbook pages and more. This digital file is available in SVG, PNG, DXF and Studio formats and you may download this digital cut file for FREE for your own personal use. Please refer to my terms of use for more information if you wish to use these for more than your own personal projects.

Scribbled Circle Free Digital Cut File by Juliana Michaels 17turtles.com

I am in love with the BoBunny Sweet Life collection and I have to say that it is probably one of my all time favorite BoBunny collections! The colors - especially the yellow - makes me super happy!!!

Always Believe Scrapbook Page by Juliana Michaels featuring a FREE 17turtles Digital Cut File and the BoBunny Sweet Life Collecttion

Check out the awesome font I used for my journaling! It's called Ostrich Sans and you can download it from Font Squirrel.

Always Believe Scrapbook Page by Juliana Michaels featuring a FREE 17turtles Digital Cut File and the BoBunny Sweet Life Collecttion

I hope you enjoy the video and I would love for you to subscribe to my YouTube Channel and of course feel free to leave any comments you have about the video. I'd love to hear your feedback!


SUPPLIES:
Patterned Paper, 6x6 Paper Pad, Chipboard Stickers: BoBunny | Sweet Life
Cardstock: American Crafts
Jewels: BoBunny
Spray Ink: Heidi Swapp Color Shine | Butter, Ocean and Navy
Sewing Machine: Kenmore
Electronic Cutting Machine: Silhouette Cameo
Digital Cut File: 17turtles | Scribbled Circle
Font: Ostrich Sans

Bo Bunny Easter Egg Tutorial

Hello everyone! Today I have a tutorial to share with you on how to create Easter Eggs using Styrofoam eggs and Bo Bunny Blossoms and Petals. When the Blossoms were first released I knew I wanted to use them to create an altered art or home decor project and with Easter right around the corner, I was inspired to use them to decorate some Easter Eggs.  I had a vision in my head of pastel Easter Eggs covered with glitter glass and gorgeous flowers. I think the end result achieved my vision! Below you will find a video tutorial on how I created the eggs. I will show you how I took the Styrofoam egg and transformed it into the lovelies you see in the photos.  In the video I also share how I created the smaller flowers using Bo Bunny Petals to accent the larger Bo Bunny Blossoms. 


I also decorated the basket with Bo Bunny Lace in coordinating colors!


Spring is coming, but until then I think I will just craft a little of it into my world! How about you? I hope you enjoy the video tutorial and I would love to hear any feedback you might have as well as any questions about this project or any other I have created.


SUPPLIES:
1.   3 Styrofoam Eggs (5" in length)
2.   Mod Podge
3.   Foam Brush
4.   Tissue Paper
5.   Thin Dowel Rod
6.   White Acrylic Gesso
7.   Elmer's Glue
8.   Diamond Dust or Glass Glitter or Glitter
9.   Heat tool for drying
10.  Dylusions Spray Ink - Vibrant Turquoise, Bubblegum Pink & Lemon Zest
11.  Hot Glue Gun
12.  Bo Bunny Patterned Papers - Prairie Chic
13.  Bo Bunny Zinnia Blossoms - Blush, Denim Blue & Buttercup
14.  Bo Bunny Petals - Prairie Chic & C'est la Vie
15.  Cuttlebug Quilling Die - Daisy Kit (for the leaves)
16.  Ranger Distress Ink - Worn Lipstick, Peeled Paint, Tumbled Glass, Mustard Seed and Vintage Photo.


Subscribe
