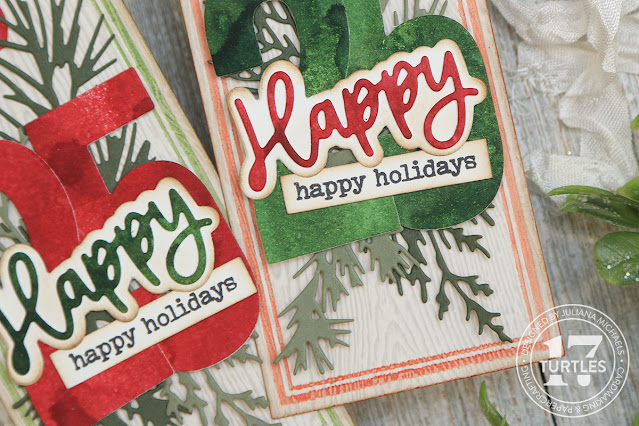
Happy Holidays friends! After a bit of a posting break, I'm back to share a little holiday cheer with a set of gift tags I created using some new dies from Scrapbook.com that I've mixed in with a few great staples from Tim Holtz. I'm also going to share how to put these together in 5 easy steps using compartmental making. Tim has recently shared a lot about compartmental making and if you aren't familiar with it, it's simply a way to break down the process of making into small sections so that it's more manageable and easier to fit some creative time into your busy schedule. Something that is super helpful this time of year!

HOLIDAY GIFT TAGS | COMPARTMENTAL MAKING
STEP 1. TAG BASE
The first step is to create the tag base. For these tags, I used the Tim Holtz Framed Tags Dies, Light Grey Woodgrain Cardstock and Distress Archival Ink in Fired Brick and Rustic Wilderness. The framed tags have a "frame" area on them that can emboss the paper for some added interest. When these dies first came out, Tim shared how to add ink to this area and achieve a letterpress effect and that is what I did on these tags.
To do this, you first want to clean the dies with a bit of rubbing alcohol to remove any residue from the manufacturing process. Then use a brayer to apply Archival Ink. I found his larger sized brayer to achieve the best results because it is wide enough to hit both side of the raised frame which minimizes getting ink on the inside of the die. After you apply the ink, place the die on top of you paper and run it through your die cutting machine. If you are making multiples of this, continue making as many as you need.
If you want to speed up this step, only use one color of ink instead of two. If you want to do more than one color, do all of the same color all at the same time. Make sure to clean off the die with rubbing alcohol before switching to the next color.
STEP 2. NUMBERS & REINFORCER HOLE
For this step, you are going to die cut the number 25 and the reinforcer hole using colored cardstock. I created my own colored cardstock using Lumberjack Plaid Distress Spray Stain and Rustic Wilderness Distress Spray Stain. To do this, I spritzed a piece of Distress Watercolor Paper with the spray stain, sprayed it with some water to get the ink flowing and then dried it with my heat tool. Once the paper was dry, I die cut the 25 using the Scrapbook.com Bold Numbers Die Set and the reinforcer hole from the Framed Tags Dies and cut them from both of the colors of paper.
If you want to speed up this step, skip creating your own cardstock with the spray inks and use colored cardstock.
STEP 3. WORD DIE
Using the same custom inked or colored cardstock as you did for the numbers and reinforcer hole, die cut the "Happy" from the Scrapbook.com Birthday Celebration Sentiments II Die Set. Next, die cut the shadow layer for the word from white cardstock and inked the edges with a little Vintage Photo Distress Ink. Adhere these layers together.
STEP 3. SENTIMENTS
Using the same white cardstock that you used for the shadow layer, stamp "happy holidays" from the Scrapbook.com Wordfetti December Stamp Set in Black Soot Archival Ink. Trim this down using a paper trimmer or scissors and ink the edges.
STEP 4. HOLIDAY GREENS
Continuing with the die cutting, use the Tim Holtz Mini Holiday Greens to die cut 2 shades of green cardstock from the Tim Holtz Cool Kraft Stock Pack. You could use greenery die and any color of cardstock here or even create your own with spray inks like I did for the other die cutting.
STEP 5. ASSEMBLE
At this stage, it's time to assemble all of the layers. Using your preferred adhesive, adhere the various die cuts and sentiment to each tag. To finish them off, add some seam binding or ribbon of your choice.
And there you have it... set of Happy Holiday Tags ready for your holiday gift giving! I hope you enjoyed learning how these came together and how easy it is to do compartmental making!
SUPPLIES
Below you can find the products I used to create these projects along with compensated affiliate links to Scrapbook.com. These links are at absolutely no cost to you. When you shop through the links below, I receive a small commission from Scrapbook.com. These links are at absolutely no cost to you and the commission I receive helps me cover the costs of my blog and other expenses, which allows me to continue to provide you with FREE inspiration and tutorials. If you want to learn more about what an affiliate link is, you can see my full affiliate and product disclosure statement here. Thank you so much for your love and support!


I love these tags!
ReplyDeleteThanks so much!
Delete