
After a lot more time playing around with the Tim Holtz Distress Watercolor Pencils, I've found that they're not just for coloring! I mean, yes, you can certainly color all the things with them, but that's not all you can do with them! In this blog post I'm going to share with you how you can use them to create a background.

HAPPY BIRTHDAY TO YOU CARD
When creating an inky background, one of my go-to techniques has always been the old ink smoosh. To do this, you simply smoosh the ink pad onto your craft mat, spritz it with a bit of water and then smoosh your paper into the ink. Dry it with a heat tool and repeat as desired.
Most recently, I came across Tiffany Solorio doing this with the Distress Spray Stains and sharing how this is a way to use spray stains with a bit more control rather than spraying directly onto your paper.
I've since tried that technique and would definitely agree that you have WAY more control as compared to spraying them directly onto the paper. I have always been a bit scared of sprays, but Tiffany's technique has made me much more likely to pull my sprays out to create inky backgrounds!
After watching her video, it got me to thinking about using the new Watercolor Pencils. Could I use them to have even more control when adding color to my backgrounds? I'm here to tell you, that the answer is yes! So, if you too would like even more control when creating inked backgrounds or if sprays scare you, then the Distress Watercolor Pencils may be the answer!

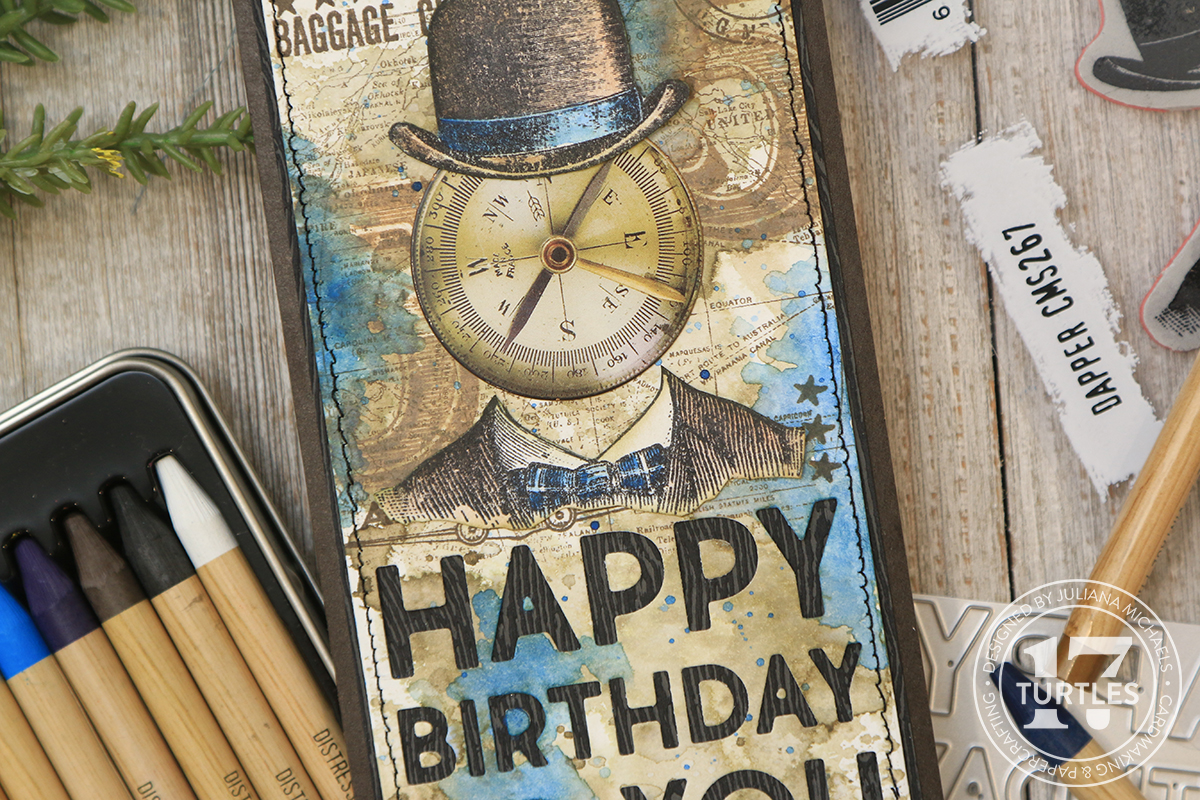
To get started, I used the largest tag die from the Stacked Tags Thinlits and die cut a piece of Distress Watercolor Paper. I then began creating my background. The first thing I did was spray some Frayed Burlap Distress Spray onto my craft mat, spritzed it with some water, mixed it together with my finger, smooshed my paper into the ink, added a bit more water and then dried it with my heat tool. By doing this and not spraying direct to paper, I was able to have some areas that had little to no ink on them, which I really like because it gives a bit of contrast. And as always, you could use an ink pad to do this part.
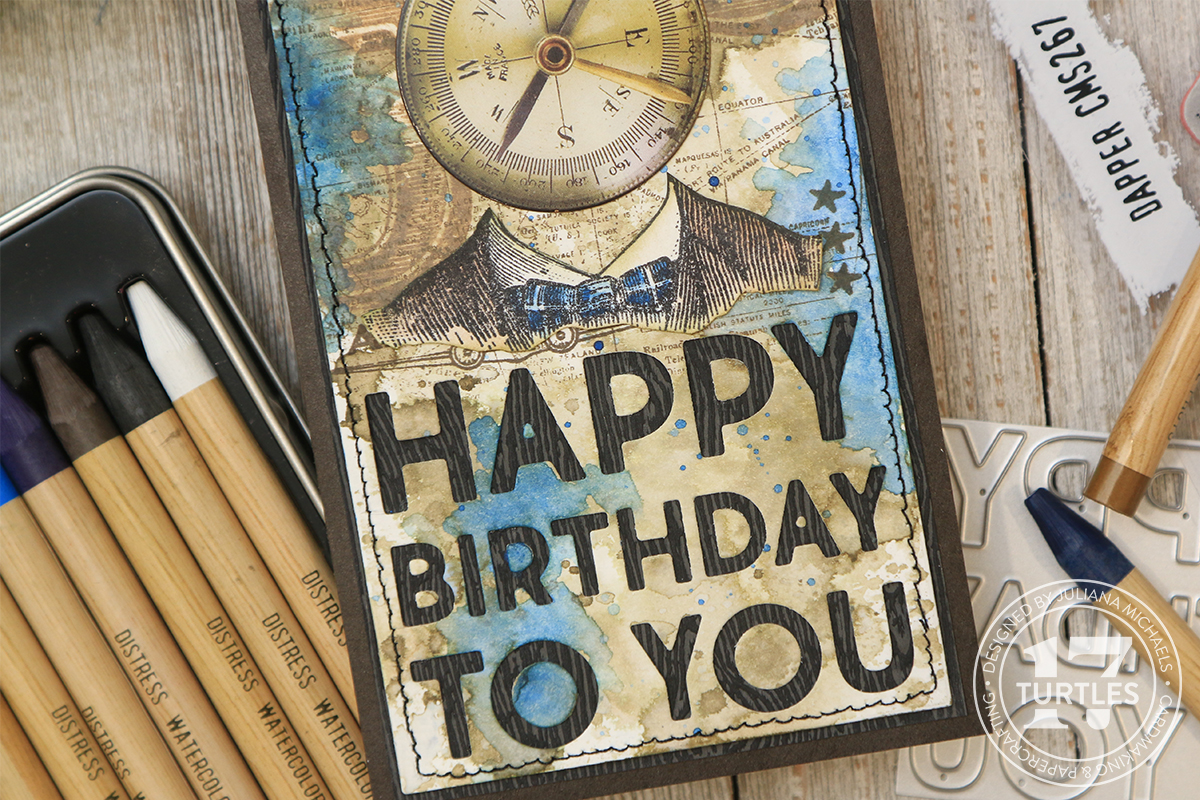
Next, I used the Happy Birthday from the Bold Text Set 1 Thinlits and die cut it from the bottom part of the tag. I kept the negative bits for later so I could use them to fill in the inside of the letters. The actual letters could also be used on another project.
After doing the die cutting, I decided to add some stamping. This, as well as the die cutting could be done later, but I choose to do them at this point.
I first stamped the map image from the Air Travel Stamp Set in Ground Espresso Archival Ink. I knew I'd be adding some water later, so this is the perfect ink to use since it's waterproof. Next, I stamped the 5 image from the Eccentric Stamp Set using Distress Oxide Inks in Frayed Burlap and then rubbed over the image with a dry paper towel to smudge the ink. Next I took several images from the Eccentric and Correspondence Stamp Sets and stamped them using Ground Espresso Archival Ink.
CREATING AN INKED BACKGROUND WITH DISTRESS WATERCOLOR PENCILS
With all of the stamping completed, I moved onto the reason you're here...the Distress Watercolor Pencils. It is seriously SO easy to add color to create what looks like a ink smooshed background. To do this, take your watercolor pencil and a water brush and pick up some of the ink from the pencil with the wet brush. You could also use a regular paint brush with water. Then just add the color where you want it! Because these are so pigmented, the color will be bold especially with darker colors like Prize Ribbon. To lighten it, all you have to do is dab off some of the excess color onto a paper towel or add some more water. If you want more color, just add more color or use less water.
ADDING SPLATTERS WITH DISTRESS WATERCOLOR PENCILS
Next, added some splatters using the pencils. Here I'm picking up some color with my water brush and then applying it to my craft mat. I then add a little more water and use a longer brush to pick up the ink and splatter it onto my background!
Another thing I'm loving about pencils is not wasting so much ink. These are all techniques I used to do with ink pads and I always felt like I was wasting so much ink. By using the pencils, I hardly waste any at all! Does that mean I won't be using my ink pads anymore? No, but it does give me other options when I want to add some color to my projects.
COLORING WITH DISTRESS WATERCOLOR PENCILS
With the background completed, I moved on to creating some embellishments for my card. I stamped some images from the Dapper Stamp Set with Black Soot Archival Ink onto a piece of Distress Watercolor Paper and left the paper in my stamping tool. I have found that if I stamp, then watercolor some of the stamped detail gets lightened by the pigment. After I finish watercoloring the images, I reinked the stamps and stamped them again to add the detail back to the image.
To color the images, I pulled the color directly from the pencil using my water brush instead of coloring with the pencil on the paper and then blending it with the water brush. After adding a color, I used my heat tool to dry the ink and paper before adding a second color so that I would avoid mixing colors.
Once again, I seriously love that I can color in such small areas, not waste any ink AND everything matches since it's all part of the Distress Palette!
After I finished the watercoloring, I used a pair of scissors to fussy cut the images. To finish off the card, I adhered an Idea-ology Gauge Dial and the fussy cut images. I also added a piece of Mummy Cloth colored with Prize Ribbon Distress Spray Stain and some machine stitching around the outer edge. I then adhered the tag to a piece of the Distress Halloween Black Woodgrain Cardstock and then onto a piece of black Kraftstock. Once it was assembled, the finished card ended up being 3.5 x 6.75 inches.
I hope you enjoyed learning some ways that I'm using the new Distress Watercolor Pencils! Have you tried them out yet? I can't wait to continue exploring all the possibilities for creating with them! If you're looking for more ideas and inspiration you can check out my Tim Holtz Distress Watercolor Pencils blog post and video or check out Tim's Distress Watercolor Pencils Highlights on Instagram.
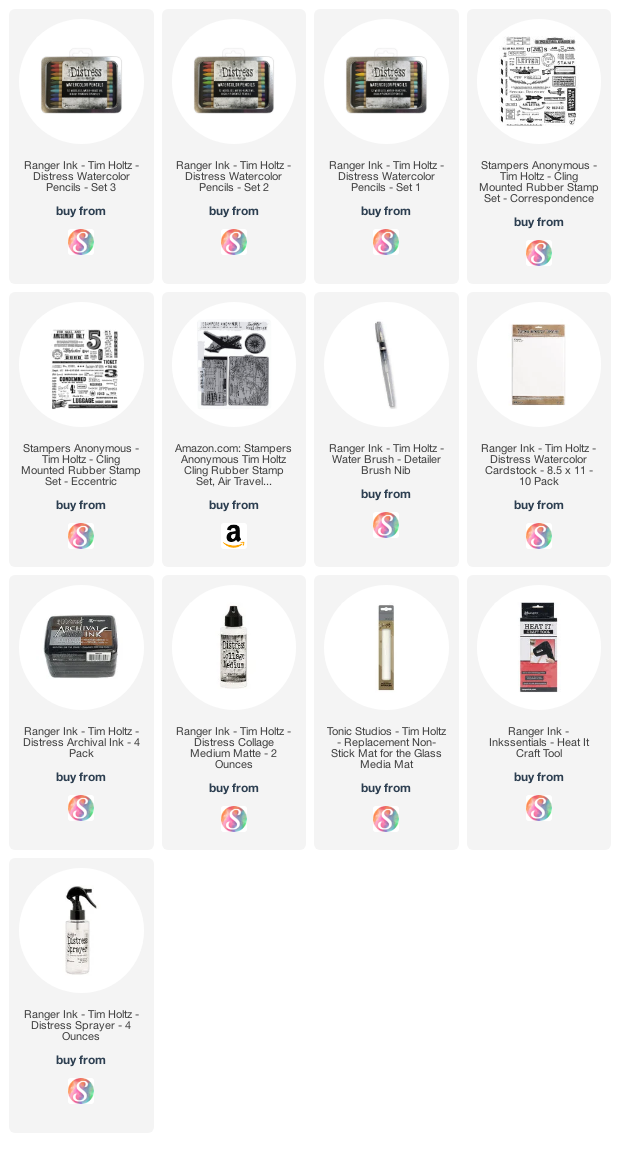
Supplies
Below you can find the products I used to create this card featuring the Tim Holtz Distress Watercolor Pencils. Each product is attached to an affiliate link with Scrapbook.com. When you shop through the links below, I receive a small commission from Scrapbook.com. These links are at absolutely no cost to you. These commission I receive helps me cover the costs of my blog and other expenses and it allows me to continue to provide you with FREE inspiration and tutorials. If you want to learn more about what an affiliate link is, you can see my full affiliate and product disclosure statement here. Thank you so much for your love and support!


No comments
Every time you smile at someone, it is an action of love, a gift to that person, a beautiful thing. ~Mother Teresa
HUGS!
JULIANA