
Did someone say Halloween shaker cards? Yes, please! Today I'm sharing another of the makes I created for the recent Tim Holtz Sizzix Halloween 2022 Release. This is a set of Halloween Shaker Cards using the Retro Halloween and Bold Text Halloween Thinlits. If you've never made a shaker card before I've got you covered. In this post, I'm taking you step by step through my process. Just follow along and you'll be creating shaker cards in no time!

To get started, I created 3 card fronts using Distress Watercolor paper trimmed to 4 x 5.25 inches. To add the color, I smooshed a Distress Ink pad directly onto my craft mat, sprayed it with a little water and then smooshed my paper into the ink. To speed up the drying process I used a heat tool. The Distress Ink colors I used to create the three backgrounds are Mowed Lawn, Carved Pumpkin and Wilted Violet.

Next, I stamped a spider web onto the card front using Hickory Smoke Archival Ink. The stamp is from the Tim Holtz Life Of The Party Stamp Set. The tool I use for my stamping is called a MISTI (which stands for Most Incredible Stamping Tool Invented) and has been a game changer for me when it comes to stamping.

After the backgrounds were finished, I choose which dies I wanted to combine and centered them on the card front. I used the bottom/shadow layer of the shape from the Retro Halloween Thinlits Set and one of the sentiments from the Halloween Bold Text Thinlits. I used Scrapbook.com Mint Tape (which is a low tack adhesive tape) to temporarily hold the dies in place as I ran them through my die cutting machine.

Next, I die cut the coordinating detailed image from the Retro Halloween Thinlits Set and the same Halloween Bold Text Thinlits sentiment from black cardstock. I used a temporary adhesive to adhere the card front to a piece of white cardstock cut to 4.25 x 5.5 inches. This will later be the card base.
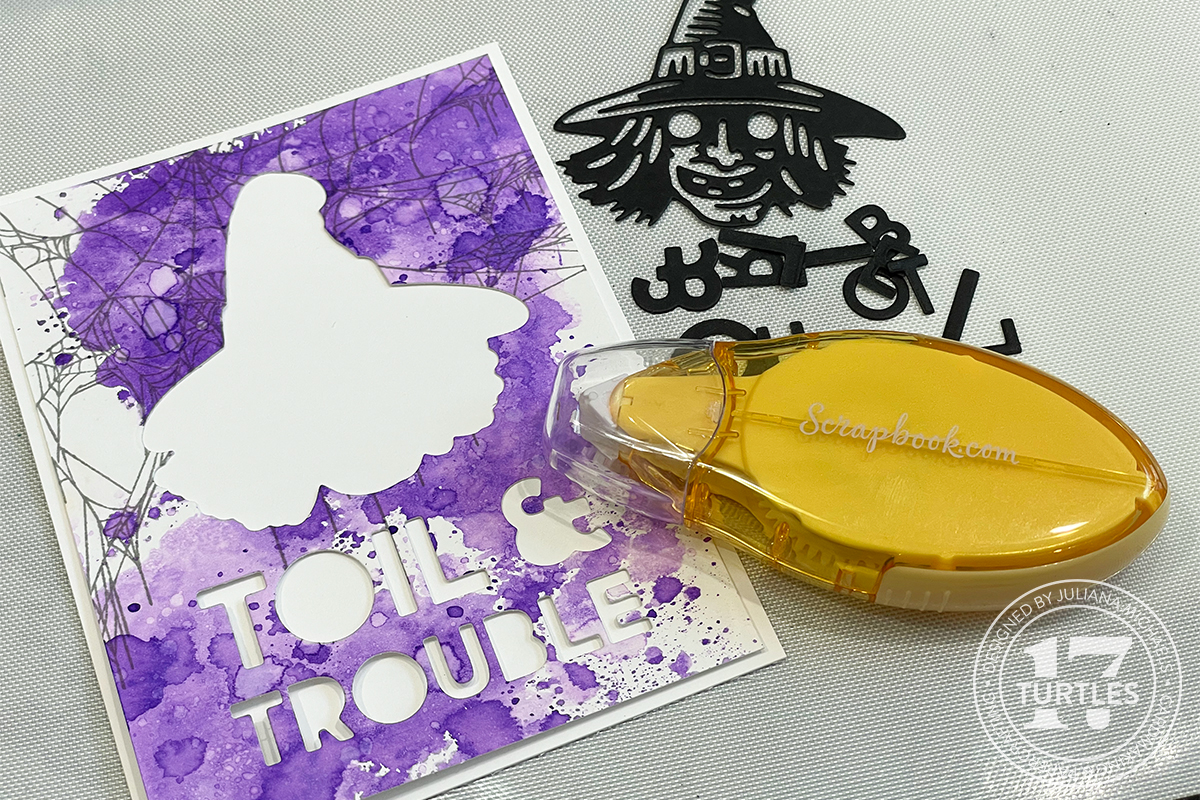
With the card front in place, I then used Distress Collage Medium to glue the black cardstock pieces into the openings and onto the white cardstock.

Here I've removed the card front and you can see the two layers.

Now it's time to create the shaker box/window portion of the card. Cut a piece of clear acetate to just slightly smaller than your card front and adhere it with double sided adhesive tape to the back side of your card front.

Next, cut strips of double sided foam tape and create a frame around the outside edge. This is once again done on the back side of the card front. You have now created your shaker box or window.

Before you begin filling your shaker box, line up the card front and bottom panel with each other and remove just one of the foam adhesive liners to hold the pieces together. Once you have done this, flip them over, lift up the top layer and begin filling your shaker box. I used a mix of sequins and beads from Sizzix.

To seal the shaker box so that the sequins/beads don't fall out, peel up just a small bit of the liner from the foam adhesive strips and fold them outward.

This will reveal part of the adhesive. Press the top layer down onto the bottom layer, grab the liner and peel the rest of it off. Press down once again to completely seal the shaker box.

That wasn't so bad was it?! Here's a look at each of the cards I created.

There are 6 different images in the Retro Halloween Die Set, so you could easily make a set of 6 of these cards!


I hope you enjoyed learning how to create these Halloween Shaker Cards featuring the Tim Holtz Retro Halloween and Halloween Bold Text Thinlits. Thanks so much for stopping by!
Supplies
Below you can find the products I used to create this project along with compensated affiliate links to Scrapbook.com. These links are at absolutely no cost to you. When you shop through the links below, I receive a small commission from Scrapbook.com. The commissions help me cover the costs of my blog and other expenses, which allows me to continue to provide you with FREE inspiration and tutorials. If you want to learn more about what an affiliate link is, you can see my full affiliate and product disclosure statement here. Thank you so much for your love and support!


No comments
Every time you smile at someone, it is an action of love, a gift to that person, a beautiful thing. ~Mother Teresa
HUGS!
JULIANA