Easter Treat Bag | Newton's Nook Designs

Hello Friends! Easter will be here soon and I for one am super excited that the Easter Candy is now available! My personal favorite are Reese's Easter Eggs and I've been known to hoard bags of them and eat on them for months after Easter has come and gone! Although Easter is about more than just the candy, it is fun to share these sweet treats with family and friends. While trying to think of a fun way to do this, I had a light bulb moment to create an Easter Treat Bag using Newton's Nook Designs Frames and Flags Die Set. And who doesn't love getting more out of their dies and using them in unexpected ways?! To learn how I created this Easter Treat Bag, keep reading for all the details!

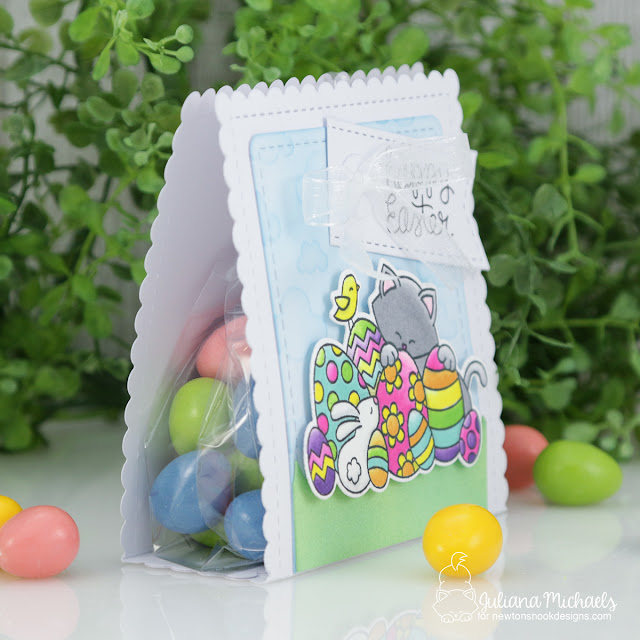
Easter Treat Bag by Juliana Michaels featuring Newton's Nook Designs Frames & Flags Die Set and Newton's Easter Basket Stamp Set

To get started, die cut 2 scalloped frames using the large die from the Frames and Flags Die Set. Score each piece at 4 inches and fold along the score lines.

Easter Treat Bag Tutorial by Juliana Michaels featuring Newton's Nook Designs Frames & Flags Die Set

Overlap them slightly, making sure to line up the scallops, and adhere them together.

Easter Treat Bag Tutorial by Juliana Michaels featuring Newton's Nook Designs Frames & Flags Die Set

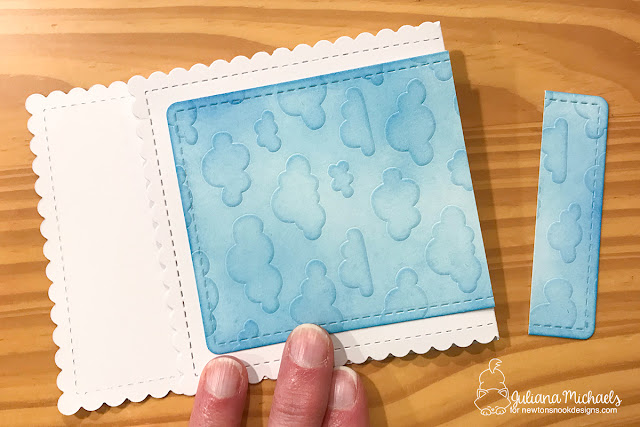
Next, die cut a panel using the smaller frame from the Frames and Flags Die Set. Dry Emboss it using the Cloudy Sky Stencil and your manual die cutting machine. (I use a Spellbinders Platinum 6 and just follow the instructions the come with the machine on how to layer the pieces and what platforms to use.) Apply Distress Oxide Ink using a foam blending tool to bring out the embossed design. Adhere this piece to the front of the treat bag and trim off the excess.

Easter Treat Bag Tutorial by Juliana Michaels featuring Newton's Nook Designs Frames & Flags Die Set

Layer on a piece of die cut grass using the grass die from the Lawn Borders Die Set. Stamp, color and die cut your image and adhere using double sided foam adhesive. For my Easter Treat Bag, I used one of the images from the Newton's Easter Basket Stamp Set.

Punch a 5/16 inch hole in the center top of the front of the treat bag. Die cut the tag hole using the Fancy Edges Tag Die Set from white cardstock and adhere over the punched hole.

Easter Treat Bag Tutorial by Juliana Michaels featuring Newton's Nook Designs Frames & Flags Die Set

Use a 1/8 inch punch to create 2 holes in the back of the treat bag. Thread a piece of ribbon through the holes.

Easter Treat Bag Tutorial by Juliana Michaels featuring Newton's Nook Designs Frames & Flags Die Set

Place your favorite candy, in my case it's Reese's Easter Eggs, in a cellophane bag and tie the ribbon around the bag to close it. Trim off any extra from the top of the bag.

Easter Treat Bag Tutorial by Juliana Michaels featuring Newton's Nook Designs Frames & Flags Die Set

Close the treat bag and thread the ribbon through the hole in the front of the treat bag. Thread the ribbon through a small tag with the sentiment and then tie a bow.

Easter Treat Bag Tutorial by Juliana Michaels featuring Newton's Nook Designs Frames & Flags Die Set

Your treat bag is now ready to give to friends and family as you celebrate Easter!

Easter Treat Bag by Juliana Michaels featuring Newton's Nook Designs Frames & Flags Die Set and Newton's Easter Basket Stamp Set

 Here's an up close look at the front of the treat bag.

Easter Treat Bag by Juliana Michaels featuring Newton's Nook Designs Frames & Flags Die Set and Newton's Easter Basket Stamp Set

I hope you enjoyed learning how to create this Easter Treat Bag and also how to think outside the box a bit, when it comes to using your dies for something different than their intended purpose!

Newton's Nook Designs March Release | Birthday Essentials

Hello all and welcome to the final day of Newton's Nook March Release! If you can't tell, the theme this week has been all about birthdays and celebrations.  Today, we continue that theme with the new set called Birthday Essentials. This is a great set of scripty sentiments, similar to the super popular Sentiments of the Season that was released for Christmas cards.

Foiled Background

Along with the fun birthday theme each day this week, I decided to challenge myself to use the new stencils being released in a different way each day. So far, I've dry embossed, inked and used texture paste with glitter. Today, I went with a Foiled Background technique I've shared in a past post about Stenciled Backgrounds. I invite you to check out that post for the full tutorial and even more inspiration on how to use stencils. They are such a fun tool to play with when creating cards because of their versatility and all the different techniques you can use with them!

For this Birthday Card, I added a touch of shine using Therm O Web Transfer Gel, Deco Foil and Newton's Nook Designs Confetti Stencil. The Deco Foil I used on this card is called Summer Rainbow.

Birthday Card with Foil Stenciled Background by Juliana Michaels featuring Newton's Nook Designs Birthday Essentials Stamp Set, Confettis Stencil and Therm O Web Transfer Gel and Deco Foil

Once the foiled background was complete, I trimmed it to size and adhered it to the card front. I then wrapped a bit of sheer ribbon around the card front. The sentiment is from the Birthday Essentials stamp set and is heat embossed with white embossing powder. After I adhered it to the card front, I finished off the design with a small bow!

This is a rather quick and easy card to put together once the Transfer Gel dries. One tip I can share is that I like to do up several panels at once and put them to the side for future projects!

Birthday Card with Foil Stenciled Background by Juliana Michaels featuring Newton's Nook Designs Birthday Essentials Stamp Set, Confettis Stencil and Therm O Web Transfer Gel and Deco Foil

Blog Hop & Giveaway


So, how would you like to win the “Birthday Essentials” Stamp Set?


This stamp set will be given away to ONE lucky winner! To enter for you chance to win all you have to do is comment on the NND blog and Design Team blogs listed below. The winner will be chosen at random from the collective reveal posts. Make sure to check out each of their blogs and comment for your chance to win. You will not know which blog has been chosen so the more you comment on the better your chances are of winning! You have until Thursday March 15th at 9pm EST to comment -- winners will be announced on the blog post on Friday, March 16th.

Now it's time to start hopping and checking out all the awesome Design Team Blogs below to enter:

P.S.  Don't forget!!! All of the new stamps, dies and stencils will be available in the Newton's Nook Designs Shop starting tomorrow.

Newton's Nook Designs March Release | Newton's Birthday Balloons

Woohoo! It's Day 3 of Newton's Nook Designs March Release! Today we have a new stamp set to share with you featured the adorable Newton and it's called Newton's Birthday Balloons.  So....are you starting to notice a theme yet with this release?

Distress Oxide Stenciled Background


To get started with creating this Birthday Card, I began by stamping the adorable Newton. I then colored him with my Chameleon Pens and then die cut him using the coordinating die. I even added some Glossy Accents to make the balloons shiny!

Birthday Card with Distress Oxide Stenciled Background by Juliana Michaels featuring Newton's Nook Designs Newton's Birthday Balloons Stamp Set and Bubbly Stencil

For the background, I used the brand new Bubbly Stencil and inked it up with a mix of Distress Oxide Inks. I used the following Distress Oxide Ink colors: Mermaid Lagoon, Twisted Citron, Picked Raspberry and Wilted Violet.

Distress Oxide Stenciled Background with Newton's Nook Designs Bubbly Stencil

To finish up the card design, I stamped the sentiment onto a white cardstock flag cut out using one of the flags from the Flags & Frames Die Set. I adhered both of these to a vellum circle and then added a scallop circle frame.  I then used some double sided foam adhesive to attach Newton and give him a bit of dimension as he floats away with his balloons!


Birthday Card with Distress Oxide Stenciled Background by Juliana Michaels featuring Newton's Nook Designs Newton's Birthday Balloons Stamp Set and Bubbly Stencil

Blog Hop & Giveaway


So, how would you like to win the “Newton's Birthday Balloons” Stamp Set?


This stamp set will be given away to ONE lucky winner! To enter for you chance to win all you have to do is comment on the NND blog and Design Team blogs listed below. The winner will be chosen at random from the collective reveal posts. Make sure to check out each of their blogs and comment for your chance to win. You will not know which blog has been chosen so the more you comment on the better your chances are of winning! You have until Thursday March 15th at 9pm EST to comment -- winners will be announced on the blog post on Friday, March 16th.

Now it's time to start hopping and checking out all the awesome Design Team Blogs below to enter:

Happy Hopping!

Newton's Nook Designs March Release | Uplifting Wishes

Welcome to Day 2 of Newton's Nook Designs March Release! We have some more fabulous new products to share with you today including a new stamp set called Uplifting Wishes and a new die set called Balloon Shaker Die Set. This stamp set is perfect to use alone, but it also fits perfectly inside the new Balloon Shaker!

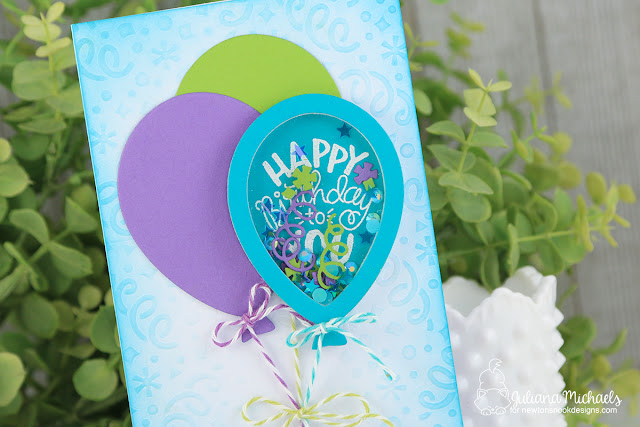
Birthday Balloon Shaker Card


To create this Birthday Ballon Shaker Card, I started off by die cutting a balloon from teal cardstock using the new Balloon Shaker Die. I then used the Uplifting Wishes Stamp set and stamped the sentiment in the center of it and heat embossed it with white embossing powder.

To create the shaker box, I used the balloon frame die to cut a piece of Double Sided Foam Adhesive (which you can get in the Newton's Nook Shop). I then adhered this piece on top of the stamped balloon die cut. Next, I filled the opening with cardstock confetti that I die cut using the dies from the Balloon Shaker Die Set. I also added a few sequins and jewels for a bit of shimmer and shine.

Birthday Balloon Shaker Card by Juliana Micheals featuring Newton's Nook Designs Uplifting Wishes Stamp Set and Balloon Shaker Die Set

Next, I die cut a solid balloon from an Acetate Sheet (again available from Newton's Nook) and adhered it on top of the foam layer. To finish off the shaker, I die cut another balloon frame from teal cardstock.

As I was creating the shaker, I thought it would be fun to group several balloons together to decorate the front of my card. As you can see, I cut 2 more balloons from green and purple cardstock and then layered all of them onto my card front. Because of the size of the balloons, I knew I would need to make a slightly taller then normal card.

Birthday Balloon Shaker Card by Juliana Micheals featuring Newton's Nook Designs Uplifting Wishes Stamp Set and Balloon Shaker Die Set

To create the background for this card, I dry embossed a piece of white cardstock using the new Confetti Stencil we featured yesterday. This card is 4.25 x 7.25 inches tall and because the stencil is only 6 inches tall, I had to do some tricky stencil work to emboss a larger piece of paper. After I embossed the bottom part of the card, I slid the stencil up to the top part that was not embossed. I then ran only this section into my die cut machine and then backed it out of the machine so as not to ruin the section I had already embossed. By doing this, I was able to easily emboss a 7.25 inch length of cardstock! After the dry embossing was complete, I added some Distress Oxide to the edges to help bring out the embossed design.

For the finishing touch, I tied a length of baker's twine in a coordinating color to each balloon.

Birthday Balloon Shaker Card by Juliana Micheals featuring Newton's Nook Designs Uplifting Wishes Stamp Set and Balloon Shaker Die Set

Blog Hop & Giveaway


So, how would you like to win the “Uplifting Wishes” Stamp Set?


This stamp set will be given away to ONE lucky winner! To enter for you chance to win all you have to do is comment on the NND blog and Design Team blogs listed below. The winner will be chosen at random from the collective reveal posts. Make sure to check out each of their blogs and comment for your chance to win. You will not know which blog has been chosen so the more you comment on the better your chances are of winning! You have until Thursday March 15th at 9pm EST to comment -- winners will be announced on the blog post on Friday, March 16th.

Here is a peek at the Balloon Shaker Die Set. I just love that it comes with it's own confetti dies and even a little word die!


Now it's time to start hopping and checking out all the awesome Design Team Blogs below to enter:

Happy Hopping!

Newton's Nook Designs March Release | Holding Happiness

Hello friends and welcome to Day 1 of Newton's Nook Designs March Release! Today we're featuring the fun new stamp set called Holding Happiness and when you take a peek at the full stamp you'll totally get why it's called that. Along with this new stamp set, there are also 2 new stencils for you to play with! I used these new goodies to create a Birthday Card with a Glitter Stenciled Background. Keep reading to learn all about it and then check out how you can win this new stamp set. All the details are down below! Oh and one last thing, as this week of new product reveals progresses, you might notice a bit of a theme to this release. I'm pretty sure it will give you a reason to celebrate!

Glitter Stenciled Background


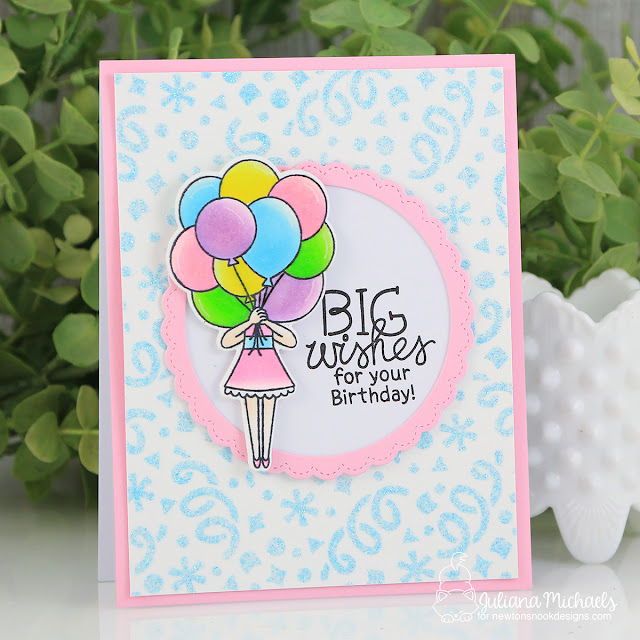
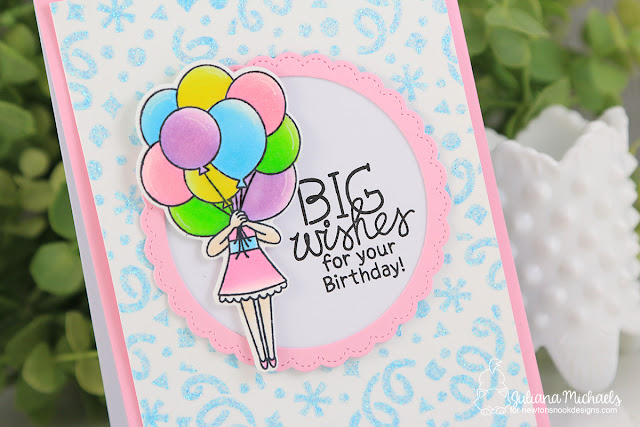
In my opinion, you can never have too many birthday stamp sets and the Holding Happiness Stamp Set is perfect for celebrating birthdays, as well as other special occasions. For this card, I couldn't resist selecting the fun image with the girl holding the balloons to create a birthday card.

Birthday Card with Glitter Stenciled Background by Juliana Michaels featuring Newton's Nook Designs Holding Happiness Stamp Set and Confetti Stencil

To get started with this card, I recommend making the fun Glitter Stenciled Background for the card.  Place the Confetti Stencil on top of a piece of white cardstock and use Purple Tape from Therm O Web to hold the stencil in place. Next, take some Ranger Texture Paste, put a bit of it onto a nonstick craft mat and then mix in a generous amount of glitter. Use a palette knife, to spread a thin layer of this glittered paste over the top of the stencil. Gently peel of the stencil and wash it to remove the paste. Set this piece to the side to allow it to dry.

Glitter Stenciled Background with Newton's Nook Designs Confetti Stencil, Therm O Web Purple Tape, Ranger Texture Paste and glitter

While the Glitter Stenciled Background is drying you can start on your stamping and coloring! I colored this image using Chameleon Markers. I then added some detail highlights using a white gel pen.  After all of the coloring was completed, I added Ranger Glossy Accents to the balloons to make them shiny. Of course, this is so hard to photograph, but in real life it adds a wonderful bit of interest to the card!

Once the Glitter Stenciled Background was dry, I added the die cut circle with the sentiment to the card front. I then adhered the girl with the balloons using double sided foam adhesive to give it a little dimension. In real life, the shiny balloons and sparkly background make for such a wonderfully fun and festive card! I can't wait to give it to it's intended recipient!

Birthday Card with Glitter Stenciled Background by Juliana Michaels featuring Newton's Nook Designs Holding Happiness Stamp Set and Confetti Stencil

Blog Hop & Giveaway


So, how would you like to win the “Holding Happiness” Stamp Set?


This stamp set will be given away to ONE lucky winner! To enter for you chance to win all you have to do is comment on the NND blog and Design Team blogs listed below. The winner will be chosen at random from the collective reveal posts. Make sure to check out each of their blogs and comment for your chance to win. You will not know which blog has been chosen so the more you comment on the better your chances are of winning! You have until Thursday March 15th at 9pm EST to comment -- winners will be announced on the blog post on Friday, March 16th.

As I mentioned, there are 2 new stencils being released. I used a stencil on each of my projects this week and for each project, I'm sharing a totally different way to use stencils to create a fun background for you cards. 

Here is a peek at both stencils. This first one is the Confetti Stencil, and this is the one I used on my project above.


This next stencil is called Bubbly Stencil. I can't wait to share with you how I used it later this week!


Make sure to check back each day this week for another new product reveal and, of course, your chance to win one of the new stamp sets!

Now it's time to start hopping and checking out all the awesome Design Team Blogs below to enter:

Newton's Nook Designs
Amanda Bodine
Holly Endress
Ellen Haxelmans
Larissa Heskett
Samantha Mann
Juliana Michaels
Naki Rager
Maria Russell
Jennifer Timko
Tatiana Trafimovich

Happy Hopping!
Subscribe