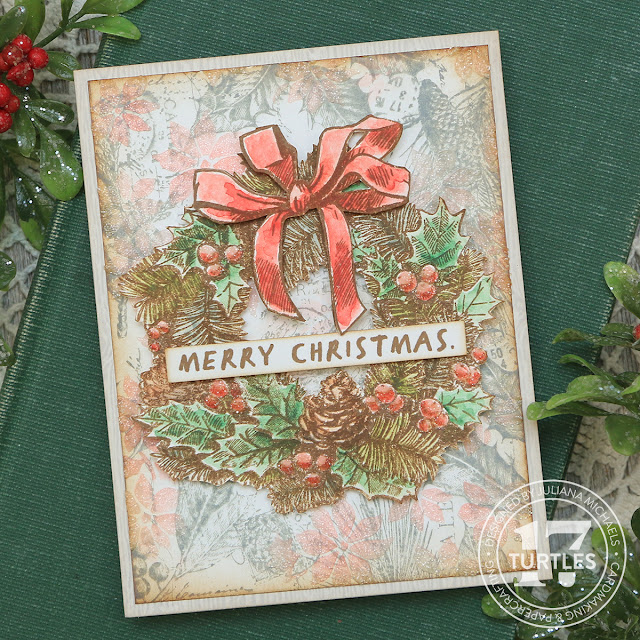
Hello crafty friends! Even though I'm in a state of seasonal confusion as a maker and have been bouncing back and forth between Halloween and Christmas for months now, I'm super excited about the amazing Tim Holtz Stampers Anonymous Christmas 2022 LIVE launch! You can watch the replay and see all of the incredible makes and inspiration over on Tim's Blog.
I was immediately drawn to the Department Store and Festive Collage Stamp Sets and couldn't wait to combine them somehow! After playing around for a bit, I ended up with this Merry Christmas Card and Tim shared it during his Live Launch. Now I want to share some of the details on how I created it with you. As for my other Christmas projects, I'll begin sharing them starting in November so that I can enjoy the Halloween making season!
To get started, I took a piece of Distress Watercolor Paper and trimmed it to 4 x 5.25 inches. I then stamped images from the Festive Collage Stamp Set around the outer edge using Iced Spruce Distress Oxide. I played around with their placement and angle to avoid having too much overlap of the images as I wanted you to be able to see the gorgeous designs.
Next, I took the Tiny Poinsettia Layering Stencil and very lightly applied Barn Door Distress Oxide through it. I made sure to keep most of the design toward the upper left and lower right corners just to leave a little breathing room.
I then cleaned and dried the stencil and placed it back onto the card, making sure to line it up with the inked design. Using a palette knife, I applied the new Distress Snowfall Grit Paste through the stencil. This paste, which is part of Tim's Seasonal Ranger Release, adds a beautiful touch of texture and hint of shimmer. If you'd like to see more, you can check out Tim's fantastic demo of these products over on his blog. I tried my best to show the Snowfall Grit Paste in a photo, but it just doesn't do it justice. In real life, is the only way you can truly appreciate what it adds to your design!
Once the paste was dry, I applied Vintage Photo Distress Ink around the outer edge using a blending tool.
While the paste was drying, I stamped the gorgeous wreath image from the Department Store Stamp Set with Vintage Photo Archival Ink onto Distress Watercolor Paper. I then stamped just the bow area so that I could use it to add a little more dimension.
Using Distress Watercolor Pencils in Barn Door, Rustic Wilderness, Iced Spruce, Peeled Paint, Vintage Photo and Walnut Stain I colored in the wreath. I used a waterbrush to pull the pigment from the pencil and color in the image. You could also color directly onto the paper with the pencil, but I find the way I did it allows me to have more control of where the color goes when I'm creating the shadows and highlights. The main thing you want to do is to make sure to have more pigment on your brush than water and apply it to the shaded (darker) areas of the stamped design. Then you can use a bit of water to blend the color out into the lighter areas.
I repeated the coloring on the extra bow image. Once the coloring was completed and the paper was dry, I used a pair of scissors to fussy cut the wreath and the extra bow. To get inside the center of the wreath, I used a craft knife to cut an opening and then cut the rest of it with my scissors. If you are really good with a craft knife, then you might be able to do it all that way. I'm just not one of those people!
Before I adhered the wreath to my background, I used double sided foam adhesive squares to adhere the bow. I also adhered the wreath with foam adhesive as well. I love adding dimension, but if that's not your thing, you can use your favorite adhesive to adhere them.
I adhered the sentiment using foam adhesive as well. The sentiment is from the Holiday Sketchbook Stamp Set and I stamped it in Vintage Photo Archival Ink, trimmed it down and inked the edges with Vintage Photo Distress Ink.
One final touch, which doesn't show up too well in the photos, is that I applied Glossy Accents to the berries. While this was still wet, I sprinkled some Rock Candy Glitter over them and tapped off the excess. In person, I really love the touch of shimmer this creates and how it adds to the vintage feel of the card design.
To finish off the card, I layered the background onto a piece of Distress Christmas Light Grey Woodgrain Cardstock trimmed to 4.25 x 5.5 inches.
Thanks so much for stopping by and let me know if you have any questions.


No comments
Every time you smile at someone, it is an action of love, a gift to that person, a beautiful thing. ~Mother Teresa
HUGS!
JULIANA