
Hello my crafty friend! I'm so happy you stopped by today, because I've got something awesome to share with you! I recently got my hands on the amazing Sizzix Scoring Board and Trimmer Tool and once I started playing around with it, I was blown away by ALL the things it can do in one tool! It seriously replaces a draw full of other tools!
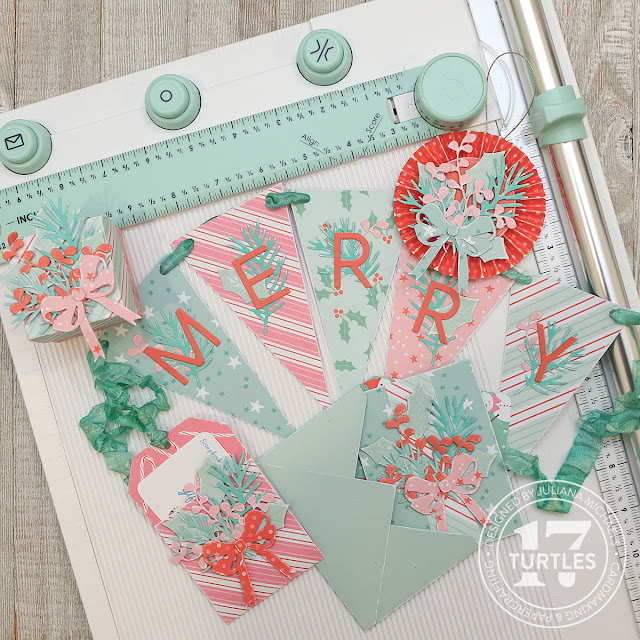
During the process of using the tool I put together a how-to video that you can find over on the Scrapbook.com YouTube Channel. So if you are interested in learning more about what the Sizzix Scoring Board and Trimmer Tool is and how to use it, then I recommend checking out that video. In the video I share the basics on using the tool to create a set of Holiday paper crafting projects including a card, an envelope, a tag, a box, a banner and a rosette using the Merry Patterned Paper Pad from Scrapbook.com.
During the process of using the tool I put together a how-to video that you can find over on the Scrapbook.com YouTube Channel. So if you are interested in learning more about what the Sizzix Scoring Board and Trimmer Tool is and how to use it, then I recommend checking out that video. In the video I share the basics on using the tool to create a set of Holiday paper crafting projects including a card, an envelope, a tag, a box, a banner and a rosette using the Merry Patterned Paper Pad from Scrapbook.com.
For those of you coming over from the Scrapbook.com YouTube channel, welcome! As I stated in the video, here on my blog you can find all the details on how I added the finishing touches to complete these projects.
The Sizzix Scoring Board and Trimmer Tool is available now at Scrapbook.com for an amazing price of just $46.99 (as compared to $65 retail price). If you're interested in the products and supplies I used to create this project, you can find a supply list at the bottom of this post. When you shop through those links, it supports me and I really do appreciate that!
Now let's get on with the making!
ENVELOPE & CARD
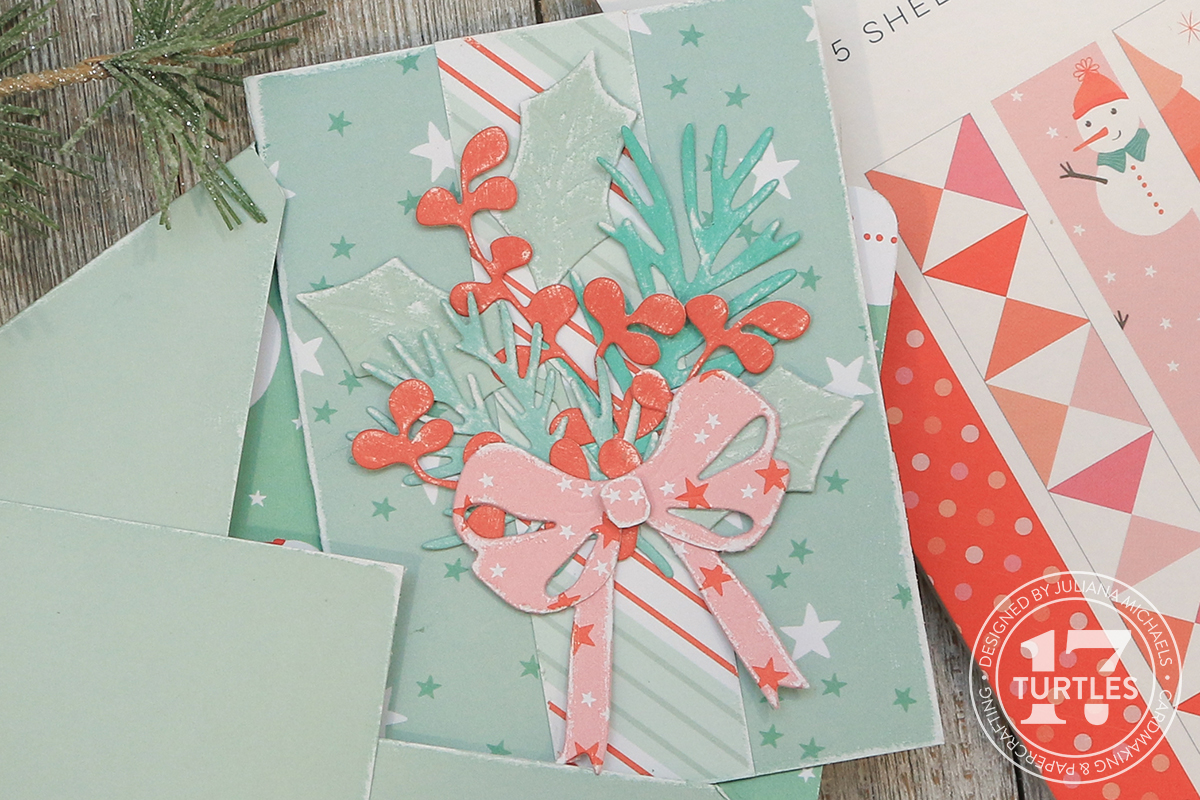
First up is the envelope and card. The finished card size is 3x4 inches and the finished envelope size is 3.25 x 4.375 inches. As I mentioned earlier, I used papers from the Merry Paper Pad to create the base for each project, so here I used it to create the card base and the envelope.To embellish the card and the other projects, I created a cluster by die cutting papers from the Merry Paper Pad and the Peppermint Paper Pad using the Cozy Autumn, Delicate Leaves and Bow Toppers Die Set. I added a strip of striped paper to the front of the card before I added the cluster. To add just a touch of distress, I sanded the edges of all of the die cuts and papers using Ranger Sanding Disc. This reveals the white core of the paper and also makes the die cuts look like they have snow on them!


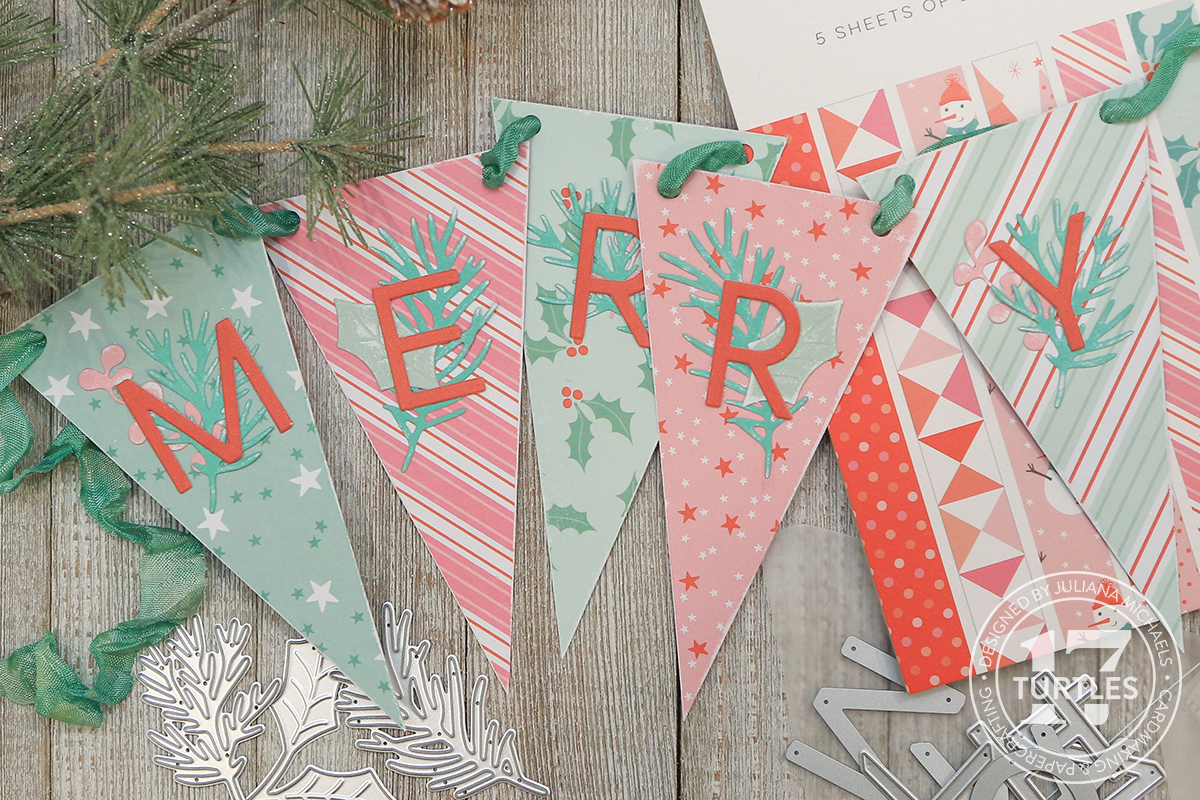
To add a more festive touch to the banner, I added some of the same die cuts I used on the envelope, tag and box. For the letters, I used the Scrapbook.com Modern Uppercase Alphabet Die Set. I cut it 3 times from red paper from the Peppermint Paper Pad, glued them together for a little dimension and then adhered them on top of the greenery die cuts. Wouldn't it be cute to have another banner that said Bright to hang with this one?!


Thanks SO much for stopping by! I hope you enjoyed learning a bit more about how to use the Sizzix Scoring Board and Trimmer Tool for your next paper crafting project!

To give the bow a little extra dimension, I cut it twice. I used one as the base. I took the second one, trimmed off the strings and then adhered the loopy part of the bow to the center of the base bow. I then cut a small circular shape for the center of the bow and adhered that with double sided foam tape.
Sizzix also has a handy tool on their website - the Sizzix Scoring Board and Trimmer Generator that will generate the measurements you need to create custom sized envelopes. Simply select centimeters or inches, put in the length and width of your card and click the generate now button to get the measurements.
TAG | GIFT CARD HOLDER
In the video I created a simple tag, but I wanted to share with you how you can make a tag into a gift card holder. To do that I took a piece of cardstock and cut it to 2.75 x 7 inches. I then trimmed the corners of the tag and added the hole punch. Next, I placed the tag into the Scoring Board and scored it at 4.25 inches from the top of the tag and folded it along the score line to create the gift card pocket. I then applied 1/8 inch double sided adhesive along the edges of the pocket to secure it.The final touches were the addition of a die cut cluster (like the one I made for the card above) and some ribbon. The ribbon I used is seam binding that I dyed to match using Cracked Pistachio Distress Spray Stain.

GIFT BOX
This little gift box is so cute at just 2 x 2 inches! You can make larger boxes of course, you just need larger pieces of paper. With a 12 x 12 piece of paper you can make up to an 8 x 8 inch size box!
As I mentioned above, the Sizzix Scoring Board and Trimmer Generator can be found on their website and along with measurements for custom sized envelopes, you can do the same for boxes. Simply select centimeters or inches, put in the length, width, height and lid depth of the items you want to create a box for and click the generate now button to get the measurements.
To dress up this cute little gift box, I added another die cut cluster cut using papers from the Merry and the Peppermint Paper Pads, just like the one I made for the envelope.
BANNER | BUNTING
Next up, I made a little banner to celebrate the season! In the video I shared a simple banner that was just 3 x 3 inches, but I also wanted to share how to create a larger one with a slightly different shape. To create this banner, I cut a piece of 6 x 8 inch paper down to 5 x 8 inches because I wanted the banners to be 5 inches tall. I then rotated the measurement ruler to 15 degrees (instead of the 30 degrees mentioned in the instruction booklet) and then followed the rest of the instructions for cutting banners. That left me with banners that are 2.875 x 5 inches. I cut my banner flags from several different patterns of paper, but you can certainly cut them all from one piece of paper. With a 5 x 8 inch piece of paper you can cut 5 banner flags.
ROSETTE ORNAMENT | TAG
Last, but not least, is a rosette I made and turned into an ornament. It could also be used as a tag. The finished size is 3.25 inches. I attached a piece of gold cording to the back of it for hanging and then embellished the front of it with another die cut cluster.
Thanks SO much for stopping by! I hope you enjoyed learning a bit more about how to use the Sizzix Scoring Board and Trimmer Tool for your next paper crafting project!
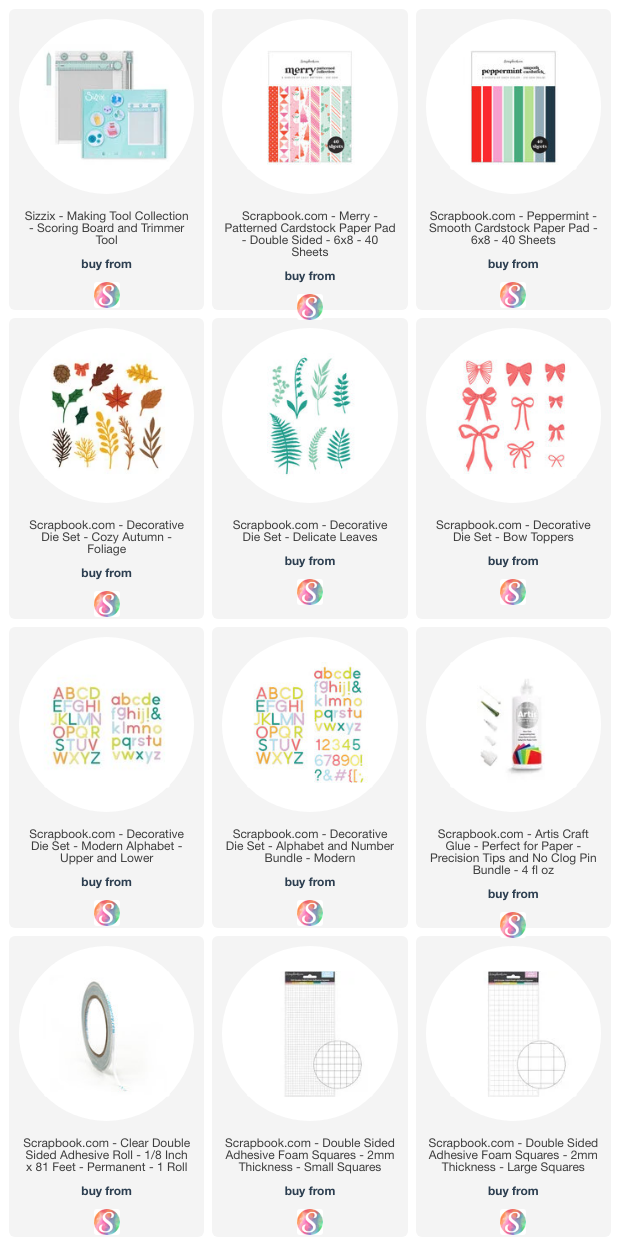
SUPPLIES
Below you can find the supplies I used to create this set of Christmas Holiday paper crafting projects. When you shop through the links below, I receive a small commission from Scrapbook.com. These links are at absolutely no cost to you and the commission I receive helps me cover the costs of my blog and other expenses, which allows me to continue to provide you with FREE inspiration and tutorials. If you want to learn more about what an affiliate link is, you can see my full affiliate and product disclosure statement here. Thank you so much for your love and support!


No comments
Every time you smile at someone, it is an action of love, a gift to that person, a beautiful thing. ~Mother Teresa
HUGS!
JULIANA