Today I want to share about something very special with you. I want to tell you about Card For Kindness® a wonderful global initiative started by Scrapbook.om and part of their Creative Kindness Foundation. Cards For Kindness® mission focuses on uplifting others and spreading happiness to anyone who could use an emotional boost, cheer, or a reminder of how much they are loved through the sending of handmade cards. You can send them your handmade cards and then they distribute them to organizations that support people in need. Some of the people they currently provide cards to include veterans, frontline workers and first responders, children's hospitals, cancer patients, senior citizens, deployed troops, people experiencing homelessness and more. To learn more about how you can become involved with Card For Kindness® and the Creative Kindness Foundation, check out this article.
When you create a handmade card for someone, you are creating a gift from the heart with love and thought that no store-bought card could ever match. Spread love and smiles to the special people in your life with our Exclusive Just a Note Bundle! - Scrapbook.com
JUST A NOTE BUNDLE
Scrapbook.com has created the Just a Note Bundle to bring awareness to Cards For Kindness®. This bundle include the Just A Note Stamp Set, the Birthday Celebration Sentiments II Die Set and the 6 x 8 Pinks Smooth Cardstock Paper Pad. To see more inspiration using this bundle make sure to check out the Scrapbook.com Livestream for August 31.
Whether you use this bundle to create cards to send to Cards For Kindness® or to send out yourself, this stamp set is a perfect addition to your stamp collection. I love the combination of flowers and sentiments and used it to create this Thinking Of You Card that I recently sent to mey sister.
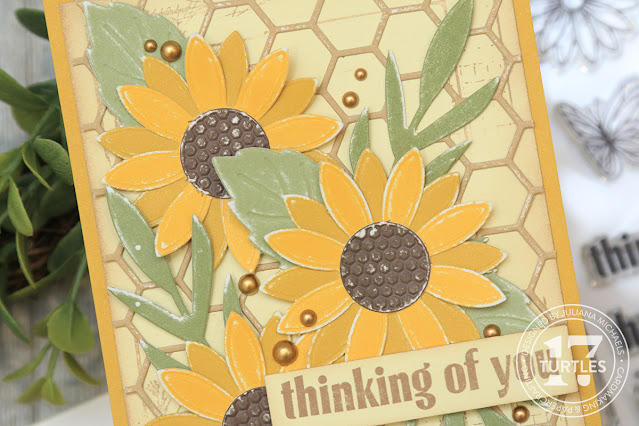
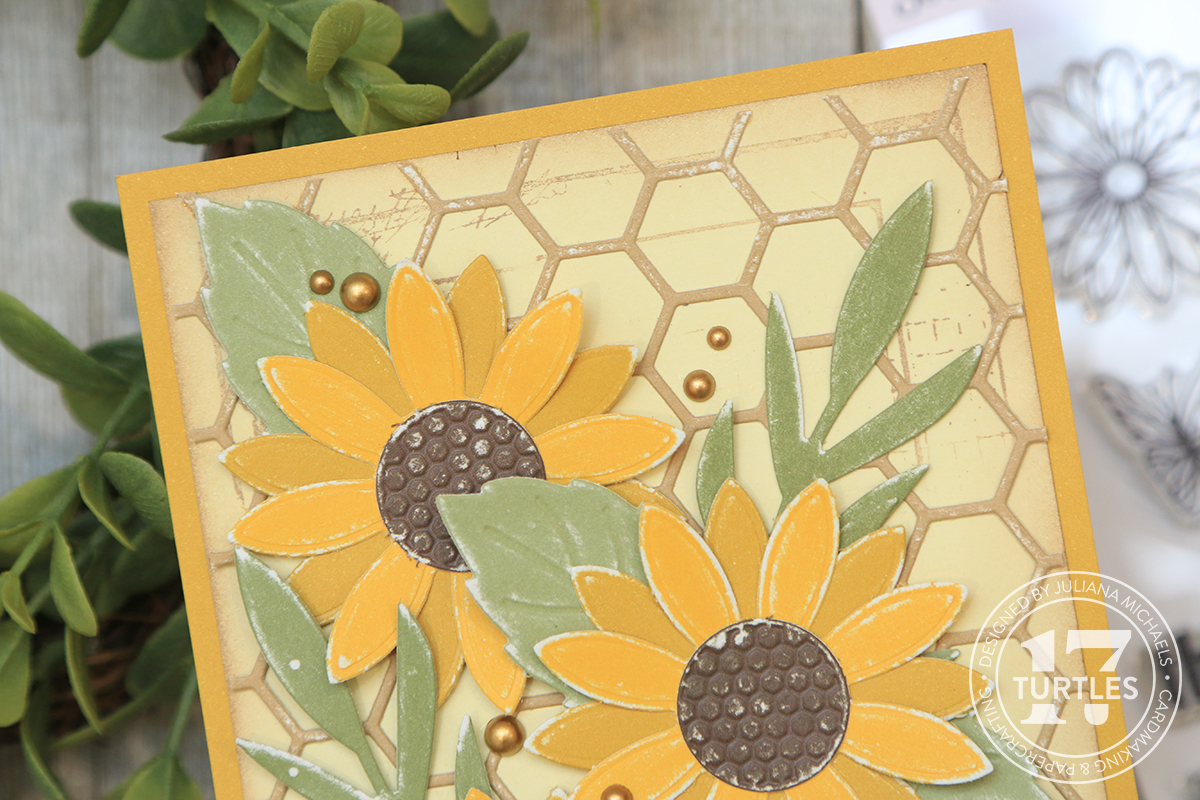
THINKING OF YOU CARD
My sister is an assistant principal and as with many who are in education, her job is demanding and stressful, but she loves the children and is driven to do everything she can to be the best she can for them. When she shared some of the challenges she was facing with the start of the school year, I was inspired to put together a package of sunshine to send to her with the hope that it would add a little cheer to her day. Included in the package I sent her, was a mix of yellow treats and self care items including lemon drops, lemon cookies and a yellow notepad that said hello sunshine. After I collected the items, I was then inspired to use the Just A Note stamp set to create a card to include in her package.
To create the base for this card, I used a piece of paper from the A2 Yellows Smooth Cardstock Paper Pad. I then trimmed a pale yellow piece of paper from the same paper pad down to 4.25 x 5.5 inches and stamped it light brown ink using the Creative Expressions Botanical Frames Stamp Set by Same Poole.
I die cut a piece of paper from the A2 Harvest Paper Pad using the Honeycomb A2 Plate Die. I sanded it lightly using a Sanding Disc and trimmed off the outer frame. I then adhered it to the card front.
Next, I used the Sunflower Die Set, Cozy Autumn Foliate Die Set, Delicate Leaves Die Set to cut yellow, green and brown cardstock from the A2 Yellows Paper Pad and A2 Harvest Paper Pad. I sanded all of these as well before I adhered them together.
As I mentioned earlier, I used the Just A Note Stamp Set to create the sentiment for this card. I stamped it onto a piece of pale yellow cardstock, cut it into a strip and then adhered it to the card. The final touch was the addition of some Pinkfresh Studio Matte Gold Metallic Pearls.
Thanks for stopping by today and I hope this post inspires you to join the Cards For Kindness® initiative or send someone you know a card to let them know just how much they mean to you!
SUPPLIES
Below you can find the supplies I used to create this Thinking Of You Card and the Just A Note Bundle. When you shop through the links below, I receive a small commission from Scrapbook.com. These links are at absolutely no cost to you and the commission I receive helps me cover the costs of my blog and other expenses, which allows me to continue to provide you with FREE inspiration and tutorials. If you want to learn more about what an affiliate link is, you can see my full affiliate and product disclosure statement here. Thank you so much for your love and support!
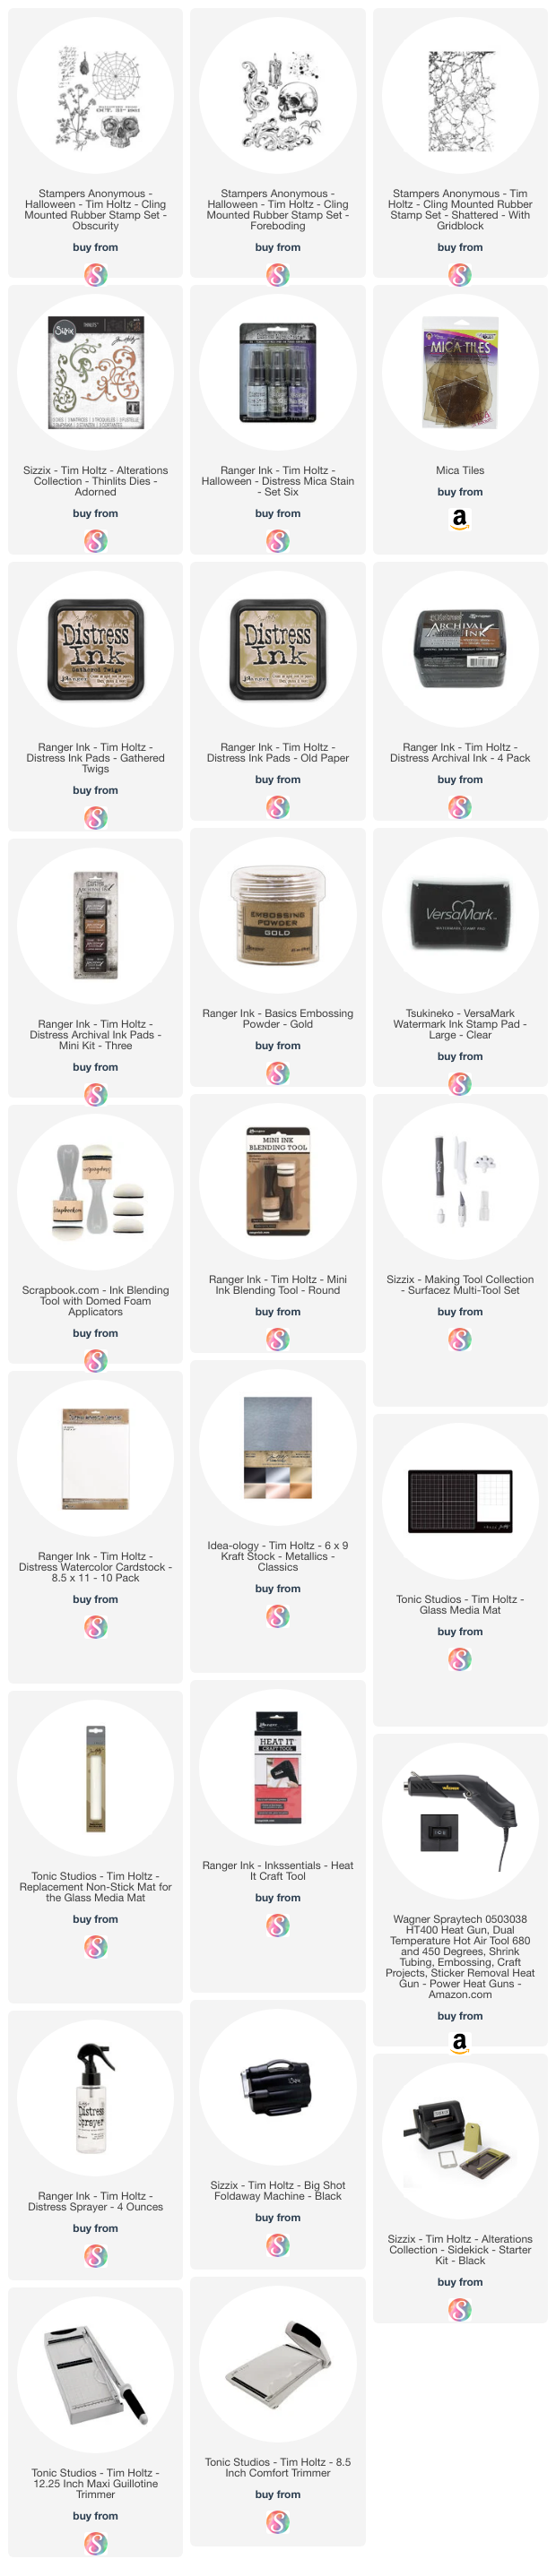
Hello my crafty friend! In this blog post I'm going to be sharing how I created this Halloween card featuring some of the new stamp sets from the Tim Holtz Stampers Anonymous 2023 Halloween release. For this card I'll be working with Shattered, Foreboding and The Obscure Stamp Sets and as I share how this card came together I'll take you step by step through how I used the various stamp sets and more. The finished size of this card is a little larger than my normal A2. This one is A6 in size which is 4.5 x 6.25 inches. I actually started off with my standard size but during the creative process, I decided to enlarge it so that all of the elements weren't so crowded and that more of the background paper would show. If you are looking for more inspiration from the release make sure check out Tim's YouTube Live and his blog for links to all of the projects created by the other Makers.
If you prefer a video format, you can watch below or head over to my YouTube channel to see the process in more detail.
If you're interested in the exact products I used to create this card, you can find links to them in the supplies list below. When you shop through those links, it supports me and I appreciate that so very much! Now let's get on with the making!
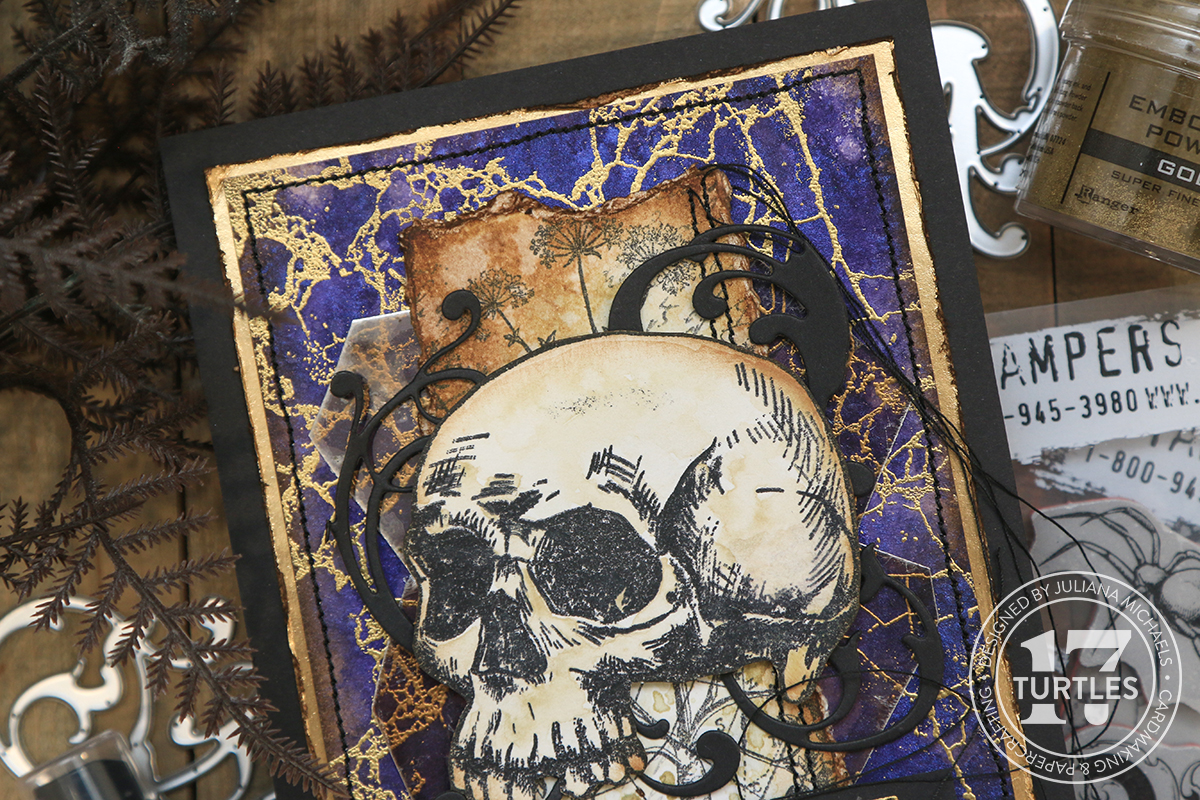
SHATTERED BACKGROUND
I began by placing a piece of Distress Watercolor Paper cut to 4 x 5.75 inches into a Splat Box. I used watercolor paper because I'm adding Distress Mica Spray Stain in Ominous Twilight and this kind of paper is perfect for using with wet mediums such as sprays. And I'm working in the Slat Box so that I don't get spray ink all over my craft space. Before I begin spraying I make sure to shake the spray until the mica is well mixed into the liquid. If you can see the mica on the bottom of the bottle you need to keep shaking it until that is mixed in. Once it was well mixed, I sprayed the ink onto the paper. To get the ink to move over the paper a bit I spritz it lightly with some water using my Distress Sprayer. I then use my heat tool to dry the paper. The Mica Spray Stains add so much gorgeous shimmer and shine!
To add some interest, I added some larger water droplets by slowly pulling the trigger of the Distress Sprayer. I used my heat tool to start the drying process. I then placed a paper towel over the paper to dab dry and lift off some of the ink and then dried it again with my heat tool. I love the interest this step adds to the already gorgeous shimmery background.
I'm going to be heat embossing during the next step, so you want to make sure your paper is completely dry because embossing powder can stick to wet paper.
For the heat embossing on the background I used the Shattered Stamp Set. This stamp actually comes with it's own stamping block, but I prefer to use a stamping platform just in case I need to restamp the image for any reason.
I placed the paper into my stamping platform and applied repositionable adhesive to the backside of the paper to help hold it in place. This is particularly helpful when working with large background stamps such as the Shattered Stamp Set which is actually larger than my paper and will keep me from being able to really use the magnets to hold the paper in place.
As I mentioned, I'm going to be heat embossing the image, so next I applied embossing ink to the stamp. I used Versamark Watermark Ink, but feel free to use any embossing ink you like.
After I stamped the image, I removed the paper from my stamping platform and placed it over a piece of computer paper folded in half. I then poured Gold Embossing Powder over the paper. I continued to add embossing powder until the entire image was covered with the powder. I then tapped off any excess powder and returned it to the jar.
To make the embossing powder permanent, you must apply heat. So next, I use a pair of tweezers to hold the paper so that I don't accidentally burn my fingers. I then apply heat using a heat embossing tool. As the powder and paper heat up, the powder begins to melt and turn shiny! It's seriously the most magical thing and I absolutely love watching the transformation every single time I heat emboss!
FOREBODING EMBELLISHMENTS
Next up I'm going to create some stamped embellishments for the card using images from the Foreboding Stamp Set. I placed a piece of Distress Watercolor Paper into my stamping platform and stamped the images using Black Soot Archival Ink. I originally played around with using the scroll like images but after thinking about the placement of them on the card, I decided to just stamp the candle and skull. I stamped the image several times to get a nice dark stamped image.
Once the images were stamped, I colored them using Distress Watercolor Pencils. When I work these, I like to pull the pigment from the pencil using a waterbrush. You could also use a wet paintbrush to do the same thing. I applied the pigment that I picked up with the waterbrush onto the paper and colored in the image. Here I'm using Antique Linen to color on the skull. Remember to start off with less color on your brush as you can always add layers of color to build them up and make them darker.
When working with the Distress Watercolor Pencils over stamped images, you will notice that they will layer over the ink and cause it to become less bold. To remedy that, I like to place the image back into my stamping platform and restamp the image. If you're worried about getting things lined back up, you can always leave the paper in the stamping platform and color it in there. After I re-stamped the image, I used a pair of detail scissors to fussy cut the skull image from the paper.
THE OBSCURE BACKGROUND
Next up, I wanted to create a stamped piece to layer behind the skull. I took a piece of Distress Watercolor Paper and adhered it inside my stamping platform using re-positionable adhesive. I then began stamping the images from The Obscure Stamp Set onto the paper using Black Soot Archival Ink. I choose this permanent ink for my stamping because I knew I was going to add some ink smooshing during the next step. As I stamped the script image I decided to hold the stamp with my fingers as I didn't want to stamp the entire image each time, but just parts of here and there to fill in the design.
With the stamping completed I went on to use ink smooshing to add some color to the paper I just stamped. I took an Old Paper Distress Ink pad and smooshed the ink pad onto my craft mat. I then spritzed the ink with some water and then smooshed my paper into the ink. I used my fingers to push sections of the paper into the ink. I repeated this several times until I'm happy with how it looked and then I used my heat tool to dry the paper. Once it was dry, I decided to add a bit more ink by smooshing the paper back into the ink that was still on my craft mat and then dried the paper once more. To add a little more interest, I then added some larger water droplets by slowly pulling the trigger of the Distress Sprayer. I began to dry the paper with my heat tool and then used a paper towel to dab dry and lift off some of the still wet ink. I then finished drying the paper with my heat tool.
The stamped layer was a bit too large to fit on my background paper, so I tore the edge of the paper and used the distress head of the Sizzix Surfacez Multi-Tool Set along the edges of the torn paper to give it a more distressed look. I continued tearing the paper and distressing the edges of it until I was happy with the size. It ended up being about 2 x 5 inches once I was done with it.
Next, I inked the edges of this piece and the skull with Gathered Twigs Distress Ink. Then, once again, I add some larger water droplets by slowly pulling the trigger of the Distress Sprayer. I dabbed the ink dry, lifted off some of the ink with a paper towel and then dried it with my heat tool.
MICA TILES
Some of you may have seen Mica Tiles before, but they are new to me and this was my first time to add them to a project. If you aren't familiar with them, Mica Tiles are compressed layers of naturally mined mica. They are heat resistant, multi-layered, transparent, acid-free, and archival safe. Because it's a natural product each tile has unique variations and markings which makes it perfect for adding a wonderfully organic touch and texture to just about any project. Here I'm using them quite simply as another layer of interest on my card, but there are many ways they can be used to add texture and interest to your project.
FINISHING DETAILS
Earlier I had thought about using the flourishes from the Foreboding stamp set, but instead I choose to add some die cuts. Using the Tim Holtz Adorned Thinlits Die Set I cut black cardstock for an additional layer of texture and interest.
For the sentiment, I stamped the October 31 image from The Obscure Stamp Set with embossing ink onto black cardstock and heat embossed it with gold embossing powder, just like I did earlier for the background paper. I then trimmed this down leaving a small border around the date.
To create the layer behind the purple embossed layer, I cut a piece of Gold Metallic Kraft Stock to 4.25 x 6 inches and distressed the edges using the same distress tool as before. I then inked the edges with Black Soot Distress Ink to darken it up.
I adhered the skull and date piece using double sided foam adhesive to add a little more dimension. I then added some machine stitching around the outside edge before I adhered all of the layers together. And then to finish it off, I layered everything onto a piece of black cardstock cut to 4.5 x 6.25 inches.
I hope you enjoyed learning how this Halloween card came together using some of the new stamp sets from the Tim Holtz Stampers Anonymous 2023 Halloween release. Until next time...stay crafty my friend!
SUPPLIES
Below you can find the supplies I used to create this October 31 Halloween Card. When you shop through the links below, I receive a small commission from Scrapbook.com. These links are at absolutely no cost to you and the commission I receive helps me cover the costs of my blog and other expenses, which allows me to continue to provide you with FREE inspiration and tutorials. If you want to learn more about what an affiliate link is, you can see my full affiliate and product disclosure statement here. Thank you so much for your love and support!
It's time for another Workspace Wednesday and in this post, I wanted to share about some great storage options in the form of zipper pouches and envelopes that are perfect for organizing, storing and protecting your crafting supplies.
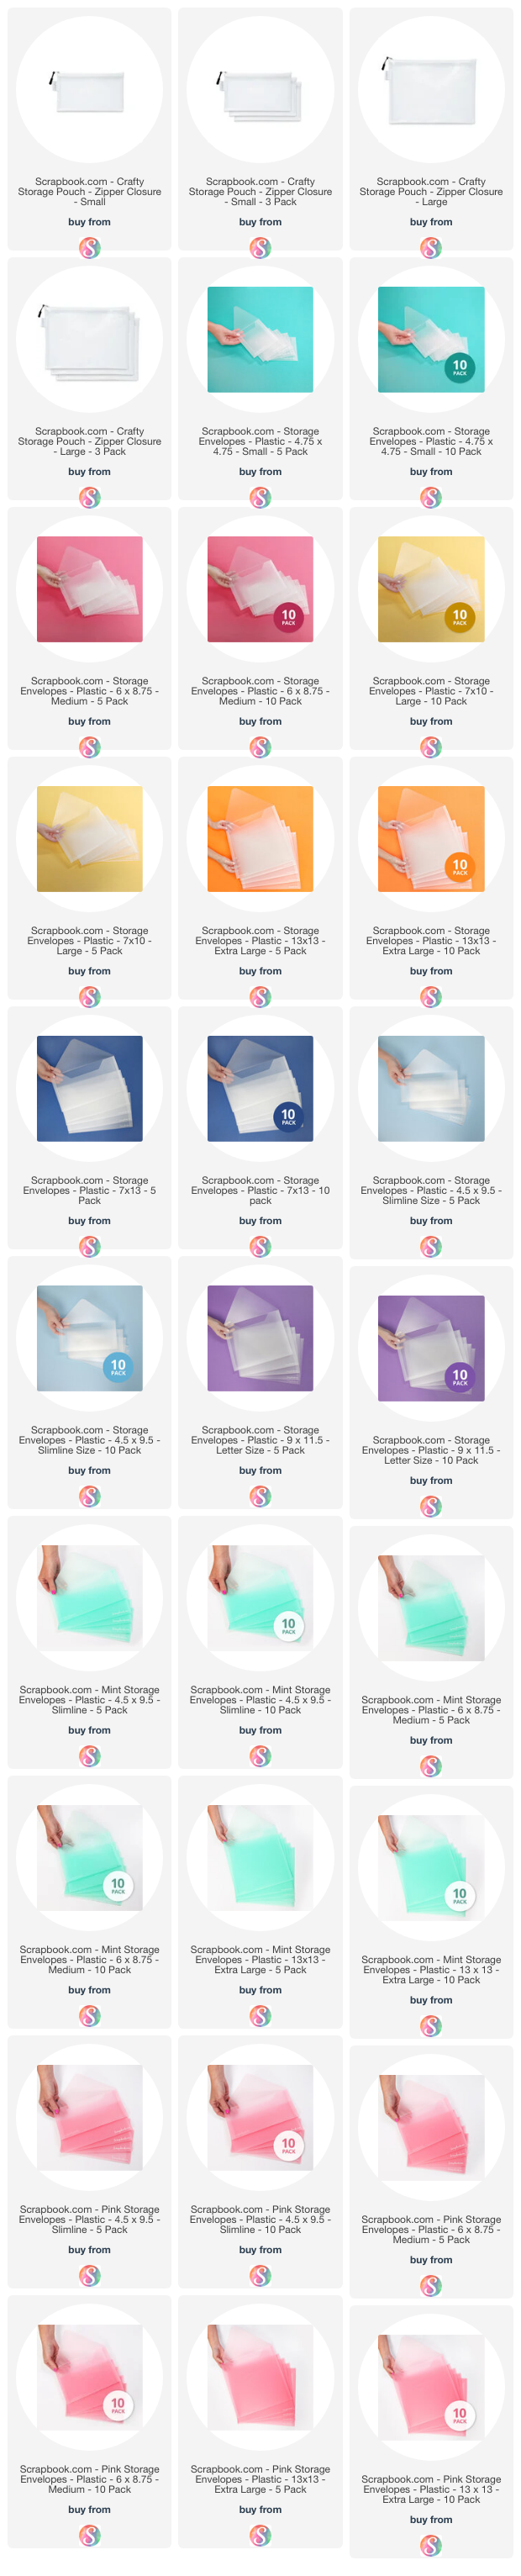
CRAFTY STORAGE ZIPPER POUCHES
First up are the Crafty Storage Zipper Pouches. I recently went to visit my mom and used these to pack some crafting supplies so we could make cards together. They were absolutely perfect for storing everything I needed.
The Zipper Pouches come in two sizes. The Large one is 13 x 9.5 inches and easily held my MISTI Stamping Tool, several Tim Holtz Stamp Sets, some stencils and there was still room to spare. The Small one is 9.5 x 5.5 inches and was perfect for holding some smaller items such as ink pads, a tape runner, scissors and a blending brush.
These Crafty Storage Pouches are a convenient and practical way to organize, store and protect all of your card making and paper crafting supplies in one place. They're made of EVA and mesh which make them flexible and allows you to fit more items in them than Plastic Storage Envelopes. They are sold individually or in packs of 3.
Another great use for these is an easy way to corral your products to make a kit, or just to easy clean up if your in the middle of a project.
STORAGE ENVELOPES
Next up I wanted to share about the Storage Envelopes. There are a couple of differences in the Pouches versus the Envelopes. The Envelopes are made from a sturdy semi-opaque frosted and durable plastic. They come in 7 sizes ranging from 4.75 x 4.75 inches to 13 x 13 inches and everything in between.
**Several of the most popular sizes are also available in a semi-opaque pink and mint color.
Small 4.75 x 4.75 inches
Medium 6 x 8.75 inches **
Large 7 x 10 inches
Extra Large 13 x 13 inches **
7 x 13 inches - I like to call this the extra long one. It's perfect for storing Tim Holtz 6x10 Backdrops Papers!
Letter 9 x 11.5 inches
Slimline 4.5 x 9.5 inches **
Each envelope has a secure notch-like closure to keep contents in place. Since these are a more sturdy storage option, I like to use them to store patterned papers, paper scraps, and paper die cuts because the paper is less likely to get bent when it's in the envelope. I also really like to use them to store metal dies. The frosted clear ones are my favorite and I like how you can see through them to easily what's inside them at a glance. These Storage Envelopes can be purchases in sets of 5 or 10.
I hope you enjoyed learning a bit more about the Crafty Zipper Storage Pouch and Storage Envelope options from Scrapbook.com. With so many choices you are sure to find the perfect storage solution!
SUPPLIES
Below you can find the Crafty Zipper Storage Pouches and Storage Envelopes I mentioned in this post. When you shop through the links below, I receive a small commission from Scrapbook.com. These links are at absolutely no cost to you and the commission I receive helps me cover the costs of my blog and other expenses, which allows me to continue to provide you with FREE inspiration and tutorials. If you want to learn more about what an affiliate link is, you can see my full affiliate and product disclosure statement here. Thank you so much for your love and support!
I don't know if you've noticed, but rub ons are back and in a big way! And the options available are mind blowingly gorgeous! Don't get me wrong, rub ons aren't anything new. They've actually been around for years and back when I first started scrapbooking, they were super popular. Over the years, they seemed to disappear, but recently I am seeing them everywhere! I recently used some gorgeous rub ons from Scrapbook.com to create this Thankful For You Card and wanted to share it with you. But, before I get into the making, I thought I'd explain a bit more about rub ons for those of you who aren't familiar with them.
WHAT IS A RUB ON?
A rub on is kind of like a sticker, dry transfer or decal that you can place anywhere on your craft projects. They are usually printed on the 'wrong side' of a piece of smooth, clear acetate. The print itself is a slightly sticky, so the rub ons will be on a non stick backing sheet. Make sure to keep the rub on sheet on the backing sheet until you're ready to use it so it doesn't accidentally stick down or tear before you're ready to use them.
They can be transferred to any smooth surface such as paper, wood, fabric, glass, mirrors, calendars, etc. and are great for scrapbooking, cardmaking, DIY and more! As long as the surface you're transferring to is smooth and clean with no wax or oil on it, you can use a rub on on it!
HOW TO USE A RUB ON
Select which image you want to use and carefully cut around it and remove it from the backing sheet.
Remove the protective backing and place the image facing up on your paper surface. Make sure you're careful about where you place the rub-on after the backing is removed because they are slightly sticky and the image can start to stick down or you can accidentally tear the image before you're ready to set the image down.
Take the popsicle stick (which will be included with your rub ons) and gently rub over the image to transfer it onto your craft surface.
Slowly begin to lift the acetate up while holding one side down with the opposite hand and check to see that the image has completely transferred before lifting the acetate off of your project. If the image didn't transfer all the way, place the image back down, line it up with the existing image, and rub over it again with the popsicle stick.
Once the image is completely transferred, remove the plastic acetate sheet and enjoy!
Now that you know a bit more about rub ons, let's get on with the making!
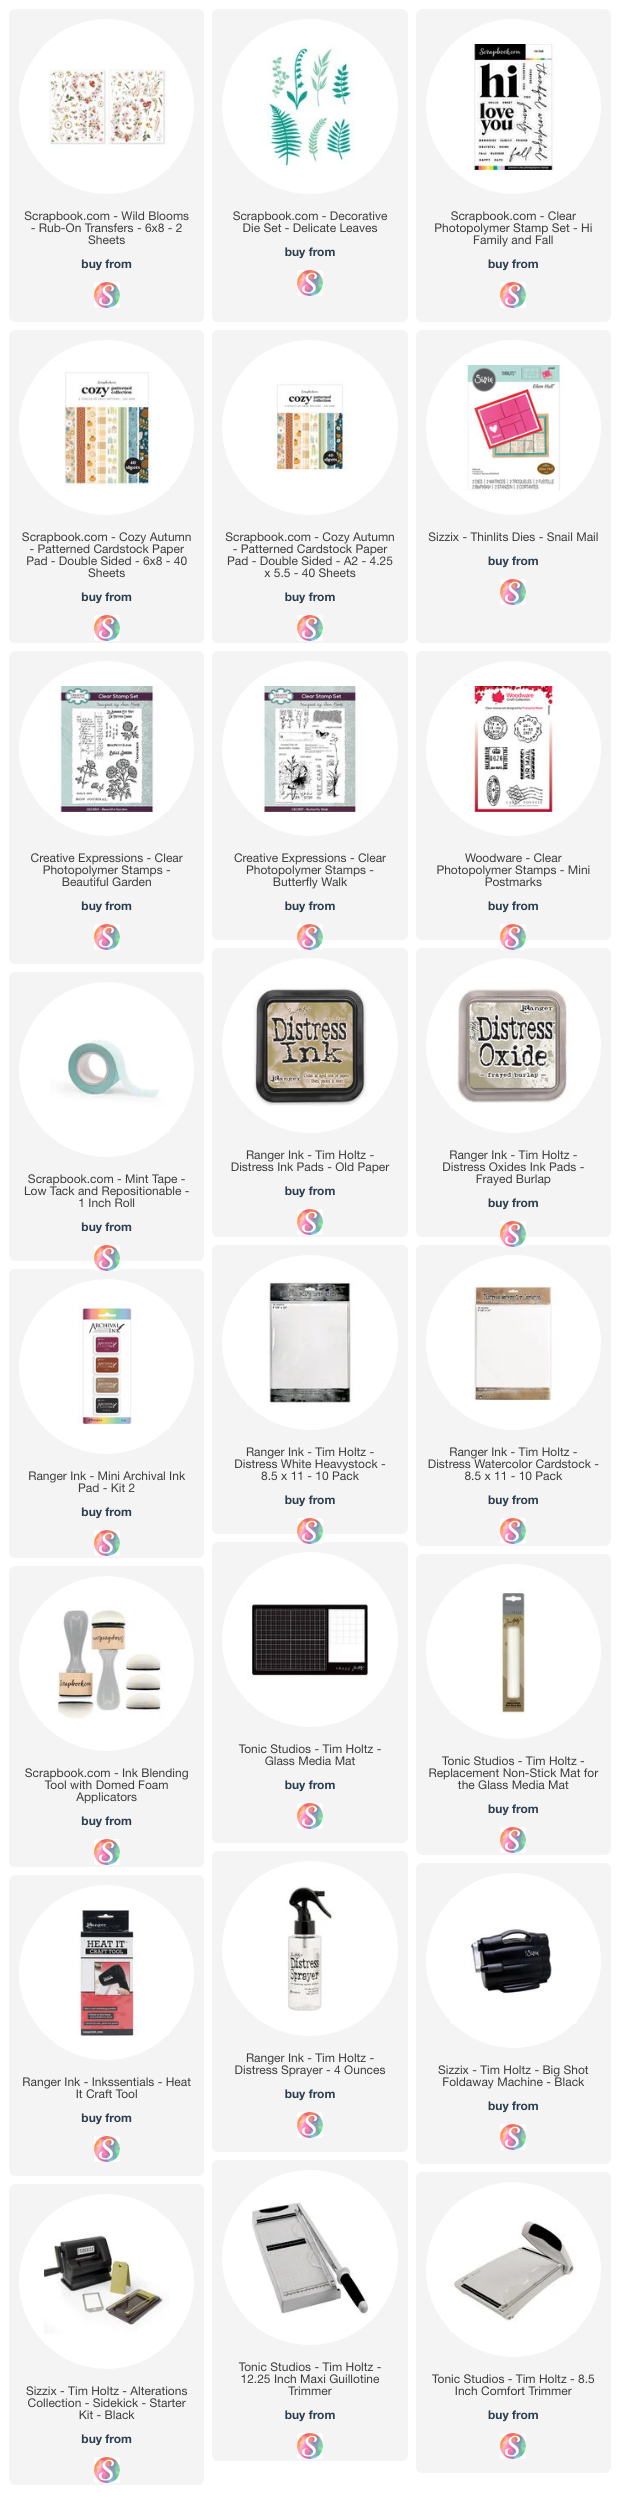
To create this card, I began with a piece of Distress Watercolor Cardstock. I die cut it using the Sizzix Snail Mail Die Set by Eileen Hull. (I'm super into postage stamp things lately!) I then ink smooshed the paper into Old Paper Distress Ink. To do this, I smooshed the ink pad onto my craft mat, spritzed it with water, smooshed the paper into the ink and then dried the paper with my heat tool.
Once the paper was dry, I stamped the paper using the ledger like image from the Creative Expressions Beautiful Garden Stamp Set by Sam Poole. I stamped the image using Frayed Burlap Distress Oxide Ink.
Next, I began applying the Wild Blooms Rub Ons to each of the "postage" areas. I masked off each box using Mint Tape and then applied the rub on. After the rub on was transferred, I used a craft knife to very gently cut along the edge of the Mint Tape and cut off the excess rub on. I then peeled up the Mint Tape and reused it to do the next area. This was a little time intensive, but I do love the effect it created.
After I had adhered the rub ons, I added some more stamping using some word stamps from the Creative Expressions Butterfly Walk Stamp Set by Sam Poole and Creative Expressions Woodware Mini Postmarks Stamp Set by Francoise Read. I stamped these images using Archival Ink in Coffee because I was stamping over the rub ons, I had to use a more permanent ink.
I then took the other die from the Sizzix Snail Mail Die Set by Eileen Hull and cut it from a piece of brown paper from the Scrapbook.com Cozy Paper Pad.
The base of the card is a piece of green patterned paper from the Scrapbook.com Cozy Paper Pad. I also used this same pattern to cut the fern using the Scrapbook.com Delicate Leaves Die Set. I then cut it 2 more times from green cardstock and adhered them all together to give it a little more dimension. I was able to easily adhere the layers together using the precision tip on the Scrapbook.com Artis Glue.
For the sentiment I used the Scrapbook.com Hi Fall Stamp Set. I stamped it using Coffee Archival Ink onto white cardstock, fussy cut around it and lightly inked the edges with Frayed Burlap Distress Oxide Ink. I then adhered it to the card with double sided foam adhesive.
The final touch was the addition of the tiny butterflies! I die cut them from a piece of yellow paper from the Scrapbook.com Cozy Paper Pad. To add some interest, I stamped onto them with Frayed Burlap Distress Oxide Ink using the linen texture image from the Creative Expressions Butterfly Walk Stamp Set by Sam Poole. I then adhered them to the card using double sided foam adhesive.
There you have it! A fun way to use rub ons on your next card project. I hope you enjoyed this bit of inspiration and learning more about rub ons.
SUPPLIES
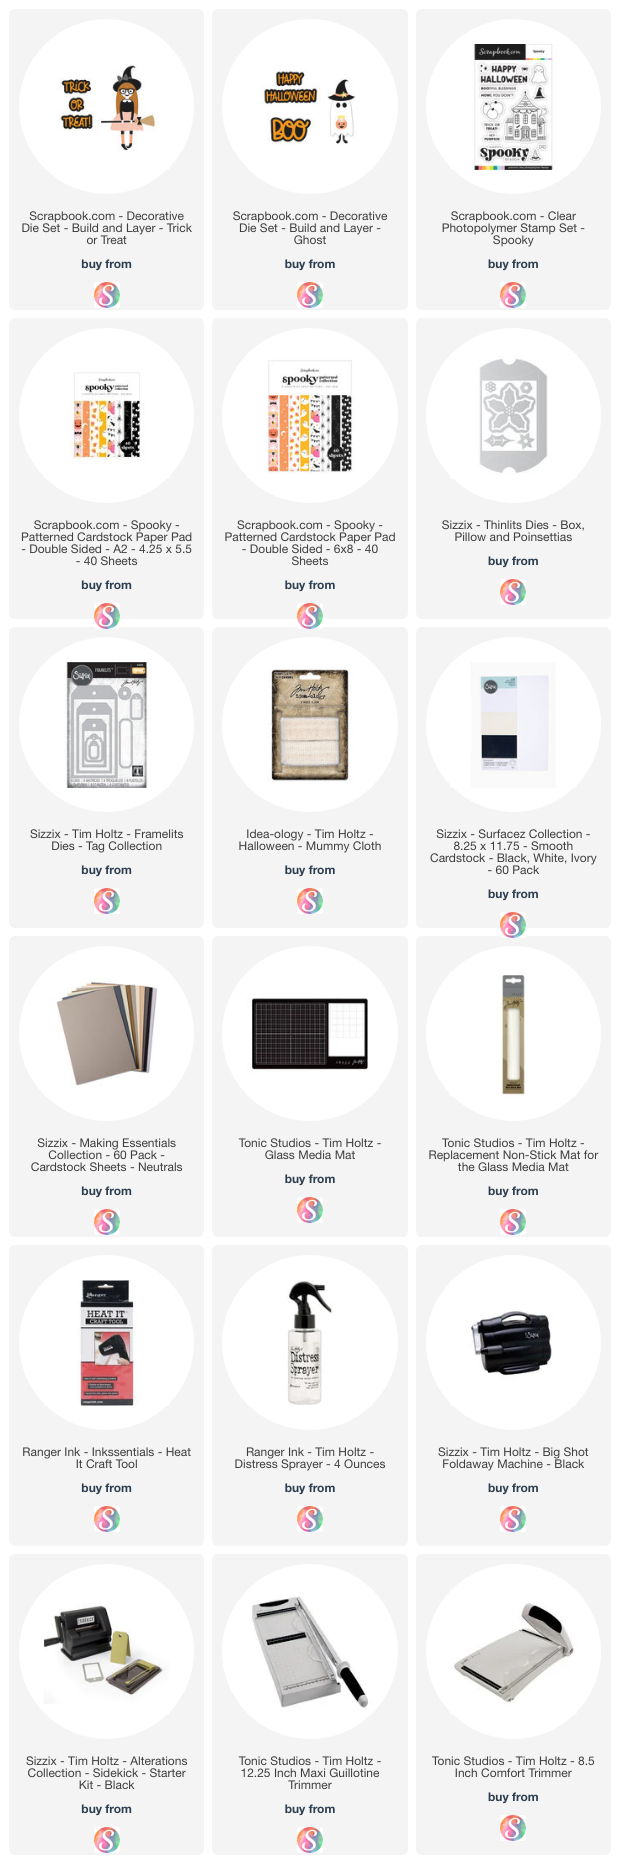
Below you can find the products I've used to create these Halloween Tags. When you shop through the links below, I receive a small commission from Scrapbook.com. These links are at absolutely no cost to you and the commission I receive helps me cover the costs of my blog and other expenses, which allows me to continue to provide you with FREE inspiration and tutorials. If you want to learn more about what an affiliate link is, you can see my full affiliate and product disclosure statement here. Thank you so much for your love and support!
As soon as I saw the new Scrapbook.com Exclusive Halloween themed products, I couldn't help but create some spooky cute Halloween inspiration to share with you including a set of Halloween Treat Boxes and a Halloween Card. You can find all the details below on how I created each one and at the bottom of this post is a complete supply list. Now let's get on with the making!
SPOOKY CUTE HALLOWEEN TREAT BOXES
First up is this set of Halloween Treat Boxes created with a pillow box die and then embellished with a sweet little ghost and adorable little witch.
I began by creating the pillow box. To do this, I used the Sizzix Pillow Box and Poinsettia Die Set (and bonus with this die set, you're all ready for Christmas!) and die cut it using patterned paper from the Scrapbook.com A2 Spooky Paper Pad.
The next layer is a strip of black cardstock trimmed to 1.5 inches wide. I wrapped it around the pillow box, trimmed it to size and secured it in place with Scrapbook.com Clear Double Sided Adhesive.
I also added the ribbon at this point. This is Tim Holtz Mummy Cloth! I love the texture this adds, but you could certainly use any color or type of ribbon you may have on hand.
On top of this, I adhered a pink oval die cut using Scrapbook.com Clear Double Sided Adhesive. I die cut a piece of pink paper from the Scrapbook.com Spooky Paper Pad using the second largest oval die Scrapbook.com Nested Ovals Die Set. Before adhering it to the pillow box with Scrapbook.com Clear Double Sided Adhesive, I inked the edges with Hickory Smoke Distress Ink.
Next, I began die cutting the various pieces to assemble the ghost and witch using the Scrapbook.com Build and Layer Ghost and Trick or Treat Die Sets. I used a combination of textured cardstock and some of the solid and patterned papers from the Spooky Paper Pad. I lightly inked the edges of the die cuts with Hickory Smoke Distress Ink. I was able to easily adhere the various layers using Scrapbook.com Artis Glue with it's fabulous precision tip.
Before I adhered the trick or treaters, I pulled some threads from the Mummy Cloth and adhered them to the center of the oval die cut using Scrapbook.com Clear Double Sided Adhesive. I then used Scrapbook.com Double Sided Foam Adhesive to adhere the trick or treaters.
The final touch was the tiny tag. I die cut this from cardstock using one of the small tag dies from the Tim Holtz Tag Collection Die Set. The sentiment is from the Scrapbook.com Spooky Stamp Set and is stamped using Versafine Pigment Ink in Onyx Black. I then attached the tag to the Mummy Cloth using a jump ring.
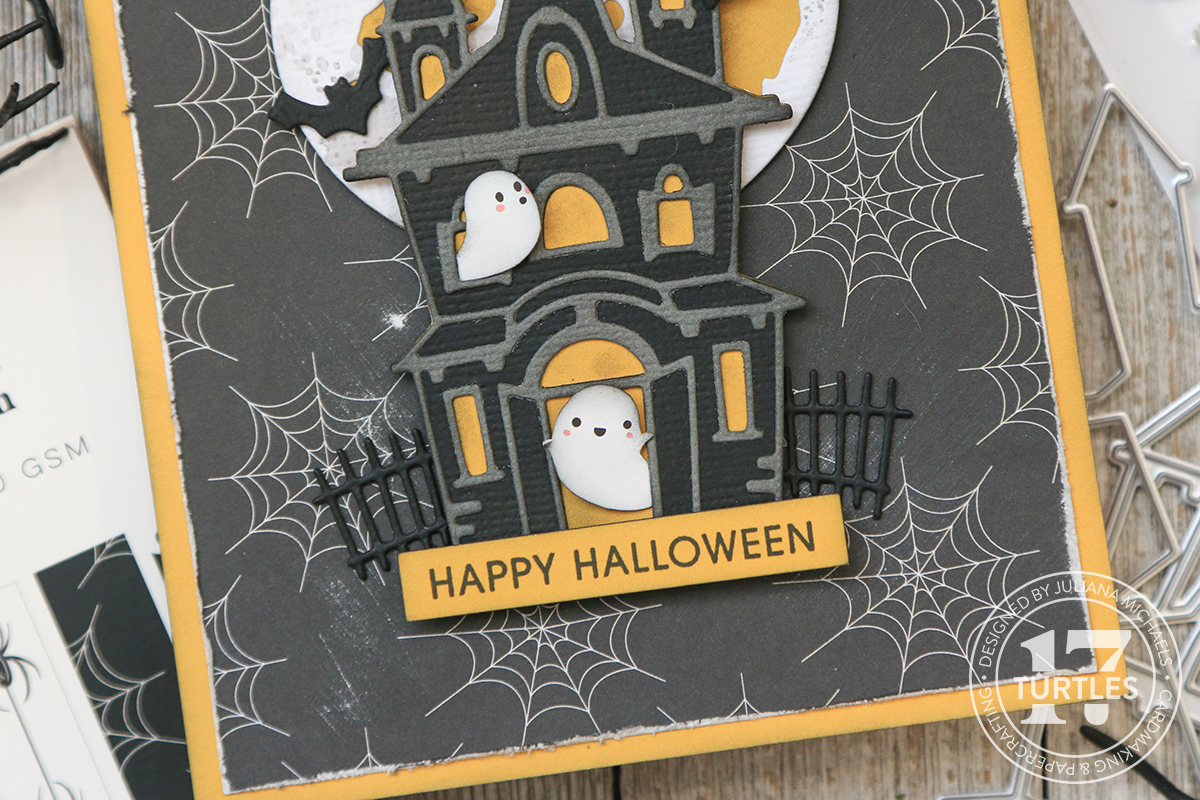
SPOOKY CUTE HAPPY HALLOWEEN CARD
Now, onto this Happy Halloween card I created using the Scrapbook.com Build and Layer Haunted House Die Set and Spooky Paper Pad.
I began with a piece of yellow paper from the A2 Spooky Paper Pad as the base for my card. These papers are 4.25 x 5.5 inches in size, which makes them perfect size for a standard card base. I then inked the edges with Hickory Smoke Distress Ink. Next, I cut the black spider web paper to 4 x 5.25 inches and distressed the edges using the distressor head from the Sizzix Surfacez Multi Tool Set. To do this you simply rub the distressor head along the edge of the paper. I then adhered this layer to the card base using Scrapbook.com Permanent Tape Runner.
To create the moon, I used the smallest moon from the Tim Holtz Moonlight Die Set. I die cut the base layer from the same yellow paper as the base of the card and added applied Hickory Smoke Distress Ink with a small blending brush to distress it just slightly. I then cut the top layer from white textured cardstock. To distress this layer, I smooshed the Hickory Smoke Distress Ink onto my craft mat, spritzed it with a little water, tapped the paper into the ink and dried the paper with my heat tool. Once the paper was dry, I adhered the layers together using Scrapbook.com Artis Glue.
Next, I die cut all the pieces to create the Haunted House using the Scrapbook.com Build and Layer Haunted House Die Set. I die cut the two top layers from textured cardstock and the base layer from the same yellow paper that I used behind the moon and for the base of the card. And once again Scrapbook.com Artis Glue with its precision tip was perfect for adhering the various layers...especially the top detail layer and windows of the Haunted House.
I adhered the moon to the card front with Scrapbook.com Clear Double Sided Adhesive and then adhered the Haunted House with Scrapbook.com Clear Double Sided Foam Adhesive to create a little dimension.
To add a little more interest to the design, I added the bats and gates from the Haunted House Die Set. I cut them from textured black cardstock. For each bat, I cut out 3-4 bats and adhered them together with Scrapbook.com Artis Glue to give them a little dimension. Normally I would use foam tape, but these are so small that the foam tape tends to show, so this is another option if you want to create a little dimension. For the gates, I cut them out twice and adhered them together Scrapbook.com Artis Glue to create some dimension for them as well.
You might be wondering about those little ghosts! Well, those came from a piece of the patterned paper in the Spooky Paper Pad. I simply fussy cut the two ghosts, inked the edges with Hickory Smoke Distress Ink, tucked them into the window and door openings and added a small foam adhesive square behind them to give them some dimension. I love the bit of whimsy they add to the scene!
The final touch was the sentiment. This is a stamp from the Scrapbook.com Trick Or Treat Stamp Set. I stamped it onto a piece of yellow paper from the Spooky Paper Pad using Versafine Pigment Ink in Onyx Black, trimmed it to size, inked the edges with Hickory Smoke Distress Ink, and adhered it to the base of the Haunted House with Scrapbook.com Adhesive Tape Runner.
There you have it! A bit of spooky cute Halloween inspiration with a set of Halloween Treat Boxes and a Halloween Card. I hope you enjoyed learning how these came together and are inspired as you begin your Halloween crafting season!
SUPPLIES
Below you can find the products I've used to create these Spooky Cute Halloween Treat Boxes and Card. When you shop through the links below, I receive a small commission from Scrapbook.com. These links are at absolutely no cost to you and the commission I receive helps me cover the costs of my blog and other expenses, which allows me to continue to provide you with FREE inspiration and tutorials. If you want to learn more about what an affiliate link is, you can see my full affiliate and product disclosure statement here. Thank you so much for your love and support!
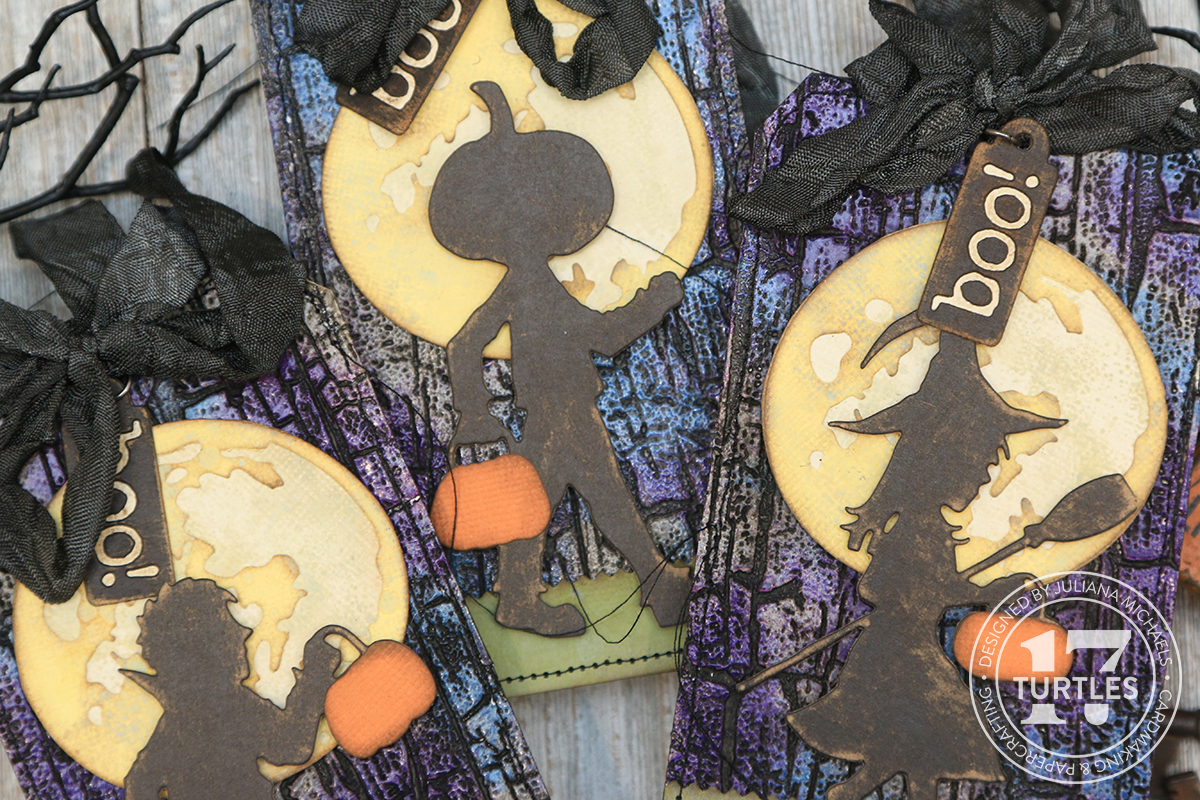
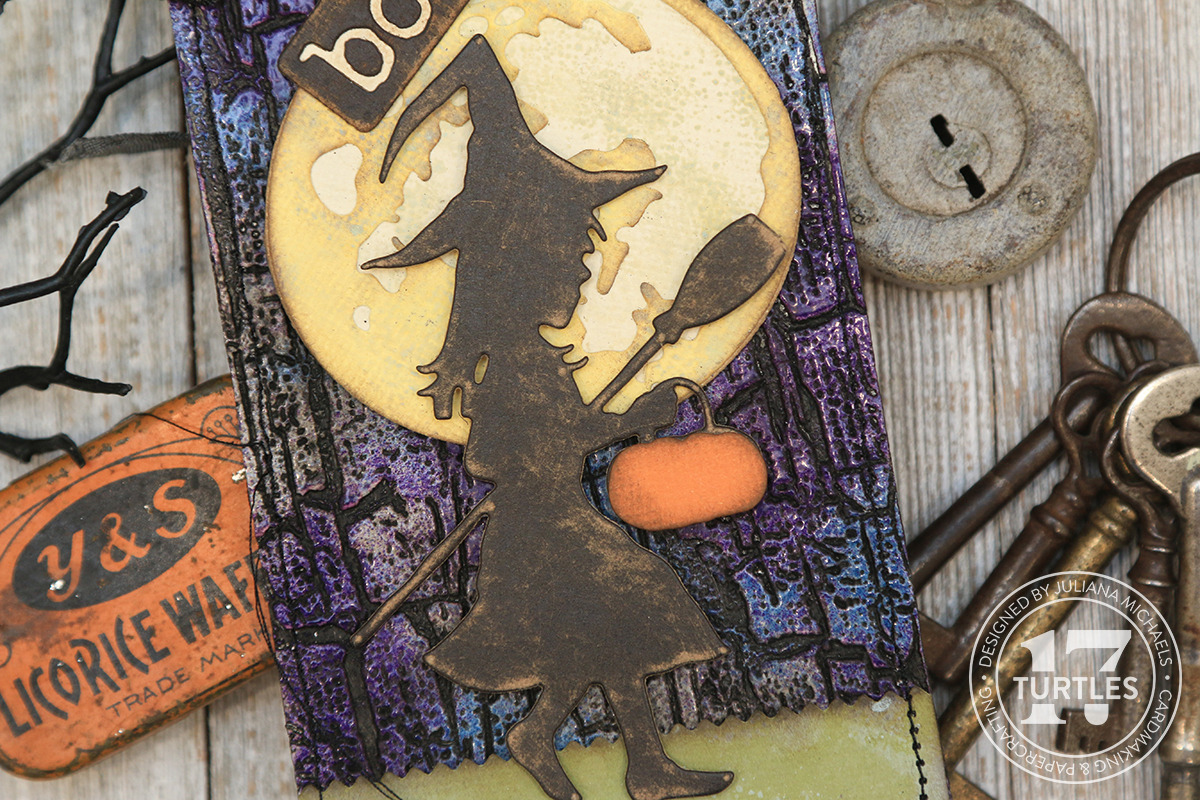
Hello and welcome! In this blog post I'm going to be sharing how I created this trio of Halloween Tags using some of the dies and embossing folders from the Tim Holtz Sizzix Halloween 2023 release. If you are looking for more inspiration featuring this new release make sure to check out the Tim Holtz Sizzix Halloween YouTube Live and Blog Post where you can find links to the projects created by the other Makers.
If you prefer a video format, you can watch below or head over to my YouTube channel to see the process in more detail.
To create this set of tags, I'll be working with the Moonlight Die Set and the Halloween Night Die Set. I'll also be using the Cracked 3D Embossing Folder. I'll also be sharing how to use Distress Embossing Glaze with an embossing folder to create the background for each tag. I'll also take you step by step through how I created the embellishments on each tag. If you're interested in the exact products I used, you can find a complete supply list at the bottom of this blog post with affiliate links to Scrapbook.com. When you shop through these links, it supports me and I really appreciate that so very much!
Now let's get on with the making!
HALLOWEEN TAGS WITH EMBOSSING GLAZE BACKGROUNDS
THE BACKGROUND
For the tag base, I'm used Distress Tags which are a heavystock mixed media paper and can handle different types of mediums. I lightly spritzed the tag with water using a Distress Sprayer, placed it inside the embossing folder and ran it through my die cutting machine. The water makes the paper more pliable and really allows it to take in all the detail from the embossing folder.
I then took the tag and gently rubbed a Versamark Watermark Embossing Ink Pad over the side that has more raised areas, because it will work best for this technique. I placed the tag over a piece of printer paper and applied Distress Embossing in Hickory Smoke, Villainous Potion and Prize Ribbon. I used my fingers to pinch out small amounts of each color and sprinkled it over the surface of the tag. I created little areas of each color and then repeated these sections to help spread the color across the tag. Once the tag was covered with the powder, I tapped off the excess powder and used a heat embossing tool to apply heat and melt the powder until it turned shiny.
You may be wondering where the black came from that you can see on the tag. To do that, I used a Black Soot Distress Crayon. I applied the crayon by coloring it directly onto the tag. I then spritzed a small amount of water onto my craft mat, dipped a stiff bristled brush into the water and then used the brush to blend the color and spread it into the cracks and crevices of the embossed design. I continued applying the crayon until the entire surface was covered with color. I then rubbed over the surface of the tag using a damp paper towel to remove the crayon from the areas where I had applied the Embossing Glaze.
THE CRINKLE RIBBON
To create the black crinkle ribbon I used seam binding. To make this, I cut a length of seam binding, placed it in a plastic bag and sprayed Black Soot Distress Spray Stain into the bag. I then worked the ink into the ribbon, pulled it out, crinkled it up into a ball and dried the ribbon with my heat tool. After I tied the ribbon onto the tag, I used a jump ring to attach the small Boo tag to the ribbon.
THE DIE CUTS
To embellish each tag, I die cut the individual trick or treaters from the Halloween Night die set. I cut them from Distress Black Kraft Stock. This is a kraft paper that has black printed on one side. After I die cut the image, I gently rubbed a sanding disc over the paper but you could also use a fine grit sandpaper. The sanding removes some of the black and reveals the kraft core which creates a distressed look.
Next up I created the moon. For this I used the smaller moon from the Moonlight Die Set. I cut the base layer from a cream colored cardstock and the top layer from a pale yellow cardstock. To give the paper more interest, I smooshed a Distress Oxide Ink Pad in Old Paper onto my craft mat, spritzed the ink with water using my Distress Sprayer and then smooshed the die cuts into the ink. I then dried the paper with a heat tool. You could also set the paper to the side to dry. Once the paper was dry, I used a blending tool to ink the edges of each die cut using Walnut Stain Distress Oxide Ink.
Next, I adhered the layers together using Distress Collage Medium. Because the shape of the moon is a little wonky, it can be difficult to get the layers lined up perfectly. If they aren't, you can use scissors to trim off any excess and then just re-ink the edges.
For the grass below the trick or treaters, I used the large pinked edge die from the Tim Holtz Decorative Trims Die Set to cut a piece of green cardstock. To add interest to this piece, I once again smooshed the Distress Oxide Ink Pad in Old Paper onto my craft mat, spritzed the ink with water using my Distress Sprayer, smooshed the die cut into the ink and then dried it with a heat tool. I finished it off by using a blending tool to ink the edges with Walnut Stain Distress Oxide Ink.
THE BOO TAG
To create the little tag that says Boo, I used the Tim Holtz Alphanumeric Tiny Type Lowercase Die Set for the word boo and the smallest tag from the Tim Holtz Tag Collection die set for the tag. I spelled out the word boo on my craft mat, making sure the cutting side was facing down and placed a piece of Mint Tape over the dies (you could also use a piece of washi tape). I was then able to pick them up, place them onto a piece of Distress Black Kraft Stock and die cut them from the paper. After die cutting the letters, I removed the die cut letters, dies and Mint Tape from the paper which left me with the negative of the letters. I placed the tag die on top of this piece of paper, using Mint Tape to hold it in place and die cut it again. I also cut a second tag from a piece of Mixed Media Heavystock as well. This is the same paper the tag bases are made from and set this to the side.
Once all the die cutting was completed, I adhered the black tag on top of the cream colored tag. I then adhered the inside of the letter die cuts to give the word a more finished look. If you don't want to waste the letters, you could adhere them to a tag and use them that way if you like. I finished off the tag by rubbing over the Black Kraft Stock with a sanding disc just like I did the trick or treater die cut.
MACHINE STITCHING
Before I attached the ribbon, I added machine stitching with black thread around the outer edge of the tag. To adhere the moon and trick or treaters I used double sided foam adhesive to give them a little dimension and I used double sided tape to adhere the grass.
THE ORANGE PUMPKIN
The last touch was the addition of the orange pumpkin. Originally I was going to leave them all black, but I cut one of the pumpkins out of orange cardstock and inked the edges with Walnut Stain Distress Ink just to see how it looked. As soon as I placed it onto the die cut, I knew I had to add them to the other tags!
This is a look at the pumpkin head trick or treater tag.
And there you have it! A trio of Halloween tags that can be used as cards, treat toppers or just as decor as you decorate for the Halloween season!
I hope you enjoyed learning how these Halloween Tags featuring the Tim Holtz Sizzix Halloween 2023 release came together. Thanks so much for stopping by and until next time, stay crafty my friend!
SUPPLIES
Below you can find the products I've used to create these Halloween Tags. When you shop through the links below, I receive a small commission from Scrapbook.com. These links are at absolutely no cost to you and the commission I receive helps me cover the costs of my blog and other expenses, which allows me to continue to provide you with FREE inspiration and tutorials. If you want to learn more about what an affiliate link is, you can see my full affiliate and product disclosure statement here. Thank you so much for your love and support!