Polar Bear Christmas Card | Sunny Studio Stamps

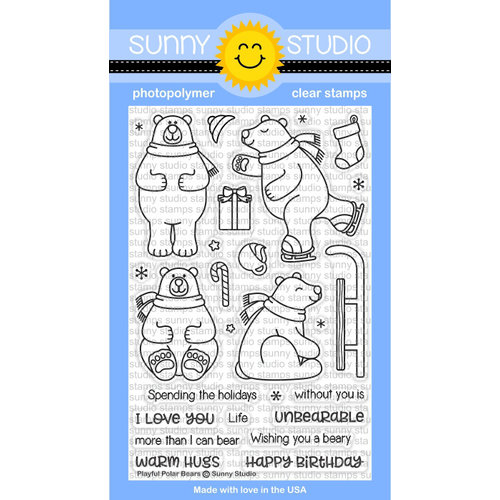
Hello friends and welcome! I'm excited to share with you today that I'm guesting over on the Sunny Studio Stamp Blog with a cute Polar Bear Christmas Shaker Card. I hope you'll stop by and check it out. While I had my Sunny Studio stamps out and was creating, I also made another Polar Bear Christmas card using the new Playful Polar Bears and Frosty Flurries Stamp Set that I wanted to share with you.

Polar Bear Christmas Card | Playful Polar Bears Stamp Set


Polar Bear Christmas Card by Juliana Michaels featuring Playful Polar Bears by Sunny Studio Stamps

I began by stamping the adorable polar bears, the present and the hat and colored them with my Chameleon Pens. I then die cut them using the coordinating Playful Polar Bear Die Set. Because of how the dies are made, the polar bears look like they are holding the presents!

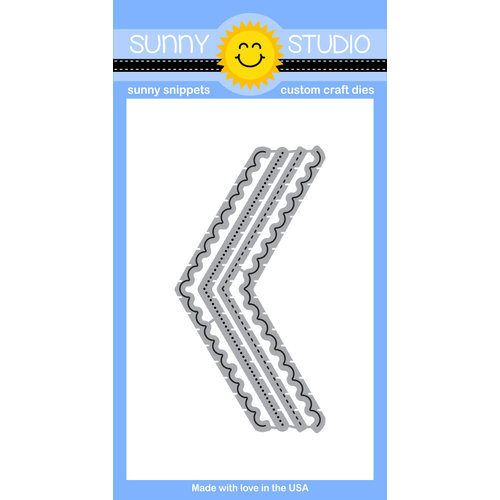
To create the white panel behind the bears, I trimmed a piece of white cardstock to 4 x 5.25 inches. I then used the scallop and the dotted dies from the Fish Tail II Die Set to cut the panel at an angle and give it a bit of a fun edge.

Polar Bear Christmas Card by Juliana Michaels featuring Playful Polar Bears by Sunny Studio Stamps

I then took the Frosted Flurries Stamp and repeatedly stamped it with Versamark Embossing Ink over the entire piece. I then heat embossed it with white embossing powder. This gives the background a subtle bit of texture and interest.

Polar Bear Christmas Card by Juliana Michaels featuring Playful Polar Bears by Sunny Studio Stamps

The final touch for my card was a bit of red and white baker's twine...kind of reminds me of peppermints! Does it for you too?!

Thanks so much for stopping by today and don't forget to head over and check out my Polar Bear Christmas Shaker Card on the Sunny Studio blog.

Supplies


Are you interested in the Sunny Studio Stamps supplies I used to create these cards?  To make them easy for you to find, I have listed them below. Affiliate links to Scrapbook.com are used at no additional cost to you and I've linked to them because I use them and love them!

Christmas Ornaments Card | Embossing with Spellbinders Dies

There are only 60 days until Christmas! Are you ready? I've already begun my Christmas card crafting and today I'm sharing a Christmas Ornaments Card I created using some fabulous supplies from Spellbinders and Scrapbook.com.

Christmas Ornaments Card | Embossing with Spellbinders Dies


Christmas ornaments have always held a special place in my heart. Since I was a born, I've collected a new ornament every year to add to the Christmas tree. And yes, I have quite the collection now! With this in mind, I was immediately drawn to the gorgeous Gilded Ornaments Die by Spellbinders.

Christmas Ornaments Card by Juliana Michaels featuring Spellbinders Gilded Ornaments Die

To create this card, I began by die cutting several circles from white cardstock using the circle die included in this set.

Embossing with Spellbinders Dies

I knew I wanted to do something different with the dies, so I decided to try embossing. Following the instructions on the machine I layered the various plates to emboss with dies. To ensure proper alignment, I placed the dies in the center of the white die cut circles and used temporary adhesive to hold them in place.

Embossing with Spellbinders Dies

I then ran everything through the Platinum 6 and out popped these gorgeous embossed circles.

Embossing with Spellbinders Dies

Next, I added some ink to the ornaments to give them a bit of color and to bring out the embossed details. You could also do this embossing technique with colored cardstock for a bolder design.

The background on this card was created using the Spellbinders Circles and Diamonds Embossing Folder. I also inked the edges of this to again bring out some of the embossed details.

Detail image - Christmas Ornaments Card by Juliana Michaels featuring Spellbinders Gilded Ornaments Die

Before adding the ornaments to the card front, I added the ornament hanger which I die cut from gold foiled cardstock. The final touch was some gold cord for "hanging" them and a fun little bow. 

Detail image - Christmas Ornaments Card by Juliana Michaels featuring Spellbinders Gilded Ornaments Die

Embossing with dies has now become one of my favorite new techniques thanks to the amazing Spellbinders Platinum 6 Embossing and Die Cutting machine.

Spellbinders and Scrapbook.com were kind enough to send me a Platinum 6, Tool N One and a couple of dies to create with and I recently shared a Halloween Witch Card I created using the Witch On A Broom Die. I want to thank Spellbinders and Scrapbook.com for this fun opportunity and for introducing me to my new favorite manual die cutting machine!

Supplies


The supplies I used to create this project can be found at Scrapbook.com. Affiliate links have been used at no additional cost to you.


This post was sponsored by:


Halloween Witch Card | Spellbinders

Halloween is right around the corner and I'll be sending out my Halloween cards this week to make sure they arrive in time to celebrate one of my favorite holidays! Today, I'm thrilled to share a Halloween Witch Card I created using some fabulous supplies from Spellbinders and Scrapbook.com.

Halloween Witch Card | Spellbinders Witch On A Broom Die


I'm a sucker for all things Halloween and this Witch On A Broom Die from Spellbinders is eekingly perfect for creating a Halloween card.

Halloween Witch Card by Juliana Michaels featuring Spellbinders Witch On A Broom Die

I began by die cutting the witch and bats from black cardstock. There are a few small pieces to pop out from this die and the Spellbinders Tool N One was perfect for poking out some of those small pieces. As you can see I cut several of the witch. I glued and layered all of these on top of each other to give this detailed design a little more sturdiness.

Using the Spellbinders Tool N One to clean out a die

To create the background, I used the Spellbinders Symmetry in Space Die and one of my new to me favorite techniques...embossing with a die! I love how easy it is to do this with the various plates included with the Spellbinders Platinum 6 Die Cutting and Embossing Machine.

Embossing with a die using the Spellbinders Platinum 6

After I trimmed the embossed panel to size, I blended several colors of ink to give it the look of a night sky look.

Detail image - Halloween Witch Card by Juliana Michaels featuring Spellbinders Witch On A Broom Die

The witch and bats, of course needed a full moon behind them so I die cut a circle from white cardstock and inked it just around the edges for a touch of color. I then added all of the die cut elements and popped up the witch and bats with some double sided foam adhesive to give them a bit of dimension.

Detail image - Halloween Witch Card by Juliana Michaels featuring Spellbinders Witch On A Broom Die

I hope this Halloween Witch Card created using these fabulous products from Spellbinders inspires you to get your Halloween craft on!

Supplies


The supplies I used to create this project can be found at Scrapbook.com. Affiliate links have been used at no additional cost to you.

Merry & Bright Stamp TV Kit Blog Hop | Gina K Designs

Hello friends and welcome to the Gina K Designs Merry & Bright Stamp TV Kit Blog Hop! Today the design team is sharing cards created using this new kit. So sit back and enjoy the inspiration as you hop along. You can also enter to win a $50 gift certificate to the shop. All the details are listed below.

Holly Jolly Christmas Card | Merry & Bright Stamp TV Kit


For my first card, I began by stamping the pine boughs in Jelly Bean Green and Green Grass and the pine cones in Dark Chocolate onto white cardstock. I then die cut them using the coordinating dies. Next, I die cut the tag from kraft cardstock using the Gina K Designs Nested Tag Dies and stamped the sentiment on it using my MISTI to line it up just right.

Holly Jolly Christmas Card by Juliana MIchaels featuring Gina K Designs Merry & Bright Stamp TV Kit

As I was arranging the pine boughs on the top of the tag, I did a little trimming to create my own custom arrangement. Don't be afraid to do this with stamping, especially if you are going to be layering things on top that you can hide it behind. Here is how they look before I added the pine cones.


Before adding the tag to the card front, I adhered the pine cones using some double sided foam tape and attached a little red bow using Therm O Web Zot. 

Holly Jolly Christmas Card by Juliana MIchaels featuring Gina K Designs Merry & Bright Stamp TV Kit

Merry Christmas Shaker Card | Merry & Bright Stamp TV Kit


My next card is a shaker card. I began by stamping the trees onto white cardstock and heat embossed them with white embossing powder. I then ink blended Distress Oxide Ink in Salty Ocean, Faded Jeans and Peacock Feathers.

Merry Christmas Shaker Card by Juliana MIchaels featuring Gina K Designs Merry & Bright Stamp TV Kit

Using the Christmas die included in this kit, I die cut the word Christmas several times from white cardstock and glued them together. I then die cut it from silver foil cardstock and adhered that to the top and then attached the word to the front of the shaker. The word "merry" was stamped and heat embossed with silver embossing powder.

Merry Christmas Shaker Card by Juliana MIchaels featuring Gina K Designs Merry & Bright Stamp TV Kit

Blog Hop + Giveaway


Would you like to win a $50 gift certificate to Gina K Designs? If your answer is yes, then all you have to do is visit each blog along the hop (listed below) and leave a comment. One lucky winner will receive a $50 Gina K Designs gift certificate!  To see who won, check the Big News Forum at StampTV a few days after the hop.

Juliana Michaels (you are here)

Supplies


Are you interested in the Gina K Designs supplies I used to create these cards? To make them easy for you to find, I have listed them below. Affiliate links are used at no additional cost to you.


Christmas Gift Tags | Sugar Pea Designs

Just a quick post this morning to let you know that I'm up on the SugarPea Designs blog with one of my Guest Designer post's today. For my project, I created a set of Christmas Gift Tags using the recently released Christmas Tag Greetings Stamp Set. I'd love for you to head over and check out all the details on how I created them.


SugarPea Designs Holiday Release | Day 5

Hello friends and welcome to Day 5 of the SugarPea Designs Holiday Release! I sure hope you've enjoyed this week of fun and inspiration as you've hopped along each day. Today we have not one, but two new stamp sets. I'm sharing one of them below, but make sure you head over to the SugarPea Designs Blog to check out the other set and hop along for your chance to win one of the new stamp sets. And don't forget, all of the new products will be available for purchase at 6PM EST tonight in the SugarPea Designs Shop!


Tinsel In A Tangle Christmas Card | Tinsel In A Tangle Stamp Set


Today, I'm sharing a card I created using the new Tinsel In A Tangle Stamp Set. Isn't that penguin just the cutest thing ever?! I stamped and colored him using my Chameleon Pens. I then die cut him using the coordinating Sugar Cut die set.

Tinsel In A Tangle Christmas Card by Juliana Michaels featuring Tinsel In A Tangle Stamp Set by Sugar Pea Designs

I then stamped the sentiment onto a die cut rectangle. However, before I adhered the penguin with double sided foam adhesive, I felt like the background needed some help.

Tinsel In A Tangle Christmas Card by Juliana Michaels featuring Tinsel In A Tangle Stamp Set by Sugar Pea Designs

The solution...I stamped some small snowflakes from the set and heat embossed them with white embossing powder! It doesn't show up well in the above photos, but here you can see the touch of texture it adds and in person it's even better. You can also see in the image that I added some Glossy Accents to the light bulbs for a bit of added interest as well.

Tinsel In A Tangle Christmas Card by Juliana Michaels featuring Tinsel In A Tangle Stamp Set by Sugar Pea Designs

Supplies


This brand new set will be available Friday, October 20 at 6PM EST.


Blog Hop Details & Giveaway


Would you like to win the Christmas Tag Greetings stamp set? Head on over to the SugarPea Designs Blog for all the details. You can also leave a comment below for an extra chance to win this stamp set.

The SugarPea Design Team has created some amazing and creative inspiration for you using the new release. Make sure to stop by each blog to check out what they created and while you’re there leave them a sweet comment and get an extra entry to win today’s giveaway prize.


Thank you so much for stopping by and remember the entire Holiday Product Release will be available for purchase on Friday, October 20th at 6PM EST.

Newton's Nook Designs Holiday Release | Day 4

Welcome to the 4th and final day of the Newton's Nook Designs Holiday Release! Today we have two more stamp sets to share with you and I think we might have saved some of the cutest for last! And as always, we have a stamp set featuring Newton that is just purrfect for the holidays!


Merry Christmouse Christmas Card | Naughty or Mice Stamp Set


I had so much fun creating the Merry Christmouse card using the new Naughty or Mice Stamp Set. I began by stamping and coloring all of the adorable mice with my Chameleon Pens. I then cut them out using the coordinating dies. To create the card front, I used fun window die and filled in each of the sections of one of the mice and popped them up with some double sided foam adhesive.

Merry Christmouse Christmas Card by Juliana Michaels featuring Naughty or Mice Stamp Set by Newton's Nook Designs

The snowflakes in the background are from the new Shaker Globe Die Set. I adhered white cardstock to Therm O Web Easy Cut Adhesive Sheet and then die cut the snowflakes. I then peeled off the liner and sprinkled the adhesive with glitter. I then used iCraft Mixed Media Liquid Adhesive to adhere them to the card front.
Merry Christmouse Christmas Card by Juliana Michaels featuring Naughty or Mice Stamp Set by Newton's Nook Designs

Naughty Or Mice Stamp Set


Santa Paws Christmas Card | Santa Paw Newton Stamp Set


The final stamp set for this release features the always adorable Newton as Santa Paws! I stamped and colored the various images with my Chameleon Pens and die cut them using the coordinating dies. I then layered this onto a tag die cut and adhered it to the card front.

Santa Paws Christmas Card by Juliana Michaels featuring Santa Paws Newton Stamp Set by Newton's Nook Designs

For a final touch of  holiday cheer, I tied on a bow made from red and white baker's twine.

Santa Paws Christmas Card by Juliana Michaels featuring Santa Paws Newton Stamp Set by Newton's Nook Designs

Santa Paws Newton Stamp Set


Blog Hop & Giveaway


Would you like to win the “Naughty or Mice” or the "Santa Paws Newton" Stamp Set? Each of these stamp sets will be given away to one lucky winner! To win all you have to do is comment on the NND blog and each of the Design Team blogs. The winner will be chosen at random from one of the reveal posts. You have until Thursday October 19th at 9pm CST to comment -- winners will be announced on the blog post on Friday, October 20th.

Now it's time to start hopping and check out some fabulous inspiration from the Newton's Nook Design Team:

Juliana Michaels (you are here)

SugarPea Designs Holiday Release | Day 4

Hello friends and welcome to Day 4 of the SugarPea Designs Holiday Release! Today the festive cheer continues with an adorable new set perfect for all the coffee, cocoa and donut lovers out there!

Warm Holiday Wishes Christmas Card | Mugs and Kisses Stamp Set


I'm a coffee lover, so when I saw this set, I was immediately in love with it! I began by stamping and coloring the coffee mug and several donuts with my Chameleon Markers to create a scene of sweet treats for Santa. After all the coloring was complete, I die cut the image using the coordinating dies.

To give the donuts a more Christmasy feel, I colored the sprinkles red, white and green using Sakura Glaze Pens. I then stamped the sentiment onto a banner die cut and adhered it to the card.

Detail image - Warm Holiday Wishes Christmas Card by Juliana Michaels featuring Mugs and Wishes Stamp Set by Sugar Pea Designs

Supplies

This brand new set will be available Friday, October 20 at 6PM EST.


Blog Hop Details & Giveaway

Would you like to win the Mugs and Kisses stamp set? Head on over to the SugarPea Designs Blog for all the details. You can also leave a comment below for an extra chance to win this stamp set.

The SugarPea Design Team has created some amazing and creative inspiration for you using the new release. Make sure to stop by each blog to check out what they created and while you’re there leave them a sweet comment and get an extra entry to win today’s giveaway prize.


Thank you so much for stopping by and remember the entire Holiday Product Release will be available for purchase on Friday, October 20th at 6PM EST.

Newton's Nook Designs Holiday Release | Day 3

It's Day 3 of Newton's Nook Designs Holiday Release and today we have two more new stamp sets to share with you! So, grab a cup of something yummy and keep scrolling to see what I've created to share with you. Then head on to the next in the hop for even more fabulous inspiration. Make sure to check out all the details below on how you can win these new stamp sets.

Reindeer Christmas Card | Reindeer Roll Call Stamp Set


I just love the word art image in this first set called Reindeer Roll Call. It is full of whimsy and perfect as the focal point on a card. I stamped it onto a banner die cut with brown ink and then distressed the edges a bit. I then finished off the banner with some red enamel dots.

Reindeer Christmas Card by Juliana Michaels featuring Reindeer Roll Call Stamp Set by Newton's Nook Designs

To further embellish the card I used the Newton's Nook Designs Pine and Holly Die Set and cut out the various shapes from colored cardstock. I then distressed them with some Distress Ink and layered them on top of and under the banner strip.

The background on the right hand side was created using the new Holiday Foliage Stencil and a mix of Distress Inks.

Reindeer Christmas Card by Juliana Michaels featuring Reindeer Roll Call Stamp Set by Newton's Nook Designs

Reindeer Roll Call Stamp Set


Very Merry Christmas Card | Stylish Stockings Stamp Set


This next card was created using the new Stylish Stockings Stamp Set and I just love the how you can stamp and die cut the different pieces to create a fun layered card design. I stamped three of the stocking images and then die cut them using the coordinating stocking die.

Very Merry Christmas Card by Juliana Michaels featuring Stylish Stockings Stamp Set by Newton's Nook Designs

 I then die cut the tops, heels and toes from glittered foam and adhered them to the stamped images. I love the dimension and shimmer the glittered foam adds AND the no mess glitter as well!

Very Merry Christmas Card by Juliana Michaels featuring Stylish Stockings Stamp Set by Newton's Nook Designs

Stylish Stockings Stamp Set


Stylish Stockings Die Set


Blog Hop & Giveaway


Would you like to win the “Reindeer Roll Call” or the "Stylish Stockings" Stamp Set? Each of these stamp sets will be given away to one lucky winner! To win all you have to do is comment on the NND blog and each of the Design Team blogs. The winner will be chosen at random from one of the reveal posts. You have until Thursday October 19th at 9pm CST to comment -- winners will be announced on the blog post on Friday, October 20th.

Now it's time to start hopping and check out some fabulous inspiration from the Newton's Nook Design Team:

Juliana Michaels (you are here)

SugarPea Designs Holiday Release | Day 3

Welcome to Day 3 of the SugarPea Designs Holiday Product Release! Today there is not one, but two new stamp sets being featured. I'm sharing one of them below, but make sure you head over to the SugarPea Designs Blog to check out the other set and hop along for your chance to win one of the new stamp sets.

Season's Greeting's Wreath Christmas Card | Pine Cone Greetings Stamp Set


The new stamp and die set called Pine Cone Greetings is sure to become a new favorite if you enjoy stamping, die cutting and creating your own little work of art. To create the wreath on my card, I began by cutting a 3.5 inch circle from white cardstock. I used this as the base for assembling my wreath. I then stamped 4 of one of the large branches, 4 of the medium branches and 6 of each of the small branches. I stamped half of these in one color of green ink and the other half in a slightly darker green ink.

Season's Greeting's Christmas Card by Juliana Michaels featuring Pine Cone Greetings by Sugar Pea Designs

Next, I went about die cutting all of the branches using the coordinating die and adhered them around the outside edge of the die cut circle using temporary adhesive until I was certain about their placement. I then stamped and die cut the medium and small pine cones and added them to the wreath. The final touch was the addition of the small red pearls to which look like little red berries!

Detail image - Season's Greeting's Christmas Card by Juliana Michaels featuring Pine Cone Greetings by Sugar Pea Designs

Here you can see some of the layering of the die cut branches and pinecones. The sentiment was stamped onto red cardstock with Versamark Embossing Ink and then heat embossed with white embossing powder.

Angled detail image - Season's Greeting's Christmas Card by Juliana Michaels featuring Pine Cone Greetings by Sugar Pea Designs

Supplies


This brand new set will be available Friday, October 20 at 6PM EST.


Blog Hop Details & Giveaway


Would you like to win the Pine Cone Greetings stamp set? Head on over to the SugarPea Designs Blog for all the details. You can also leave a comment below for an extra chance to win this stamp set.

The SugarPea Design Team has created some amazing and creative inspiration for you using the new release. Make sure to stop by each blog to check out what they created and while you’re there leave them a sweet comment and get an extra entry to win today’s giveaway prize.


Thank you so much for stopping by and remember the entire Holiday Product Release will be available for purchase on Friday, October 20th at 6PM EST.

Newton's Nook Designs Holiday Release | Day 2

Hello and welcome to Day 2 of the Newton's Nook Designs Holiday Release! Today we are featuring a fun new stamp and die set called Snow Globe Scenes, that is perfect for creating the most adorable interactive shaker cards. Keep reading to learn how I created a fun shaker card and then enter for you chance to win this new stamp set.


Merry Christmas Snow Globe Shaker Card | Snow Globe Scene Stamp Set and Snow Globe Shaker Die


The Snow Globe Scene Stamp Set has unlimited options when it comes to creating your own snow globe scene! I had a hard time picking which one to use, but finally settled on the little row of houses and colored them a mix of bright and cheery colors. I then die cut it using the coordinating die.
To fill in the background behind the houses, I die cut several snowflakes from glitter paper using the snowflake dies that come with the Snow Globe Shaker Die Set.

Step 1. Back
To assemble the snow globe shaker, I began with the Snow globe solid die and cut it from a piece of white cardstock. This is the back of the snow globe. I adhered my colored houses and snowflakes to this piece.

Step 2.  Shaker Box
I used the open snow globe die and cut it from a foam sheet. The foam sheet I used has adhesive on both sides and is perfect for making Shaker cards. These foam sheets will be available in the Newton's Nook Designs Store so you can purchase it at the same time as you get this set and you'll be ready to go when it's time to create your shaker cards! I peeled off the liner and placed it on top of the back piece.

Merry Christmas Snow Globe Shaker Card by Juliana Michaels featuring Snow Globe Scenes Stamp Set and Snow Globe Shaker Die by Newton's Nook Designs

Step 3. Acetate Window
Next use the solid snow globe die to cut a piece of acetate. This will be the window of the snow globe. Fill the shaker box with your favorite sequins and then peel of the top liner on the foam. Place the acetate on top and you shaker box will be closed. These acetate sheets will also be available in the Newton's Nook Designs Store.

Step 4. Top
To complete the shaker box, use the open snow globe die cut to cut a coordinating piece of cardstock and use your favorite adhesive to adhere it on top of the acetate.

Step 5. Snow Globe Base
The final step is the base of the snow globe. I die cut the base from a piece of foam and then from a piece of red cardstock. I stamped one of the sentiments onto the cardstock piece and heat embossed it with white embossing powder. I then peeled off the adhesive liner on the foam and adhered it to the foam base. I then added the finished snow globe shaker to my card front.

Detail image - Merry Christmas Snow Globe Shaker Card by Juliana Michaels featuring Snow Globe Scenes Stamp Set and Snow Globe Shaker Die by Newton's Nook Designs

For a final touch of wintery fun, I used the new Snow Fall Stencil to dry emboss a piece of white cardstock. It's not very easy to see in a photo, but I love the texture and interest it adds to the card. To learn how to create Embossed Backgrounds using a stencil and several other great ideas for stencils, check out my Stenciled Background 3 Ways post.

Detail image - Merry Christmas Snow Globe Shaker Card by Juliana Michaels featuring Snow Globe Scenes Stamp Set and Snow Globe Shaker Die by Newton's Nook Designs

Snow Globe Scenes Stamp Set | Snow Globe Scenes Die Set | Snow Globe Shaker Die Set

Snowfall Stencil


Blog Hop & Giveaway


Would you like to win the “Snow Globe Scenes” Stamp Set? This set will be given away to one lucky winner! To win all you have to do is comment on the NND blog and each of the Design Team blogs. The winner will be chosen at random from one of the reveal posts. You have until Thursday October 19th at 9pm CST to comment -- winners will be announced on the blog post on Friday, October 20th.

Now it's time to start hopping and check out some fabulous inspiration from the Newton's Nook Design Team:

Juliana Michaels (you are here)

Thanks for stopping by and remember all of the new Holiday Release products will be available on Friday, October 20th.
Subscribe